How to Use XH M601: Examples, Pinouts, and Specs
Introduction
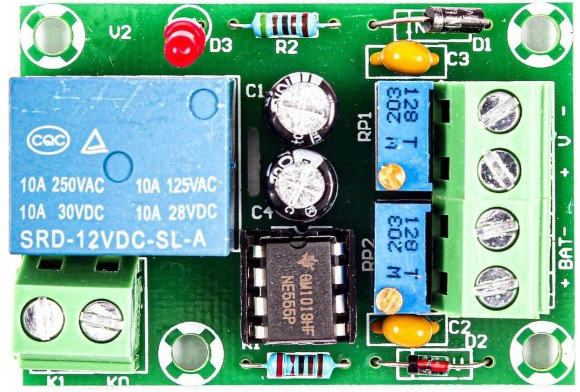
The XH M601, manufactured by Arduino, is a Battery Charging Control Module - 12V designed for efficient and reliable battery charging in electronic circuits. This module is widely used in applications requiring 12V battery management, such as solar power systems, uninterruptible power supplies (UPS), and other energy storage solutions. Its compact design and robust functionality make it a popular choice for both hobbyists and professionals.
Explore Projects Built with XH M601

Explore Projects Built with XH M601
Common Applications and Use Cases
- Solar-powered systems for charging 12V batteries
- Uninterruptible Power Supplies (UPS)
- Battery-powered devices and systems
- DIY electronics projects requiring battery management
- Automotive battery charging and maintenance
Technical Specifications
The XH M601 module is designed to provide safe and efficient charging for 12V batteries. Below are its key technical details:
| Parameter | Specification |
|---|---|
| Input Voltage Range | 15V - 18V DC |
| Output Voltage | 12V DC |
| Maximum Charging Current | 10A |
| Battery Type Supported | Lead-acid, Lithium-ion |
| Charging Mode | Constant Current/Constant Voltage (CC/CV) |
| Dimensions | 60mm x 40mm x 20mm |
| Operating Temperature | -20°C to 60°C |
| Efficiency | ≥ 85% |
Pin Configuration and Descriptions
The XH M601 module features a simple pin layout for easy integration into circuits. Below is the pin configuration:
| Pin Name | Description |
|---|---|
| VIN+ | Positive input voltage terminal (15V - 18V DC) |
| VIN- | Negative input voltage terminal (Ground) |
| BAT+ | Positive terminal for connecting the 12V battery |
| BAT- | Negative terminal for connecting the 12V battery |
| LOAD+ | Positive terminal for connecting the load |
| LOAD- | Negative terminal for connecting the load |
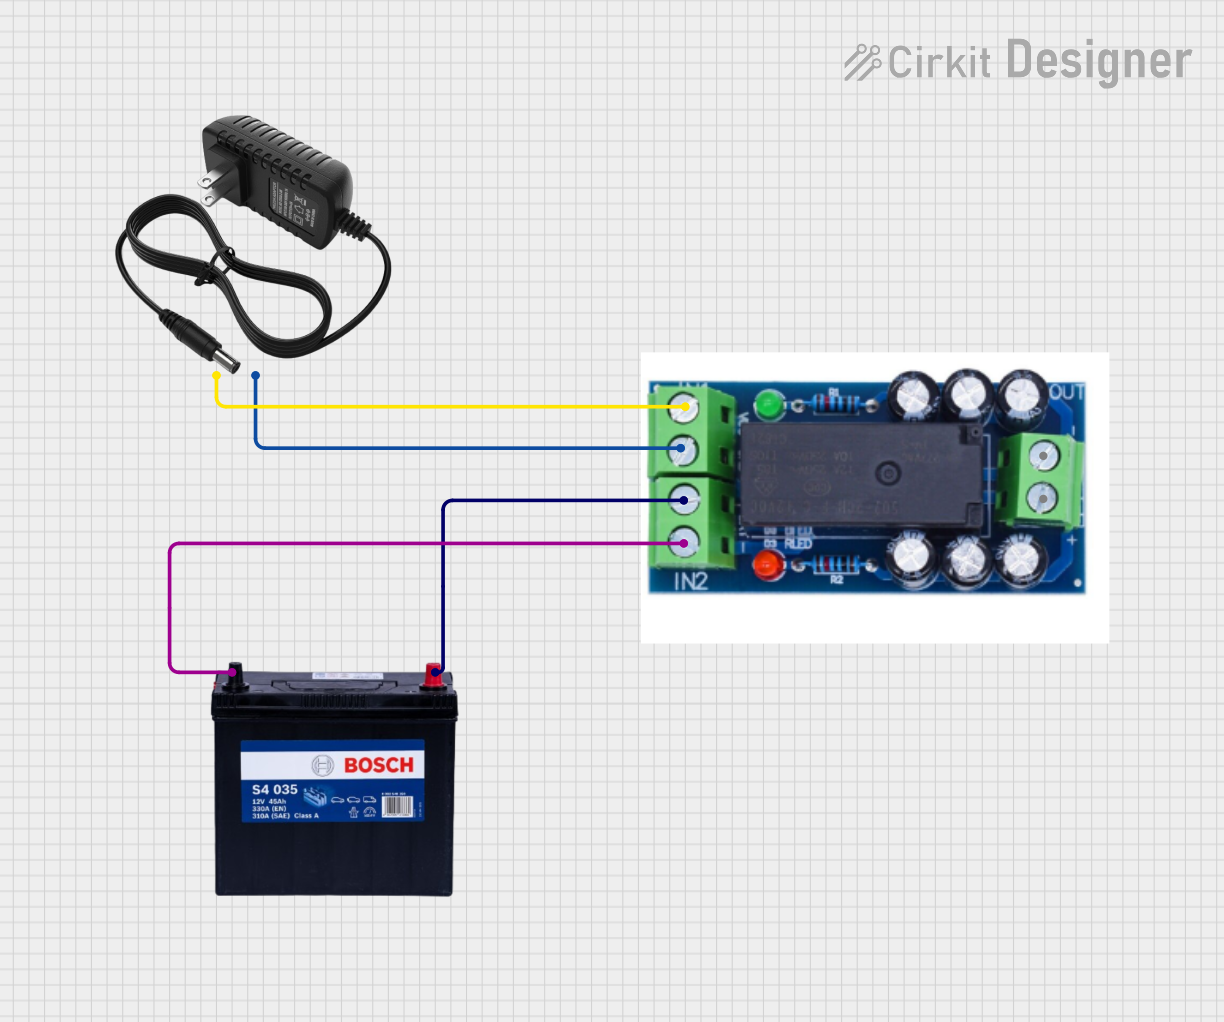
Usage Instructions
How to Use the XH M601 in a Circuit
- Power Supply Connection: Connect a DC power source (15V - 18V) to the
VIN+andVIN-terminals. Ensure the power supply can provide sufficient current for the charging process. - Battery Connection: Connect the 12V battery to the
BAT+andBAT-terminals. Double-check the polarity to avoid damage. - Load Connection: If you wish to power a load while charging the battery, connect the load to the
LOAD+andLOAD-terminals. - Operation: Once all connections are secure, the module will automatically manage the charging process using the CC/CV method. The charging status is typically indicated by onboard LEDs (if available).
Important Considerations and Best Practices
- Input Voltage: Ensure the input voltage is within the specified range (15V - 18V DC). Exceeding this range may damage the module.
- Battery Compatibility: Use only 12V batteries (lead-acid or lithium-ion) as specified. Using incompatible batteries may result in improper charging or damage.
- Heat Dissipation: The module may generate heat during operation. Ensure adequate ventilation or use a heatsink if necessary.
- Polarity Check: Always double-check the polarity of connections to avoid short circuits or damage to the module.
- Load Current: Ensure the load current does not exceed the module's maximum charging current (10A).
Example: Using XH M601 with Arduino UNO
The XH M601 can be used in conjunction with an Arduino UNO to monitor the battery voltage during charging. Below is an example code snippet:
// Example code to monitor battery voltage using Arduino UNO
// Connect the BAT+ terminal to an analog pin (e.g., A0) via a voltage divider

const int batteryPin = A0;  // Analog pin connected to BAT+ via voltage divider
float voltage = 0.0;        // Variable to store the battery voltage

void setup() {
  Serial.begin(9600);       // Initialize serial communication
  pinMode(batteryPin, INPUT); // Set the battery pin as input
}

void loop() {
  int sensorValue = analogRead(batteryPin); // Read the analog value
  voltage = (sensorValue / 1023.0) * 15.0;  // Convert to voltage (adjust for divider)

  // Print the battery voltage to the Serial Monitor
  Serial.print("Battery Voltage: ");
  Serial.print(voltage);
  Serial.println(" V");

  delay(1000); // Wait for 1 second before the next reading
}
Note: Use a voltage divider circuit to scale down the battery voltage to a safe range (0-5V) for the Arduino's analog input pins.
Troubleshooting and FAQs
Common Issues and Solutions
Module Not Charging the Battery
- Cause: Incorrect input voltage or polarity.
- Solution: Verify the input voltage is within the 15V - 18V range and check the polarity of all connections.
Overheating During Operation
- Cause: Insufficient ventilation or excessive load current.
- Solution: Ensure proper ventilation and reduce the load current if necessary. Consider adding a heatsink.
Battery Not Reaching Full Charge
- Cause: Faulty battery or incorrect charging parameters.
- Solution: Test the battery for faults and ensure it is compatible with the module.
LED Indicators Not Working
- Cause: Faulty LEDs or incorrect wiring.
- Solution: Check the LED connections and replace faulty LEDs if needed.
FAQs
Q1: Can I use the XH M601 to charge a 24V battery?
A1: No, the XH M601 is designed specifically for 12V batteries. Using it with a 24V battery may damage the module or the battery.
Q2: Is it safe to connect a load while charging the battery?
A2: Yes, the XH M601 supports simultaneous charging and load operation. Ensure the total current does not exceed the module's maximum rating.
Q3: How do I know when the battery is fully charged?
A3: The module typically includes LED indicators to show the charging status. Refer to the module's datasheet for specific LED behavior.
Q4: Can I use a solar panel as the input power source?
A4: Yes, as long as the solar panel provides a stable voltage within the 15V - 18V range. Use a voltage regulator if necessary.