How to Use openScale_v04: Examples, Pinouts, and Specs
Introduction
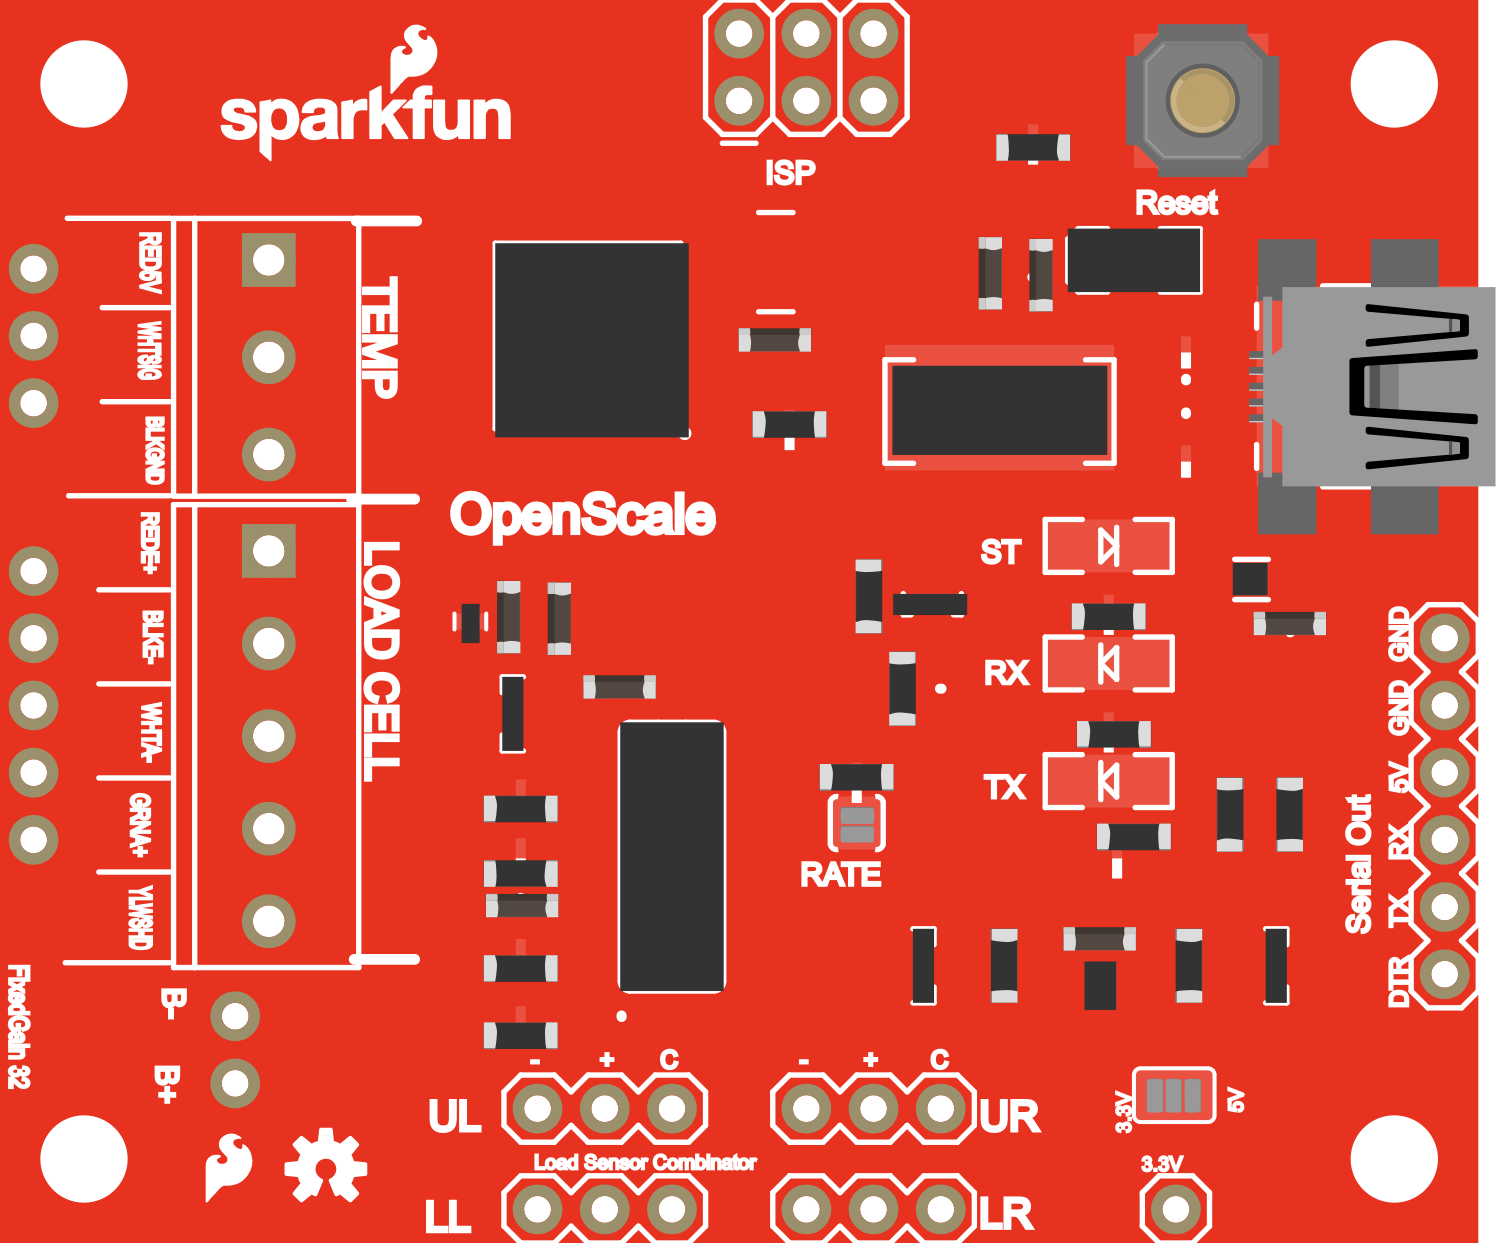
The openScale v04 is a versatile and user-friendly load cell amplifier and data logger module designed to measure weight or force with high precision. It is commonly used in applications such as digital scales, industrial systems, and experimental force measurement setups. The openScale simplifies the process of integrating a load cell into your projects by providing both analog and digital outputs, making it suitable for a wide range of applications from hobbyist projects to professional data logging.
Explore Projects Built with openScale_v04
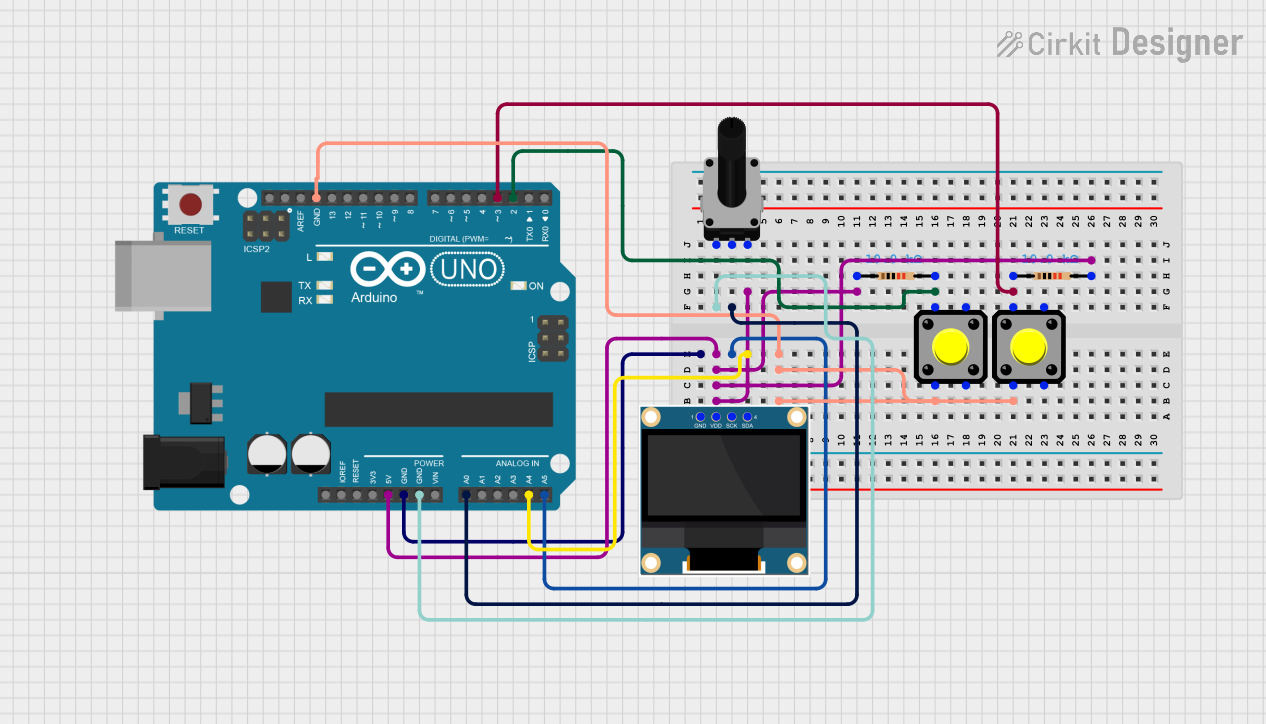

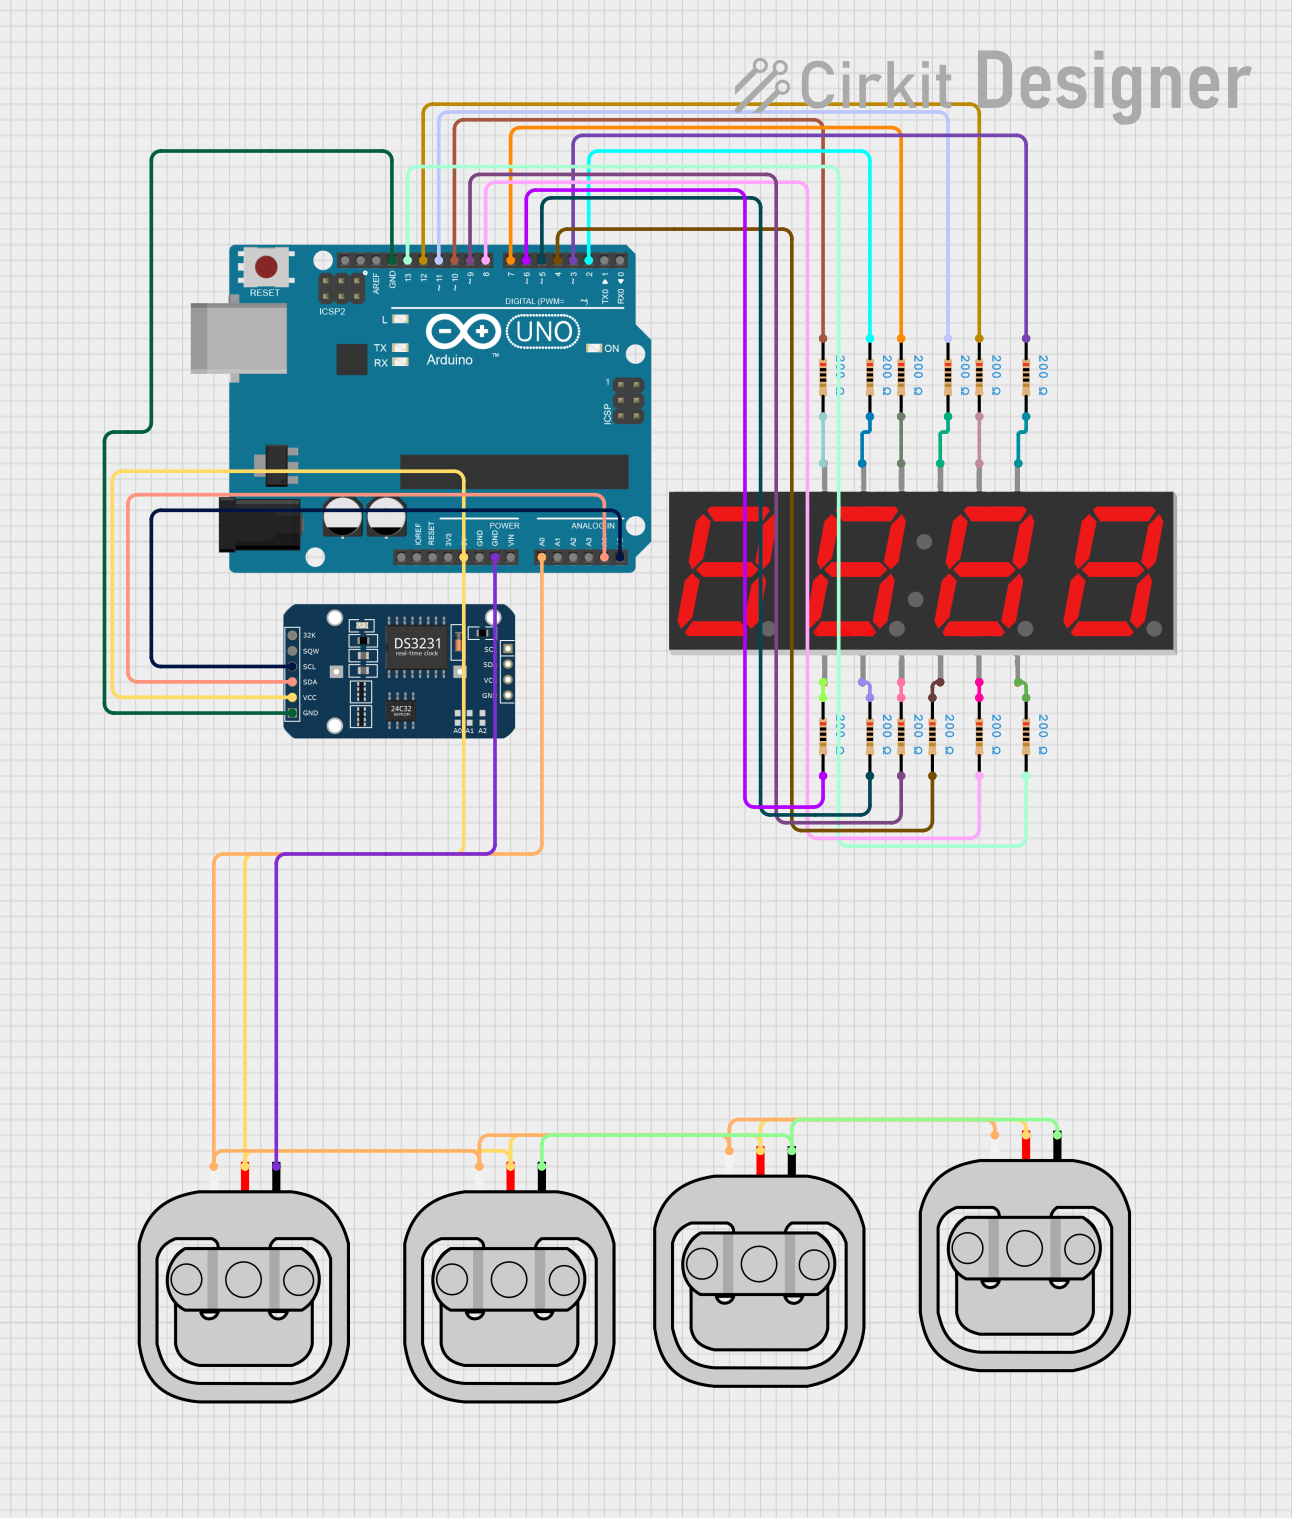
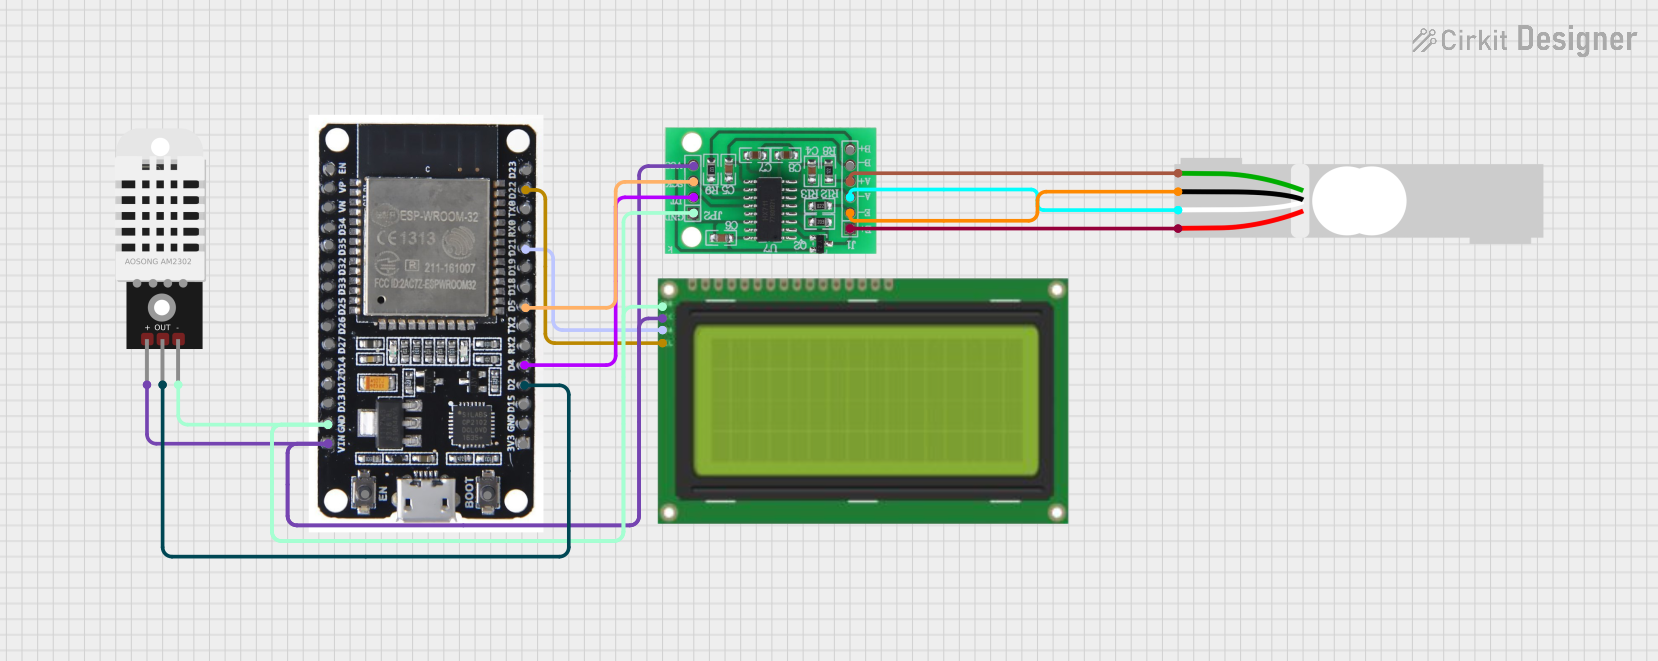
Explore Projects Built with openScale_v04
Technical Specifications
Key Technical Details
- Supply Voltage: 3.3V to 5V DC
- Current Consumption: Typically 10mA (excluding load cell)
- Load Cell Excitation Voltage: 5V
- Analog Output: 0-3V (proportional to load)
- Digital Output: UART (serial) at 9600 bps
- Maximum Load Cell Capacity: Depends on the load cell used (commonly up to 50kg)
- Resolution: 24-bit ADC
- Data Logging Rate: Configurable
- Dimensions: 44.5mm x 20.3mm
Pin Configuration and Descriptions
| Pin Number | Name | Description |
|---|---|---|
| 1 | GND | Ground connection |
| 2 | VCC | Power supply (3.3V to 5V DC) |
| 3 | TX | UART Transmit (to microcontroller RX) |
| 4 | RX | UART Receive (from microcontroller TX) |
| 5 | DAT | Load cell data output |
| 6 | CLK | Load cell clock input |
| 7 | SCL | I2C clock (for future use) |
| 8 | SDA | I2C data (for future use) |
Usage Instructions
Integrating with a Circuit
- Powering the Module: Connect the VCC pin to a 3.3V or 5V power supply and the GND pin to the ground.
- Connecting a Load Cell: Attach the load cell wires to the DAT and CLK pins. Ensure correct polarity and secure connections.
- Serial Communication: Connect the TX pin to the RX pin on your microcontroller (e.g., Arduino UNO) and the RX pin to the TX pin on the microcontroller for UART communication.
- Calibration: Before using the openScale, calibrate it with known weights to ensure accurate readings.
Important Considerations and Best Practices
- Power Supply: Ensure that the power supply is stable and within the specified voltage range to prevent damage to the module.
- Load Cell Selection: Choose a load cell with an appropriate capacity for your application. The openScale can handle various load cell types, but the capacity should match your requirements.
- Shielding: Load cell signals can be susceptible to noise. Use shielded cables and keep signal wires away from high-current carrying conductors.
- Environment: Avoid using the openScale in environments with high humidity or corrosive gases, which can affect the accuracy and longevity of the module.
Example Code for Arduino UNO
#include <HX711.h>

// HX711 circuit wiring
const int LOADCELL_DOUT_PIN = 5;
const int LOADCELL_SCK_PIN = 6;

HX711 scale;

void setup() {
  Serial.begin(9600);
  scale.begin(LOADCELL_DOUT_PIN, LOADCELL_SCK_PIN);
}

void loop() {
  if (scale.is_ready()) {
    long reading = scale.read();
    Serial.print("Weight measurement: ");
    Serial.println(reading);
  } else {
    Serial.println("Load cell not detected.");
  }
  delay(500);
}
Troubleshooting and FAQs
Common Issues
- Inaccurate Readings: Ensure the openScale is calibrated correctly. Check the load cell connections and verify that the load cell is not damaged.
- No Readings: Check the power supply and wiring. Ensure the TX and RX pins are connected to the correct pins on the microcontroller.
- Unstable Readings: Use shielded cables for the load cell and keep the openScale away from electromagnetic interference.
Solutions and Tips
- Calibration: Use a known weight to calibrate the openScale. Follow the calibration procedure outlined in the openScale documentation.
- Wiring: Double-check all connections, especially the load cell wiring, to ensure they are secure and correct.
- Environment: Operate the openScale in a stable environment, away from vibrations and temperature fluctuations.
FAQs
Q: Can I use multiple load cells with one openScale? A: Yes, the openScale can support multiple load cells in certain configurations. Refer to the openScale documentation for details on connecting multiple load cells.
Q: What is the maximum data logging rate? A: The data logging rate is configurable. For high-speed applications, the openScale can log at intervals as short as a few milliseconds.
Q: How do I connect the openScale to a computer for data logging? A: The openScale can be connected to a computer via the UART interface. Use a USB-to-serial adapter if necessary and capture the data with serial communication software.
Remember to always refer to the latest version of the openScale documentation for the most accurate and detailed information.