
How to Use MB102 Breadboard Power Supply Module 3.3V/5V: Examples, Pinouts, and Specs
 Design with MB102 Breadboard Power Supply Module 3.3V/5V in Cirkit Designer
Introduction
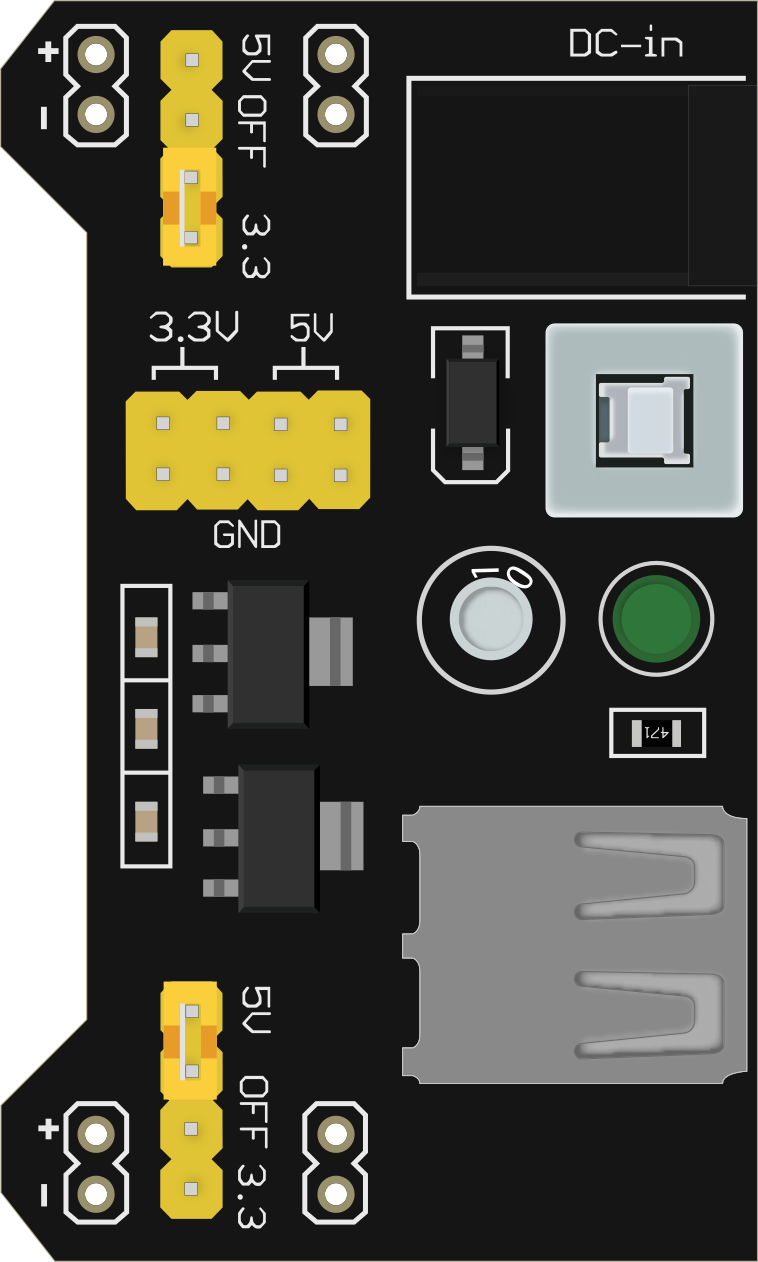
The MB102 Breadboard Power Supply Module by CorpCo is a compact and versatile power supply solution designed specifically for breadboard-based prototyping. It provides selectable output voltages of 3.3V and 5V, making it ideal for powering a wide range of electronic components and microcontroller projects. This module is easy to use, fits snugly onto standard breadboards, and eliminates the need for bulky external power supplies.
Explore Projects Built with MB102 Breadboard Power Supply Module 3.3V/5V
 Open Project in Cirkit Designer
 Open Project in Cirkit Designer
 Open Project in Cirkit Designer
 Open Project in Cirkit Designer
Explore Projects Built with MB102 Breadboard Power Supply Module 3.3V/5V
Open Project in Cirkit DesignerOpen Project in Cirkit DesignerOpen Project in Cirkit DesignerOpen Project in Cirkit DesignerCommon Applications and Use Cases
- Powering microcontrollers such as Arduino, ESP8266, and Raspberry Pi Pico.
- Supplying regulated voltage to sensors, LEDs, and other electronic components.
- Prototyping circuits on breadboards for educational or development purposes.
- Testing low-power devices in a controlled environment.
Technical Specifications
The following table outlines the key technical details of the MB102 Breadboard Power Supply Module:
| Parameter | Specification |
|---|---|
| Input Voltage | 6.5V - 12V DC (via DC barrel jack) |
| USB Input Voltage | 5V DC (via USB Type-A port) |
| Output Voltage Options | 3.3V / 5V (selectable via jumper) |
| Maximum Output Current | 700mA |
| Dimensions | 53mm x 35mm x 20mm |
| Compatibility | Standard 830-point breadboards |
Pin Configuration and Descriptions
The MB102 module has several key pins and connectors. The table below describes their functions:
| Pin/Connector | Description |
|---|---|
| DC Barrel Jack Input | Accepts 6.5V - 12V DC input for powering the module. |
| USB Type-A Input | Provides 5V DC input as an alternative power source. |
| 3.3V Output Pins | Provides regulated 3.3V output for powering components. |
| 5V Output Pins | Provides regulated 5V output for powering components. |
| Power Switch | Turns the module ON or OFF. |
| Voltage Selector Jumper | Allows switching between 3.3V and 5V output on each power rail. |
| Breadboard Pins | Connects directly to the power rails of a standard breadboard. |
Usage Instructions
How to Use the MB102 Power Supply Module in a Circuit
Powering the Module:
- Connect a DC power adapter (6.5V - 12V) to the barrel jack input, or use a USB cable to supply 5V via the USB Type-A port.
- Ensure the power switch is in the "OFF" position before connecting the power source.
Setting the Output Voltage:
- Use the voltage selector jumpers to choose between 3.3V and 5V for each power rail.
- Place the jumper on the appropriate pins labeled "3.3V" or "5V" for the desired output.
Connecting to a Breadboard:
- Insert the module's pins into the power rails of a standard 830-point breadboard.
- Ensure the module is securely seated to avoid loose connections.
Powering Components:
- Connect your components to the breadboard's power rails.
- Flip the power switch to the "ON" position to supply power to the circuit.
Important Considerations and Best Practices
- Input Voltage: Ensure the input voltage does not exceed 12V to avoid damaging the module.
- Current Limitations: Do not exceed the maximum output current of 700mA to prevent overheating.
- Polarity: Double-check the polarity of your connections to avoid short circuits.
- Heat Management: If the module becomes excessively hot, reduce the load or check for short circuits in your circuit.
Example: Using MB102 with Arduino UNO
The MB102 module can be used to power an Arduino UNO via its breadboard connections. Below is an example of how to connect and use the module:
- Set the MB102 output voltage to 5V using the voltage selector jumper.
- Insert the MB102 module into the breadboard and connect the breadboard's power rails to the Arduino's VIN and GND pins.
- Flip the power switch to "ON" to power the Arduino.
Sample Arduino Code
// Example: Blink an LED using Arduino UNO powered by MB102 module
// Ensure the MB102 output is set to 5V and connected to the Arduino VIN and GND pins.

int ledPin = 13; // Pin connected to the onboard LED

void setup() {
  pinMode(ledPin, OUTPUT); // Set the LED pin as an output
}

void loop() {
  digitalWrite(ledPin, HIGH); // Turn the LED on
  delay(1000);               // Wait for 1 second
  digitalWrite(ledPin, LOW);  // Turn the LED off
  delay(1000);               // Wait for 1 second
}
Troubleshooting and FAQs
Common Issues and Solutions
| Issue | Possible Cause | Solution |
|---|---|---|
| Module does not power on | Power source not connected or insufficient | Check the input voltage and connections. |
| Output voltage is incorrect | Incorrect jumper setting | Verify and adjust the voltage selector jumper. |
| Module overheats | Excessive current draw | Reduce the load or check for short circuits. |
| Breadboard connections are loose | Module not seated properly | Ensure the module is firmly inserted. |
FAQs
Can I use the MB102 module with a 9V battery?
- Yes, you can connect a 9V battery to the DC barrel jack input, but ensure the battery can supply sufficient current for your circuit.
What happens if I exceed the maximum current rating?
- Exceeding 700mA may cause the module to overheat or shut down. Always monitor the current draw of your circuit.
Can I use both 3.3V and 5V outputs simultaneously?
- Yes, the MB102 module allows you to configure one power rail for 3.3V and the other for 5V.
By following this documentation, you can effectively use the MB102 Breadboard Power Supply Module for your electronic projects.