How to Use Modulo Bluetooth HC-05: Examples, Pinouts, and Specs
Introduction
The HC-05 is a Bluetooth module designed and manufactured by Arduino to enable wireless communication between devices. It supports both master and slave modes, making it a versatile solution for a wide range of applications. The module is commonly used to connect microcontrollers, such as Arduino boards, to smartphones, computers, or other Bluetooth-enabled devices. Its ease of use and reliable performance make it a popular choice for wireless communication in IoT projects, robotics, and home automation systems.
Explore Projects Built with Modulo Bluetooth HC-05

Explore Projects Built with Modulo Bluetooth HC-05
Common Applications and Use Cases
- Wireless communication between microcontrollers and smartphones
- Remote control of robots or IoT devices
- Data logging and monitoring via Bluetooth
- Home automation systems
- Wireless sensor networks
Technical Specifications
The HC-05 Bluetooth module is a compact and efficient device with the following key specifications:
| Parameter | Value |
|---|---|
| Bluetooth Version | 2.0 + EDR (Enhanced Data Rate) |
| Operating Voltage | 3.3V to 5V |
| Operating Current | 30mA (typical) |
| Communication Range | Up to 10 meters (unobstructed) |
| Baud Rate (Default) | 9600 bps |
| Modes | Master and Slave |
| Frequency Band | 2.4 GHz ISM band |
| Dimensions | 37.5mm x 15.2mm x 2.5mm |
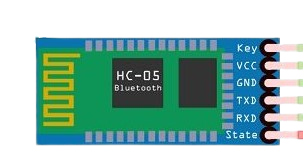
Pin Configuration and Descriptions
The HC-05 module has six pins, as described in the table below:
| Pin Name | Description |
|---|---|
| VCC | Power supply pin (3.3V to 5V). Connect to the 5V pin of the Arduino. |
| GND | Ground pin. Connect to the GND pin of the Arduino. |
| TXD | Transmit data pin. Sends serial data to the connected microcontroller. |
| RXD | Receive data pin. Receives serial data from the connected microcontroller. |
| EN (Key) | Enable pin. Used to switch between command and data modes. |
| STATE | Indicates the connection status (HIGH when connected, LOW when disconnected). |
Usage Instructions
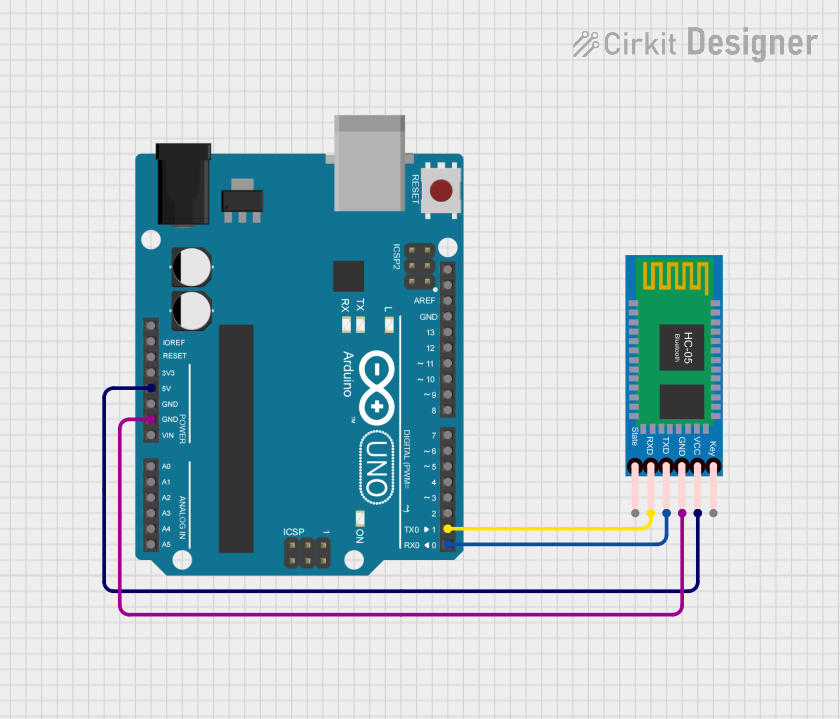
How to Use the HC-05 in a Circuit
Wiring the HC-05 to an Arduino UNO:
- Connect the
VCCpin of the HC-05 to the5Vpin of the Arduino. - Connect the
GNDpin of the HC-05 to theGNDpin of the Arduino. - Connect the
TXDpin of the HC-05 to theRXpin of the Arduino (pin 0). - Connect the
RXDpin of the HC-05 to theTXpin of the Arduino (pin 1). - Optionally, connect the
ENpin to a digital pin on the Arduino for mode switching.
- Connect the
Configuring the HC-05:
- By default, the HC-05 operates in slave mode with a baud rate of 9600 bps.
- To change settings (e.g., baud rate or mode), enter AT command mode by setting the
ENpin HIGH.
Example Circuit Diagram:
Arduino UNO          HC-05
------------------------------
5V                -> VCC
GND               -> GND
RX (Pin 0)        -> TXD
TX (Pin 1)        -> RXD
Example Code for Arduino UNO
The following code demonstrates how to send and receive data using the HC-05 module:
#include <SoftwareSerial.h>
// Create a SoftwareSerial object to communicate with the HC-05
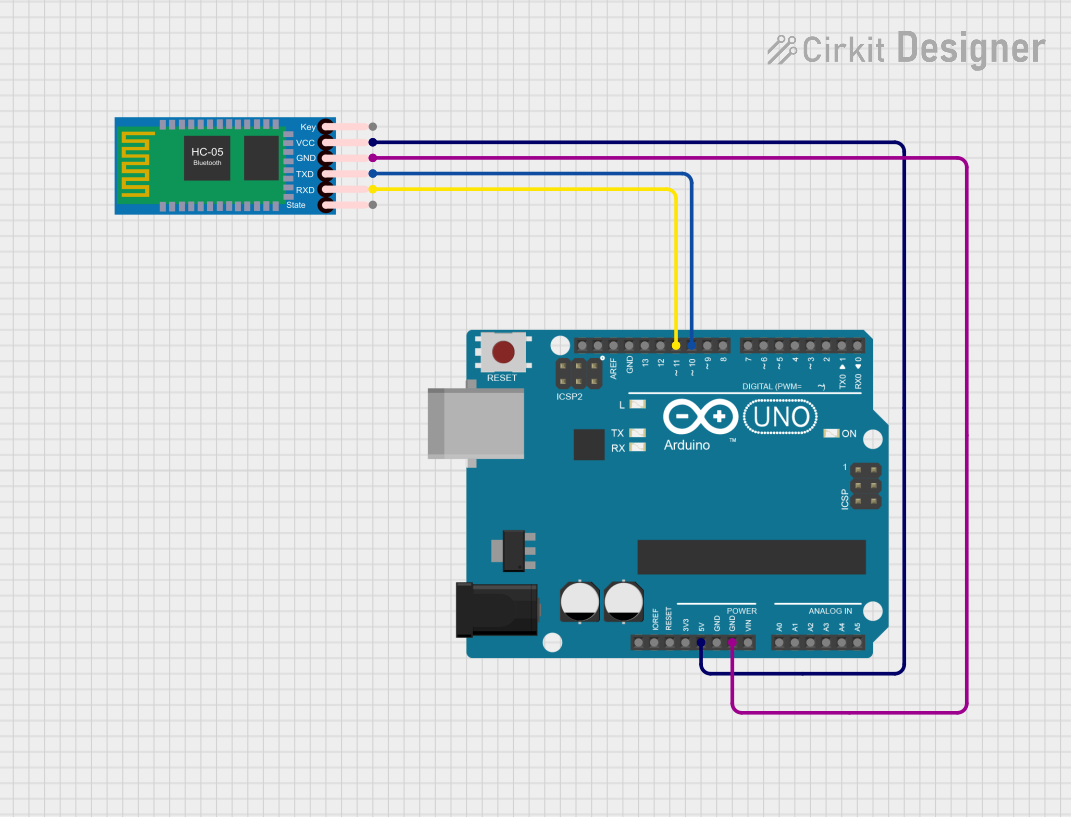
SoftwareSerial Bluetooth(10, 11); // RX = Pin 10, TX = Pin 11
void setup() {
// Initialize serial communication with the computer
Serial.begin(9600);
// Initialize serial communication with the HC-05
Bluetooth.begin(9600);
Serial.println("HC-05 Bluetooth Module Initialized");
Serial.println("You can now send and receive data.");
}
void loop() {
// Check if data is available from the HC-05
if (Bluetooth.available()) {
char received = Bluetooth.read(); // Read the incoming data
Serial.print("Received: ");
Serial.println(received); // Print the received data to the Serial Monitor
}
// Check if data is available from the Serial Monitor
if (Serial.available()) {
char toSend = Serial.read(); // Read the data from the Serial Monitor
Bluetooth.write(toSend); // Send the data to the HC-05
Serial.print("Sent: ");
Serial.println(toSend); // Print the sent data to the Serial Monitor
}
}
Important Considerations and Best Practices
- Use a voltage divider or level shifter on the
RXDpin if the microcontroller operates at 5V logic levels, as the HC-05 operates at 3.3V logic. - Avoid connecting the HC-05's
TXDpin directly to a 5V microcontroller without proper interfacing. - Ensure the module is not in AT command mode when transmitting or receiving data.
- Keep the module within the specified communication range for reliable performance.
Troubleshooting and FAQs
Common Issues and Solutions
Issue: The HC-05 is not responding to AT commands.
- Solution: Ensure the
ENpin is HIGH to enter AT command mode. Also, verify the baud rate is set to 38400 bps in AT mode.
- Solution: Ensure the
Issue: The module is not pairing with a Bluetooth device.
- Solution: Check if the module is in slave mode. Ensure the pairing device is within range and the correct PIN (default:
1234) is used.
- Solution: Check if the module is in slave mode. Ensure the pairing device is within range and the correct PIN (default:
Issue: Data transmission is unreliable or slow.
- Solution: Verify the baud rate matches between the HC-05 and the microcontroller. Ensure there are no obstructions or interference in the communication range.
Issue: The HC-05 is not powering on.
- Solution: Confirm the
VCCpin is connected to a 3.3V or 5V power source. Check all connections for loose wires.
- Solution: Confirm the
FAQs
Q: Can the HC-05 connect to multiple devices simultaneously?
A: No, the HC-05 can only connect to one device at a time.Q: How do I reset the HC-05 to factory settings?
A: Enter AT command mode and send theAT+ORGLcommand to reset the module.Q: What is the default name of the HC-05 module?
A: The default name is usually "HC-05," but it can be changed using AT commands.Q: Can the HC-05 be used for audio transmission?
A: No, the HC-05 is designed for serial data communication and does not support audio transmission.