Cirkit Designer Logo
Cirkit Designer
Your all-in-one circuit design IDE
Home / 
Component Documentation

How to Use Adafruit NeoPXL8 FeatherWing: Examples, Pinouts, and Specs

Image of Adafruit NeoPXL8 FeatherWing
Cirkit Designer LogoDesign with Adafruit NeoPXL8 FeatherWing in Cirkit Designer

Introduction

The Adafruit NeoPXL8 FeatherWing is an innovative add-on board designed for use with the Adafruit Feather ecosystem. This board enables users to control up to eight separate strands of NeoPixel LEDs, providing a powerful solution for creating large-scale LED projects with complex lighting effects and animations. The NeoPXL8 FeatherWing simplifies the process of driving multiple LED strands by handling the signal timing and level shifting, making it compatible with both 3.3V and 5V logic levels.

Explore Projects Built with Adafruit NeoPXL8 FeatherWing

Use Cirkit Designer to design, explore, and prototype these projects online. Some projects support real-time simulation. Click "Open Project" to start designing instantly!
Arduino UNO and OLED FeatherWing Display: Battery-Powered Hello World Project
Image of ARDUINO_SSD1306: A project utilizing Adafruit NeoPXL8 FeatherWing in a practical application
This circuit consists of an Arduino UNO connected to an Adafruit OLED FeatherWing display via I2C communication (SDA and SCL lines). The Arduino is powered through a Vcc source and provides 3.3V and GND connections to the OLED display. The Arduino runs a program to display 'Hello, World!' on the OLED screen.
Cirkit Designer LogoOpen Project in Cirkit Designer
ESP32-Based Vibration Feedback System with Quad Alphanumeric Display and ADXL343 Accelerometer
Image of EC444 - Quest 3: A project utilizing Adafruit NeoPXL8 FeatherWing in a practical application
This circuit features an Adafruit HUZZAH32 ESP32 Feather board as the central microcontroller, which is connected to an Adafruit Quad AlphaNumeric Featherwing display and an Adafruit ADXL343 accelerometer via I2C communication (SCL and SDA lines). The ESP32 controls a vibration motor connected to one of its GPIO pins (A5_IO4) and shares a common power supply (3.3V) and ground (GND) with the other components. The purpose of this circuit is likely to read acceleration data, display information on the alphanumeric display, and provide haptic feedback through the vibration motor.
Cirkit Designer LogoOpen Project in Cirkit Designer
Touch-Sensitive Interface with Adafruit MPR121 and Feather 32u4 Bluefruit
Image of MPR121: A project utilizing Adafruit NeoPXL8 FeatherWing in a practical application
This circuit integrates an Adafruit MPR121 capacitive touch sensor with an Adafruit Feather 32u4 Bluefruit microcontroller. The MPR121 is powered by the Feather and communicates via I2C (SCL and SDA) to detect touch inputs, which can be processed or transmitted wirelessly by the Feather.
Cirkit Designer LogoOpen Project in Cirkit Designer
Solar-Powered Environmental Data Logger with Adafruit Feather M0 Express
Image of Lake Thoreau Monitoring Station: A project utilizing Adafruit NeoPXL8 FeatherWing in a practical application
This circuit is designed for environmental data collection and logging, utilizing an Adafruit Feather M0 Express microcontroller as the central processing unit. It interfaces with a BME280 sensor for atmospheric temperature, humidity, and pressure measurements, an SGP30 sensor for monitoring air quality (eCO2 and TVOC), and a STEMMA soil sensor for detecting soil moisture and temperature. The system is powered by a solar panel and a 3.7v LiPo battery, managed by an Adafruit BQ24074 Solar-DC-USB Lipo Charger, and provides easy access to the microcontroller's connections through an Adafruit Terminal Breakout FeatherWing.
Cirkit Designer LogoOpen Project in Cirkit Designer

Explore Projects Built with Adafruit NeoPXL8 FeatherWing

Use Cirkit Designer to design, explore, and prototype these projects online. Some projects support real-time simulation. Click "Open Project" to start designing instantly!
Image of ARDUINO_SSD1306: A project utilizing Adafruit NeoPXL8 FeatherWing in a practical application
Arduino UNO and OLED FeatherWing Display: Battery-Powered Hello World Project
This circuit consists of an Arduino UNO connected to an Adafruit OLED FeatherWing display via I2C communication (SDA and SCL lines). The Arduino is powered through a Vcc source and provides 3.3V and GND connections to the OLED display. The Arduino runs a program to display 'Hello, World!' on the OLED screen.
Cirkit Designer LogoOpen Project in Cirkit Designer
Image of EC444 - Quest 3: A project utilizing Adafruit NeoPXL8 FeatherWing in a practical application
ESP32-Based Vibration Feedback System with Quad Alphanumeric Display and ADXL343 Accelerometer
This circuit features an Adafruit HUZZAH32 ESP32 Feather board as the central microcontroller, which is connected to an Adafruit Quad AlphaNumeric Featherwing display and an Adafruit ADXL343 accelerometer via I2C communication (SCL and SDA lines). The ESP32 controls a vibration motor connected to one of its GPIO pins (A5_IO4) and shares a common power supply (3.3V) and ground (GND) with the other components. The purpose of this circuit is likely to read acceleration data, display information on the alphanumeric display, and provide haptic feedback through the vibration motor.
Cirkit Designer LogoOpen Project in Cirkit Designer
Image of MPR121: A project utilizing Adafruit NeoPXL8 FeatherWing in a practical application
Touch-Sensitive Interface with Adafruit MPR121 and Feather 32u4 Bluefruit
This circuit integrates an Adafruit MPR121 capacitive touch sensor with an Adafruit Feather 32u4 Bluefruit microcontroller. The MPR121 is powered by the Feather and communicates via I2C (SCL and SDA) to detect touch inputs, which can be processed or transmitted wirelessly by the Feather.
Cirkit Designer LogoOpen Project in Cirkit Designer
Image of Lake Thoreau Monitoring Station: A project utilizing Adafruit NeoPXL8 FeatherWing in a practical application
Solar-Powered Environmental Data Logger with Adafruit Feather M0 Express
This circuit is designed for environmental data collection and logging, utilizing an Adafruit Feather M0 Express microcontroller as the central processing unit. It interfaces with a BME280 sensor for atmospheric temperature, humidity, and pressure measurements, an SGP30 sensor for monitoring air quality (eCO2 and TVOC), and a STEMMA soil sensor for detecting soil moisture and temperature. The system is powered by a solar panel and a 3.7v LiPo battery, managed by an Adafruit BQ24074 Solar-DC-USB Lipo Charger, and provides easy access to the microcontroller's connections through an Adafruit Terminal Breakout FeatherWing.
Cirkit Designer LogoOpen Project in Cirkit Designer

Common Applications and Use Cases

  • Wearable electronics with extensive LED patterns
  • Large-scale LED installations and art displays
  • Interactive light shows and performances
  • Prototyping for LED-based product design
  • Educational projects teaching about LED control and programming

Technical Specifications

Key Technical Details

  • Voltage: 3.3V to 5V logic levels
  • Current: Depends on the number and type of connected NeoPixels
  • Power Ratings: Must be sufficient to drive connected NeoPixels

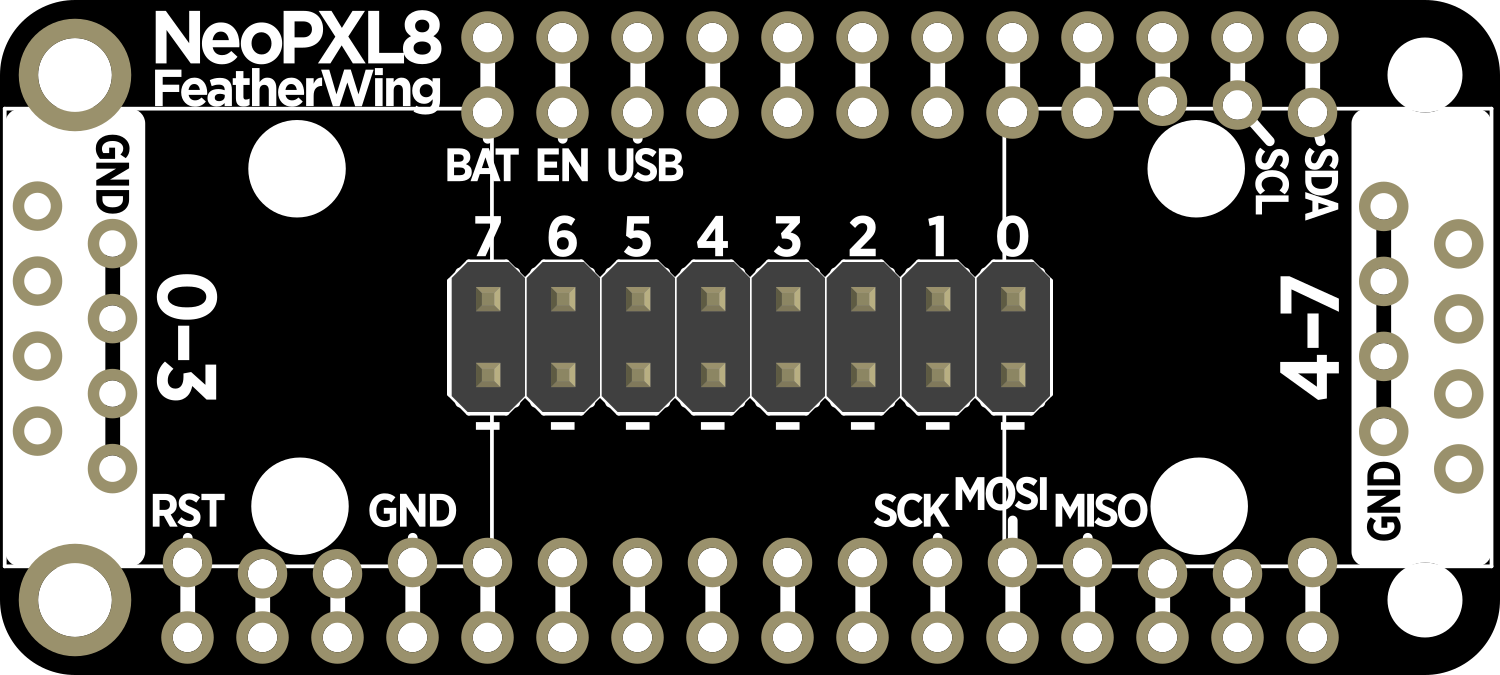
Pin Configuration and Descriptions

Pin Function Description
GND Ground Common ground for power and logic
BAT Battery + Connect to battery positive terminal (if applicable)
USB USB + Power from USB (if applicable)
3V 3.3V Power Regulated 3.3V power output
EN Enable Enable pin for the regulator
RST Reset Reset pin for the Feather
A0-A7 NeoPixel Data Lines Data lines for NeoPixel strands (0-7)

Usage Instructions

How to Use the Component in a Circuit

  1. Powering the Board:

    • Ensure that the power supply is adequate for the number of NeoPixels you plan to control.
    • Connect the power supply to the BAT and GND pins if using a battery, or the USB pin if powered by USB.
  2. Connecting NeoPixels:

    • Connect the data input of your NeoPixel strands to the respective A0-A7 pins on the FeatherWing.
    • Ensure that the ground of the NeoPixels is connected to the GND pin on the FeatherWing.
  3. Interfacing with a Microcontroller:

    • Mount the NeoPXL8 FeatherWing onto a compatible Feather board.
    • Ensure that the microcontroller is programmed to communicate with the NeoPXL8 FeatherWing using the appropriate libraries.

Important Considerations and Best Practices

  • Always use a separate power supply for the NeoPixels if the total current exceeds the Feather's capabilities.
  • Keep the data line connections as short as possible to prevent signal degradation.
  • Use a capacitor (typically 1000 µF, 6.3V or higher) across the power inputs of the NeoPixels to prevent initial onrush of current from damaging the LEDs.
  • Include a 300 to 500 Ohm resistor on the data line to prevent spikes that could damage the first pixel.

Troubleshooting and FAQs

Common Issues Users Might Face

  • LEDs Not Lighting Up:

    • Check power connections and ensure the power supply is adequate.
    • Verify that the data lines are connected to the correct pins.
  • Incorrect Colors or Patterns:

    • Ensure that the code matches the type and number of NeoPixels used.
    • Check for signal integrity issues, such as long data lines or lack of a series resistor.

Solutions and Tips for Troubleshooting

  • Double-check wiring, especially the orientation of the NeoPixels' data input.
  • Use the example code provided with the NeoPXL8 library to test basic functionality.
  • Ensure that the Feather board and NeoPXL8 FeatherWing are firmly connected.

Example Code for Arduino UNO

#include <Adafruit_NeoPixel.h>

// Define the pin connected to the NeoPixels and the number of pixels
#define PIN A0
#define NUMPIXELS 8

// Create an instance of the Adafruit_NeoPixel class
Adafruit_NeoPixel pixels = Adafruit_NeoPixel(NUMPIXELS, PIN, NEO_GRB + NEO_KHZ800);

void setup() {
  pixels.begin(); // Initialize the NeoPixel library.
}

void loop() {
  for(int i = 0; i < NUMPIXELS; i++) {
    pixels.setPixelColor(i, pixels.Color(150, 0, 0)); // Set color to red, green, blue.
    pixels.show(); // Update the pixels.
    delay(500);
    pixels.setPixelColor(i, pixels.Color(0, 0, 0)); // Turn off the pixel.
  }
}

Note: The above code is a simple example to light up each NeoPixel in sequence. Ensure you have installed the Adafruit_NeoPixel library before uploading the code to your Arduino UNO.

FAQs

Q: Can I power the NeoPXL8 FeatherWing directly from the Feather board? A: It depends on the number of NeoPixels and their current draw. For larger installations, an external power supply is recommended.

Q: How many NeoPixels can I control with one NeoPXL8 FeatherWing? A: Theoretically, you can control up to 8 strands of NeoPixels, with each strand having its own data line. The actual number of NeoPixels per strand depends on the power supply and memory limitations of the microcontroller.

Q: Do I need to use all eight data lines? A: No, you can use as many or as few as your project requires. Unused data lines can be left unconnected.