Cirkit Designer Logo
Cirkit Designer
Your all-in-one circuit design IDE
Home / 
Component Documentation

How to Use Adafruit CharliePlex Driver IS31FL3731: Examples, Pinouts, and Specs

Image of Adafruit CharliePlex Driver IS31FL3731
Cirkit Designer LogoDesign with Adafruit CharliePlex Driver IS31FL3731 in Cirkit Designer

Introduction

The Adafruit CharliePlex Driver IS31FL3731 is a versatile LED driver chip that utilizes the Charlieplexing technique to control a multitude of LEDs with a limited number of I/O pins. This component is ideal for creating eye-catching LED displays and matrices without the complexity of using numerous pins or external components. Common applications include wearable electronics, custom lighting effects, and dynamic signage.

Explore Projects Built with Adafruit CharliePlex Driver IS31FL3731

Use Cirkit Designer to design, explore, and prototype these projects online. Some projects support real-time simulation. Click "Open Project" to start designing instantly!
ESP32-Based I2C Communication Hub with Multiplexer and Expander
Image of Lights: A project utilizing Adafruit CharliePlex Driver IS31FL3731 in a practical application
This circuit features an Olimex ESP32-EVB microcontroller unit (MCU) for processing and connectivity, interfaced with an MCP23017 I/O expander and an Adafruit TCA9548A I2C multiplexer to expand the number of I/O lines and allow multiple I2C devices to communicate with the MCU over the same bus. Pull-up resistors are connected to the I2C lines for proper bus operation, and both the MCP23017 and TCA9548A have their reset lines pulled high, likely for normal operation without external reset control.
Cirkit Designer LogoOpen Project in Cirkit Designer
Arduino Mega 2560 Multi-Sensor Data Logger with I2C Multiplexer
Image of Gesamt Schaltplan: A project utilizing Adafruit CharliePlex Driver IS31FL3731 in a practical application
This circuit uses an Arduino Mega 2560 to interface with multiple sensors, including an Adafruit ADXL326 accelerometer, a pressure transducer, and two MLX90614 IR temperature sensors connected via an Adafruit TCA9548A I2C multiplexer. The Arduino reads data from these sensors and outputs the values to the Serial Monitor.
Cirkit Designer LogoOpen Project in Cirkit Designer
ESP32-Based Wi-Fi Controlled Motor System with ADXL345 Accelerometer
Image of Rangkaian Alat Peraga Crank Rocker Wiper: A project utilizing Adafruit CharliePlex Driver IS31FL3731 in a practical application
This circuit features an ESP32 microcontroller interfaced with an ADXL345 accelerometer and a DC motor controlled via an L293 motor driver. It also includes a bi-directional logic level converter for signal compatibility and two rotary encoders for position feedback, all powered by a 12V power supply.
Cirkit Designer LogoOpen Project in Cirkit Designer
ESP32 and MCP23017-Based Smart Relay Control System with DHT22 Sensors
Image of Indoor Lounge: A project utilizing Adafruit CharliePlex Driver IS31FL3731 in a practical application
This circuit is a control system that uses an ESP32 microcontroller to manage multiple relays and read data from DHT22 temperature and humidity sensors. The DFRobot Gravity MCP23017 I2C module expands the GPIO capabilities of the ESP32, allowing it to control additional relays for switching high-power devices.
Cirkit Designer LogoOpen Project in Cirkit Designer

Explore Projects Built with Adafruit CharliePlex Driver IS31FL3731

Use Cirkit Designer to design, explore, and prototype these projects online. Some projects support real-time simulation. Click "Open Project" to start designing instantly!
Image of Lights: A project utilizing Adafruit CharliePlex Driver IS31FL3731 in a practical application
ESP32-Based I2C Communication Hub with Multiplexer and Expander
This circuit features an Olimex ESP32-EVB microcontroller unit (MCU) for processing and connectivity, interfaced with an MCP23017 I/O expander and an Adafruit TCA9548A I2C multiplexer to expand the number of I/O lines and allow multiple I2C devices to communicate with the MCU over the same bus. Pull-up resistors are connected to the I2C lines for proper bus operation, and both the MCP23017 and TCA9548A have their reset lines pulled high, likely for normal operation without external reset control.
Cirkit Designer LogoOpen Project in Cirkit Designer
Image of Gesamt Schaltplan: A project utilizing Adafruit CharliePlex Driver IS31FL3731 in a practical application
Arduino Mega 2560 Multi-Sensor Data Logger with I2C Multiplexer
This circuit uses an Arduino Mega 2560 to interface with multiple sensors, including an Adafruit ADXL326 accelerometer, a pressure transducer, and two MLX90614 IR temperature sensors connected via an Adafruit TCA9548A I2C multiplexer. The Arduino reads data from these sensors and outputs the values to the Serial Monitor.
Cirkit Designer LogoOpen Project in Cirkit Designer
Image of Rangkaian Alat Peraga Crank Rocker Wiper: A project utilizing Adafruit CharliePlex Driver IS31FL3731 in a practical application
ESP32-Based Wi-Fi Controlled Motor System with ADXL345 Accelerometer
This circuit features an ESP32 microcontroller interfaced with an ADXL345 accelerometer and a DC motor controlled via an L293 motor driver. It also includes a bi-directional logic level converter for signal compatibility and two rotary encoders for position feedback, all powered by a 12V power supply.
Cirkit Designer LogoOpen Project in Cirkit Designer
Image of Indoor Lounge: A project utilizing Adafruit CharliePlex Driver IS31FL3731 in a practical application
ESP32 and MCP23017-Based Smart Relay Control System with DHT22 Sensors
This circuit is a control system that uses an ESP32 microcontroller to manage multiple relays and read data from DHT22 temperature and humidity sensors. The DFRobot Gravity MCP23017 I2C module expands the GPIO capabilities of the ESP32, allowing it to control additional relays for switching high-power devices.
Cirkit Designer LogoOpen Project in Cirkit Designer

Technical Specifications

Key Features

  • Integrated 144-segment/16-common LED driver
  • Supports 3.3V to 5V logic levels
  • I2C interface for communication
  • Adjustable LED brightness with PWM control
  • Open/Short LED error detection
  • Thermal shutdown and over-temperature protection

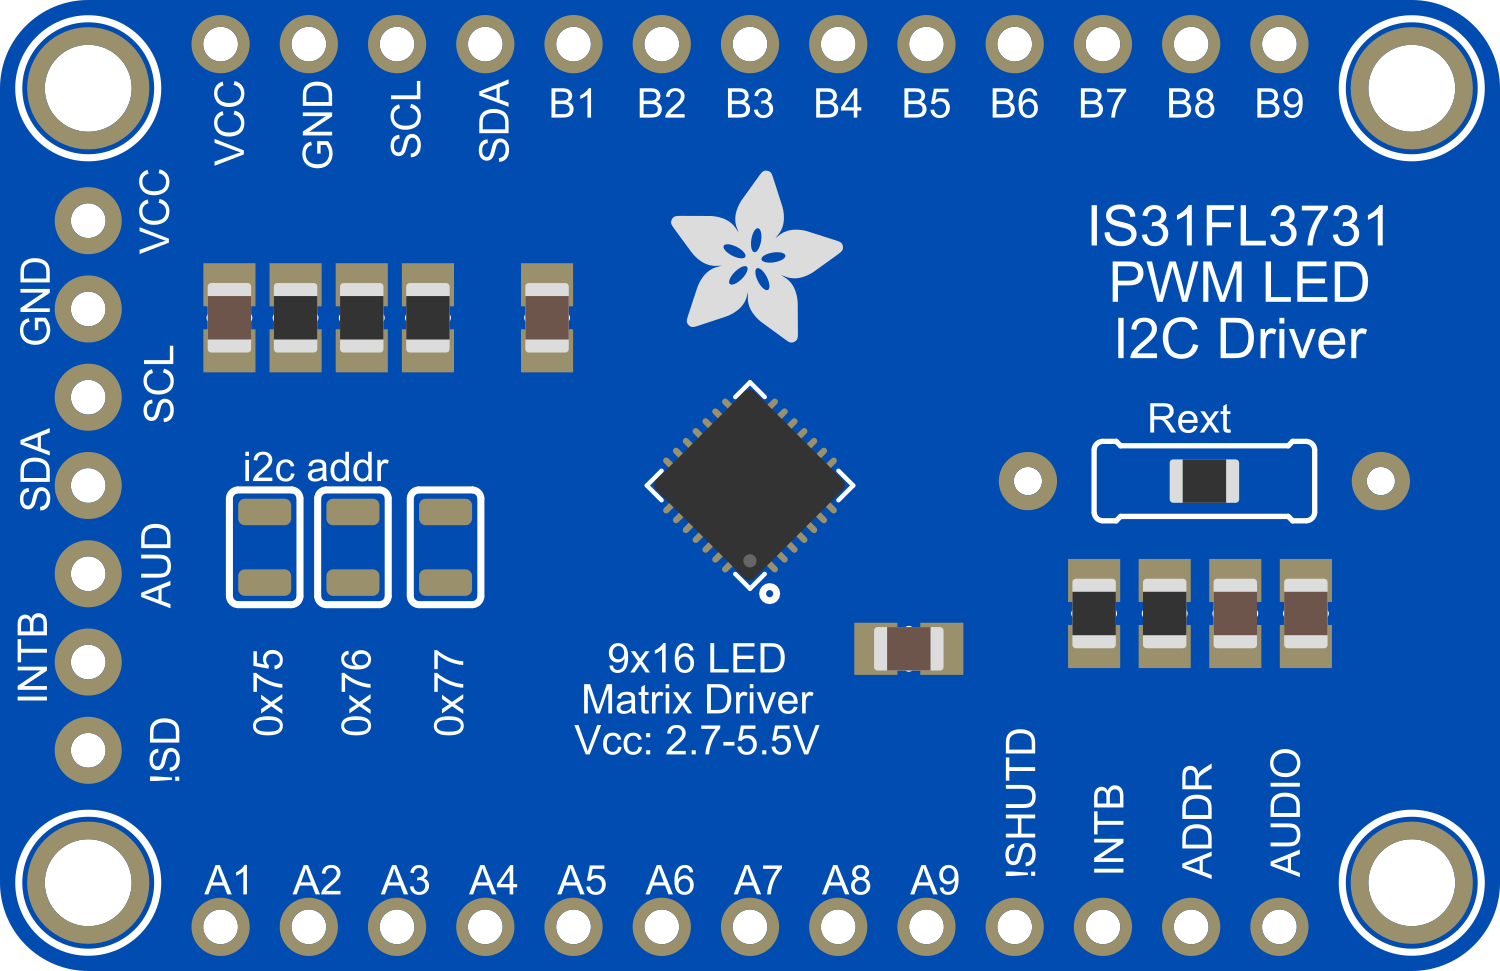
Pin Configuration and Descriptions

Pin Number Name Description
1 GND Ground connection
2 SDA I2C Data Line
3 SCL I2C Clock Line
4 VCC Power supply (3.3V - 5V)
5 INT Interrupt output (active low)
6 ADDR I2C Address selection pin

Usage Instructions

Connecting to a Circuit

  1. Connect the VCC pin to your power supply (3.3V or 5V).
  2. Connect the GND pin to the ground of your power supply.
  3. Connect the SDA and SCL pins to the corresponding I2C data and clock lines on your microcontroller.
  4. Optionally, connect the INT pin to an interrupt-capable pin on your microcontroller if you wish to use the interrupt feature.
  5. Use the ADDR pin to set the I2C address if you are using multiple IS31FL3731 chips in your project.

Best Practices

  • Ensure that the power supply is within the specified voltage range.
  • Use pull-up resistors on the I2C lines if they are not already present on your microcontroller board.
  • Avoid running the chip at its maximum ratings for extended periods to prevent overheating.
  • Check for open or shorted LEDs if you encounter unexpected behavior.

Example Code for Arduino UNO

#include <Wire.h>
#include "Adafruit_IS31FL3731.h"

// Create an instance of the driver
Adafruit_IS31FL3731 ledDriver;

void setup() {
  Wire.begin(); // Initialize I2C
  if (!ledDriver.begin()) {
    Serial.println("IS31FL3731 not found");
    while (1);
  }
  Serial.println("IS31FL3731 found!");
}

void loop() {
  // Light up all the LEDs in a loop
  for (uint8_t i = 0; i < 144; i++) {
    ledDriver.drawPixel(i, 127); // Set brightness to half (0-255)
    delay(50);
    ledDriver.drawPixel(i, 0); // Turn off LED
  }
}

Ensure that the Adafruit_IS31FL3731 library is installed in your Arduino IDE before uploading this code to an Arduino UNO.

Troubleshooting and FAQs

Common Issues

  • LEDs are not lighting up: Check the connections and ensure that the I2C address is correctly set. Also, verify that the power supply is within the acceptable range.
  • Random LEDs are flickering or not working: This could be due to a short or open circuit in the LED matrix. Inspect the matrix for any damaged LEDs or soldering issues.
  • The chip is overheating: Ensure that the current through the LEDs is not exceeding the chip's maximum ratings. Consider adding a heatsink or improving airflow around the chip.

FAQs

Q: Can I control individual LED brightness? A: Yes, the IS31FL3731 allows for individual PWM control over each LED's brightness.

Q: How many of these chips can I chain together? A: You can chain multiple IS31FL3731 chips by setting unique I2C addresses using the ADDR pin.

Q: What is the maximum current the chip can handle? A: The maximum current per LED is 40mA, and the total current for the chip should not exceed the power dissipation limits.

For further assistance, consult the Adafruit IS31FL3731 datasheet and the Adafruit support forums.