How to Use Adafruit BNO055 and BMP280 BFF: Examples, Pinouts, and Specs
Introduction
The Adafruit BNO055 and BMP280 BFF is a compact breakout board that integrates two powerful sensors:
- BNO055: A 9-DOF (Degrees of Freedom) sensor that combines an accelerometer, gyroscope, and magnetometer with an onboard microcontroller for orientation and motion tracking.
- BMP280: A barometric pressure sensor capable of measuring atmospheric pressure and temperature, ideal for altitude calculations and environmental monitoring.
This combination makes the board an excellent choice for applications such as robotics, drones, weather stations, and IoT devices requiring precise motion tracking and environmental data.
Explore Projects Built with Adafruit BNO055 and BMP280 BFF
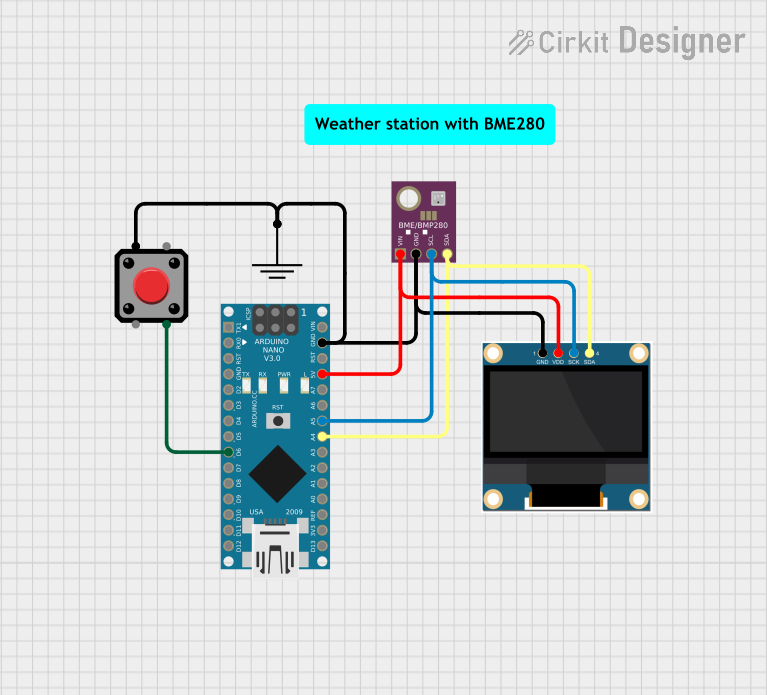
Explore Projects Built with Adafruit BNO055 and BMP280 BFF
Technical Specifications
Key Technical Details
| Parameter | BNO055 | BMP280 |
|---|---|---|
| Sensor Type | 9-DOF IMU (Accelerometer, Gyroscope, Magnetometer) | Barometric Pressure and Temperature |
| Communication Interface | I²C or UART | I²C or SPI |
| Operating Voltage | 3.3V | 1.71V to 3.6V |
| Current Consumption | ~12mA (typical) | ~2.7µA (standby) |
| Pressure Measurement Range | N/A | 300 hPa to 1100 hPa |
| Temperature Measurement Range | N/A | -40°C to +85°C |
| Orientation Accuracy | ±2.5° | N/A |
| Dimensions | 25mm x 25mm | Integrated on the same board |
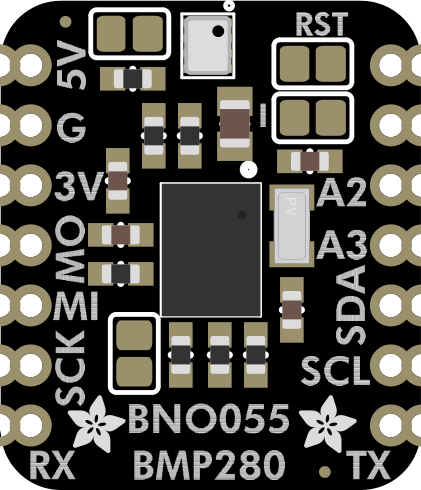
Pin Configuration and Descriptions
| Pin | Name | Description |
|---|---|---|
| 1 | VIN | Power input (3.3V to 5V). Powers both the BNO055 and BMP280 sensors. |
| 2 | GND | Ground connection. |
| 3 | SDA | I²C data line. Used for communication with a microcontroller. |
| 4 | SCL | I²C clock line. Used for communication with a microcontroller. |
| 5 | INT | Interrupt pin for the BNO055. Can be used to signal specific events. |
| 6 | RST | Reset pin for the BNO055. Pull low to reset the sensor. |
| 7 | CS | Chip Select for SPI communication (used with BMP280). Leave unconnected for I²C. |
| 8 | SDO | SPI Data Out (used with BMP280). Leave unconnected for I²C. |
Usage Instructions
How to Use the Component in a Circuit
- Powering the Board: Connect the VIN pin to a 3.3V or 5V power source and GND to ground.
- Communication:
- For I²C: Connect the SDA and SCL pins to the corresponding I²C pins on your microcontroller.
- For SPI (BMP280 only): Connect CS, SDO, and SCL to the appropriate SPI pins on your microcontroller.
- Interrupts and Reset: Optionally, connect the INT pin to monitor events from the BNO055 and the RST pin to reset the sensor.
Important Considerations and Best Practices
- Voltage Levels: Ensure your microcontroller operates at 3.3V logic levels. If using a 5V microcontroller, use level shifters for SDA and SCL.
- I²C Address: The default I²C address for the BNO055 is
0x28, and for the BMP280, it is0x76. Ensure no address conflicts on the I²C bus. - Mounting: Secure the board to minimize vibrations, which can affect sensor readings.
- Calibration: The BNO055 requires calibration for accurate orientation data. Follow the calibration procedure in the Adafruit library documentation.
Example Code for Arduino UNO
Below is an example of how to use the Adafruit BNO055 and BMP280 BFF with an Arduino UNO via I²C.
#include <Wire.h>
#include <Adafruit_Sensor.h>
#include <Adafruit_BNO055.h>
#include <Adafruit_BMP280.h>

// Create sensor objects
Adafruit_BNO055 bno = Adafruit_BNO055(55);
Adafruit_BMP280 bmp; // I2C address 0x76 by default

void setup() {
  Serial.begin(9600);
  while (!Serial); // Wait for Serial Monitor to open

  // Initialize BNO055
  if (!bno.begin()) {
    Serial.println("Error: BNO055 not detected. Check wiring!");
    while (1);
  }
  Serial.println("BNO055 initialized!");

  // Initialize BMP280
  if (!bmp.begin(0x76)) {
    Serial.println("Error: BMP280 not detected. Check wiring!");
    while (1);
  }
  Serial.println("BMP280 initialized!");

  // Optional: Set BMP280 settings
  bmp.setSampling(Adafruit_BMP280::MODE_NORMAL,
                  Adafruit_BMP280::SAMPLING_X2,   // Temperature oversampling
                  Adafruit_BMP280::SAMPLING_X16,  // Pressure oversampling
                  Adafruit_BMP280::FILTER_X16,    // Filtering
                  Adafruit_BMP280::STANDBY_MS_500); // Standby time
}

void loop() {
  // Read orientation data from BNO055
  sensors_event_t event;
  bno.getEvent(&event);
  Serial.print("Orientation: ");
  Serial.print("X: "); Serial.print(event.orientation.x);
  Serial.print(" Y: "); Serial.print(event.orientation.y);
  Serial.print(" Z: "); Serial.println(event.orientation.z);

  // Read pressure and temperature from BMP280
  Serial.print("Pressure: ");
  Serial.print(bmp.readPressure() / 100.0); // Convert to hPa
  Serial.println(" hPa");

  Serial.print("Temperature: ");
  Serial.print(bmp.readTemperature());
  Serial.println(" °C");

  delay(1000); // Wait 1 second before next reading
}
Troubleshooting and FAQs
Common Issues and Solutions
Sensors Not Detected:
- Ensure proper wiring, especially SDA and SCL connections.
- Verify the I²C addresses (
0x28for BNO055,0x76for BMP280). - Check for loose connections or damaged wires.
Incorrect Orientation Data:
- Perform the BNO055 calibration process as described in the Adafruit library.
- Ensure the board is mounted securely to avoid vibrations.
Inaccurate Pressure or Temperature Readings:
- Verify the BMP280 is configured correctly in the code.
- Avoid placing the sensor near heat sources or in areas with rapid airflow.
FAQs
Can I use this board with a 5V microcontroller?
Yes, but you must use level shifters for the I²C lines (SDA and SCL).How do I reset the BNO055?
Pull the RST pin low for at least 1ms, then release it.What is the maximum I²C speed supported?
The BNO055 supports up to 400kHz, while the BMP280 supports up to 3.4MHz in I²C Fast Mode Plus.
This documentation provides a comprehensive guide to using the Adafruit BNO055 and BMP280 BFF. For further details, refer to the official Adafruit libraries and datasheets.