Cirkit Designer Logo
Cirkit Designer
Your all-in-one circuit design IDE
Home / 
Component Documentation

How to Use COIN VIBRATION MOTOR: Examples, Pinouts, and Specs

Image of COIN VIBRATION MOTOR
Cirkit Designer LogoDesign with COIN VIBRATION MOTOR in Cirkit Designer

Introduction

The Coin Vibration Motor is a compact, coin-shaped motor designed to produce vibrations when powered. It is widely used in applications requiring haptic feedback, such as mobile devices, gaming controllers, wearable devices, and medical equipment. Its small size and low power consumption make it ideal for portable and battery-powered devices.

Common applications include:

  • Haptic feedback in smartphones and gaming controllers
  • Notifications in wearable devices
  • Tactile feedback in medical devices
  • Silent alarms in pagers and personal devices

Explore Projects Built with COIN VIBRATION MOTOR

Use Cirkit Designer to design, explore, and prototype these projects online. Some projects support real-time simulation. Click "Open Project" to start designing instantly!
Battery-Powered Vibration Motor Control with ESP32 and DRV2605L
Image of Guante Háptico 2: A project utilizing COIN VIBRATION MOTOR in a practical application
This circuit is a haptic feedback system powered by a 2000mAh battery, controlled by an Adafruit HUZZAH32 ESP32 Feather microcontroller, and utilizing an Adafruit DRV2605L haptic driver to drive two vibration motors. The system includes a flex resistor for input sensing, and the microcontroller communicates with the haptic driver via I2C.
Cirkit Designer LogoOpen Project in Cirkit Designer
Nucleo 401RE Controlled Robotic Motor with Vibration Feedback and ADXL345 Accelerometer
Image of MLKIT: A project utilizing COIN VIBRATION MOTOR in a practical application
This circuit features a Nucleo 401RE microcontroller as the central processing unit, interfacing with an ADXL345 accelerometer and an INA219 current sensor over an I2C bus for motion sensing and power monitoring, respectively. A DC motor with an encoder is driven by an L298N motor driver, with speed control potentially provided by a connected potentiometer and vibration feedback through a vibration motor. The system is powered by a 12V battery, with voltage regulation provided for the various components.
Cirkit Designer LogoOpen Project in Cirkit Designer
Arduino UNO-Based Vibration Monitoring and Control System with ADXL345 and L298N Motor Driver
Image of vibrating table: A project utilizing COIN VIBRATION MOTOR in a practical application
This circuit is a vibrating table control system that uses an Arduino UNO to manage a DC motor via an L298N motor driver, with vibration feedback from an ADXL345 accelerometer and speed control via a potentiometer. The system includes an emergency stop feature and displays vibration and motor speed data on an OLED screen.
Cirkit Designer LogoOpen Project in Cirkit Designer
Interactive Touch and Motion Sensor System with Bela Board and OLED Display
Image of GIZMO Teaset: A project utilizing COIN VIBRATION MOTOR in a practical application
This circuit integrates a Bela Board with various sensors and actuators, including a TRILL CRAFT touch sensor, an ADXXL335 accelerometer, a vibration motor, and a loudspeaker. The Bela Board processes input from the touch sensor and accelerometer, and controls the vibration motor and loudspeaker, while an OLED display provides visual feedback.
Cirkit Designer LogoOpen Project in Cirkit Designer

Explore Projects Built with COIN VIBRATION MOTOR

Use Cirkit Designer to design, explore, and prototype these projects online. Some projects support real-time simulation. Click "Open Project" to start designing instantly!
Image of Guante Háptico 2: A project utilizing COIN VIBRATION MOTOR in a practical application
Battery-Powered Vibration Motor Control with ESP32 and DRV2605L
This circuit is a haptic feedback system powered by a 2000mAh battery, controlled by an Adafruit HUZZAH32 ESP32 Feather microcontroller, and utilizing an Adafruit DRV2605L haptic driver to drive two vibration motors. The system includes a flex resistor for input sensing, and the microcontroller communicates with the haptic driver via I2C.
Cirkit Designer LogoOpen Project in Cirkit Designer
Image of MLKIT: A project utilizing COIN VIBRATION MOTOR in a practical application
Nucleo 401RE Controlled Robotic Motor with Vibration Feedback and ADXL345 Accelerometer
This circuit features a Nucleo 401RE microcontroller as the central processing unit, interfacing with an ADXL345 accelerometer and an INA219 current sensor over an I2C bus for motion sensing and power monitoring, respectively. A DC motor with an encoder is driven by an L298N motor driver, with speed control potentially provided by a connected potentiometer and vibration feedback through a vibration motor. The system is powered by a 12V battery, with voltage regulation provided for the various components.
Cirkit Designer LogoOpen Project in Cirkit Designer
Image of vibrating table: A project utilizing COIN VIBRATION MOTOR in a practical application
Arduino UNO-Based Vibration Monitoring and Control System with ADXL345 and L298N Motor Driver
This circuit is a vibrating table control system that uses an Arduino UNO to manage a DC motor via an L298N motor driver, with vibration feedback from an ADXL345 accelerometer and speed control via a potentiometer. The system includes an emergency stop feature and displays vibration and motor speed data on an OLED screen.
Cirkit Designer LogoOpen Project in Cirkit Designer
Image of GIZMO Teaset: A project utilizing COIN VIBRATION MOTOR in a practical application
Interactive Touch and Motion Sensor System with Bela Board and OLED Display
This circuit integrates a Bela Board with various sensors and actuators, including a TRILL CRAFT touch sensor, an ADXXL335 accelerometer, a vibration motor, and a loudspeaker. The Bela Board processes input from the touch sensor and accelerometer, and controls the vibration motor and loudspeaker, while an OLED display provides visual feedback.
Cirkit Designer LogoOpen Project in Cirkit Designer

Technical Specifications

Below are the key technical details of the Coin Vibration Motor:

Parameter Value
Operating Voltage 2.5V to 3.7V
Rated Voltage 3.0V
Operating Current 80mA (typical at 3.0V)
Starting Voltage 2.3V (minimum)
Vibration Frequency 100-150 Hz
Dimensions Diameter: 10mm, Height: 3mm
Weight ~1.2g
Connection Type Wire leads (red: positive, black: negative)

Pin Configuration and Descriptions

The Coin Vibration Motor typically has two wire leads for connection:

Wire Color Description
Red Positive terminal (connect to VCC)
Black Negative terminal (connect to GND)

Usage Instructions

How to Use the Coin Vibration Motor in a Circuit

  1. Power Supply: Connect the red wire to a positive voltage source (e.g., 3.0V) and the black wire to ground (GND). Ensure the voltage is within the operating range (2.5V to 3.7V).
  2. Control with a Microcontroller: Use a transistor or MOSFET to control the motor with a microcontroller, as the motor may draw more current than the microcontroller can supply directly.
  3. PWM Control: To adjust the vibration intensity, use Pulse Width Modulation (PWM) to vary the average voltage supplied to the motor.

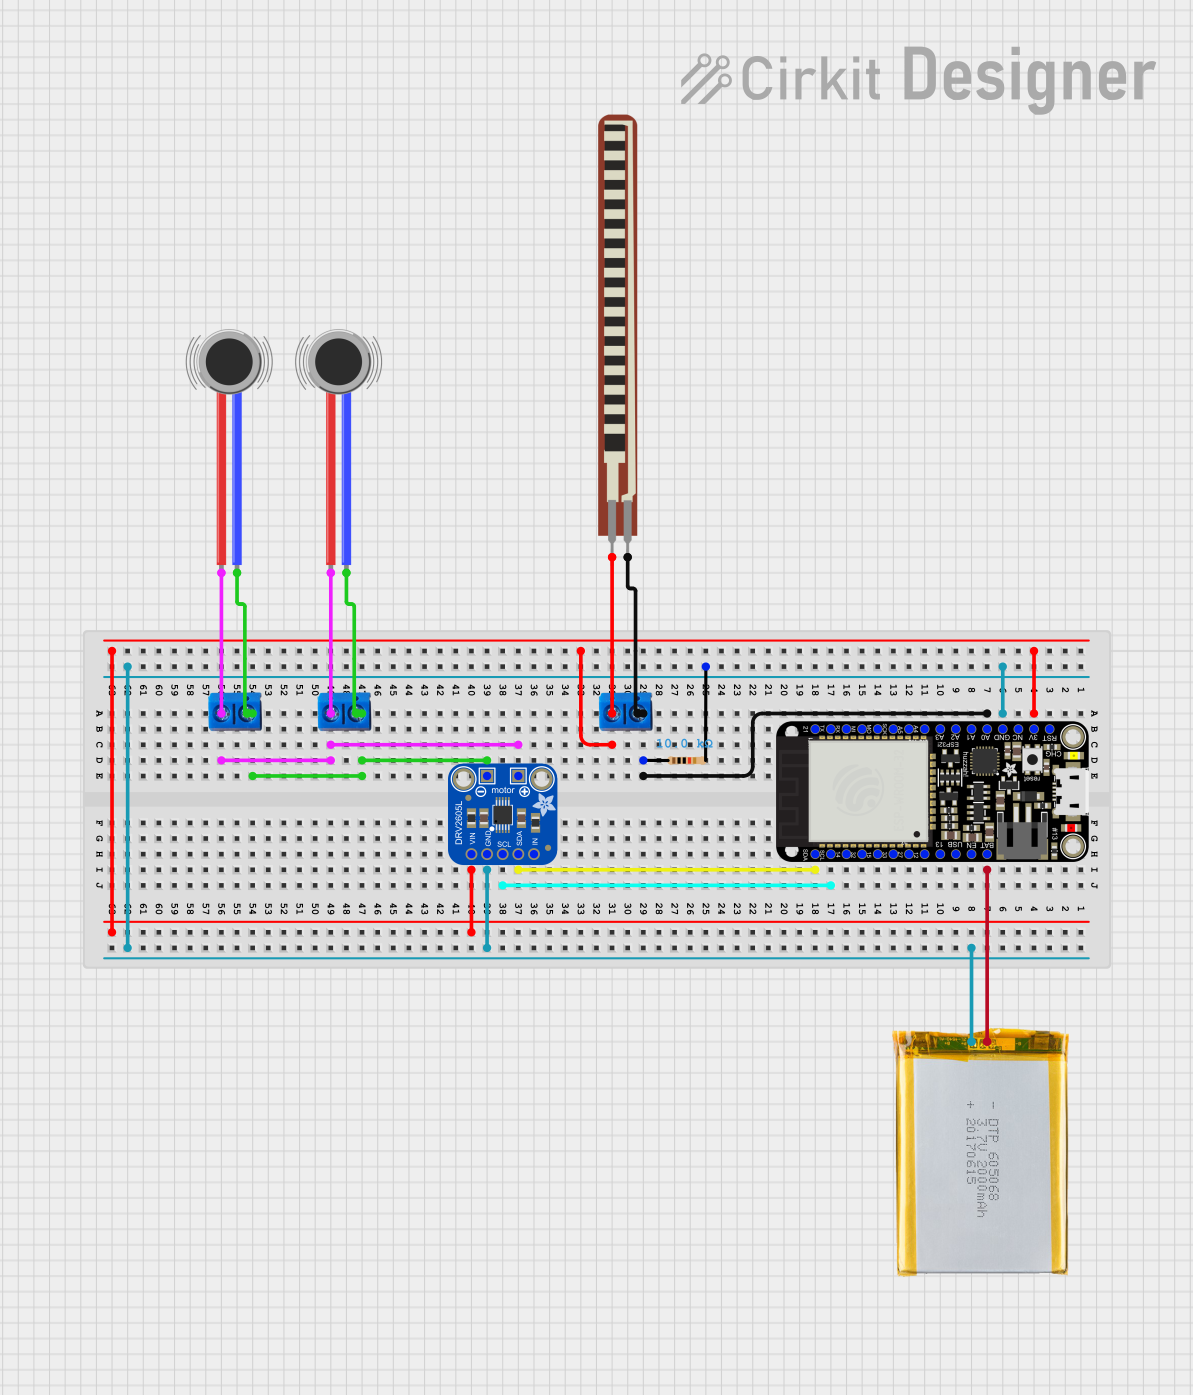
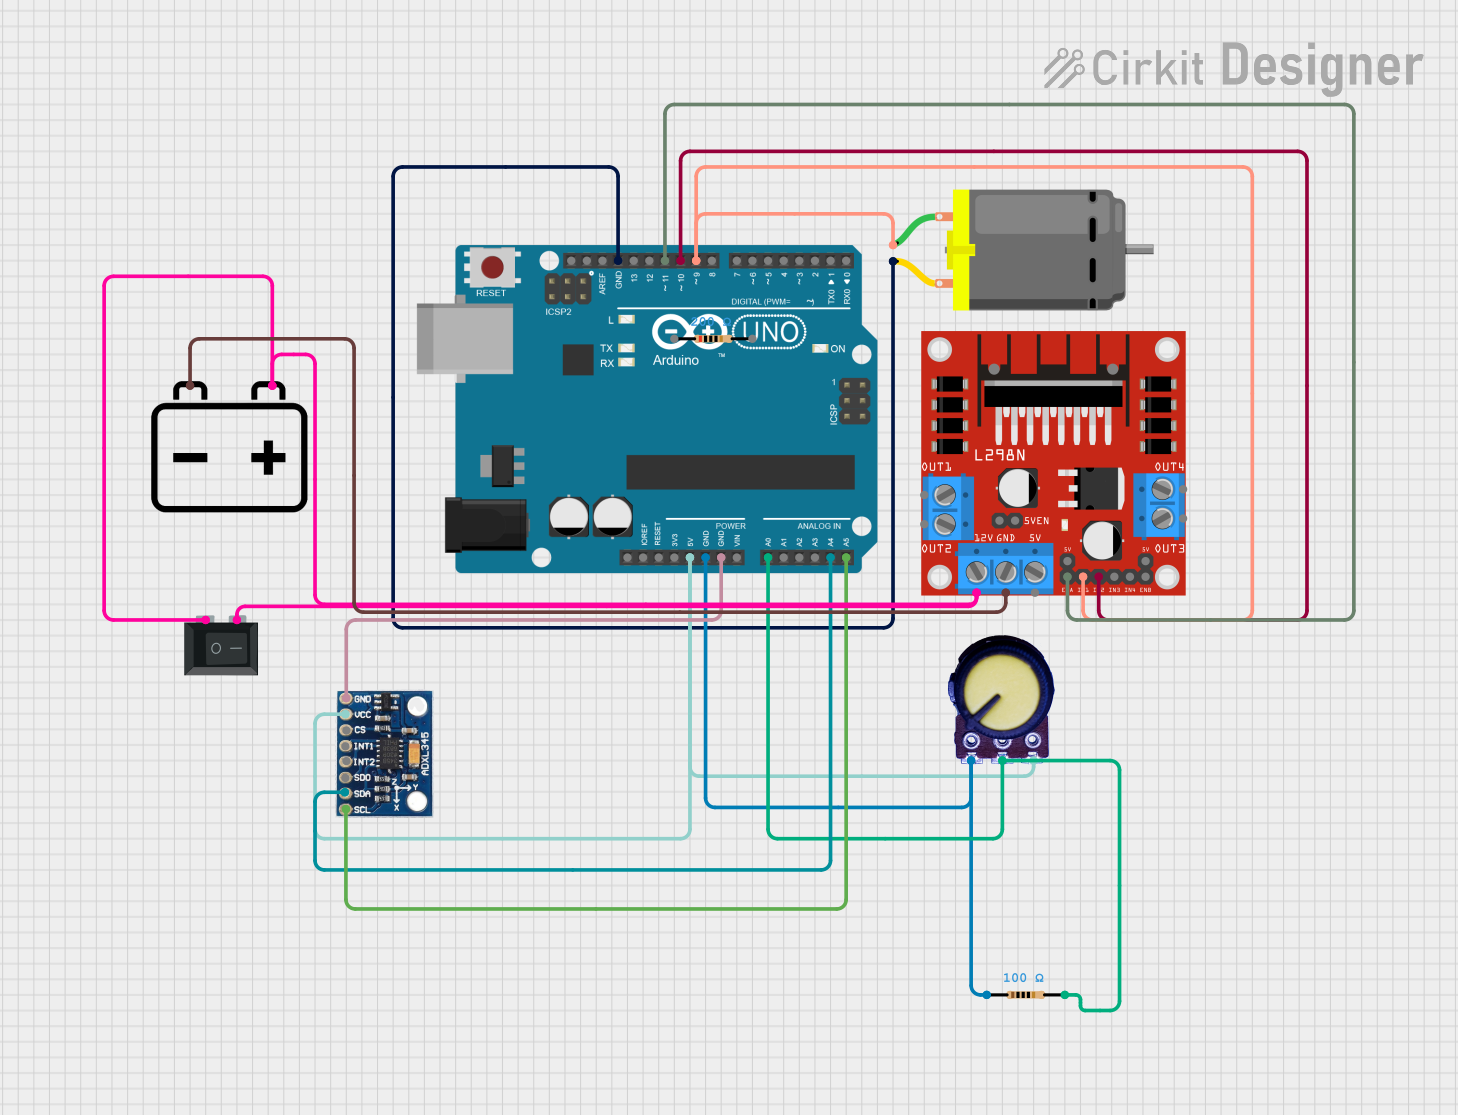
Circuit Example with Arduino UNO

Below is an example of how to connect and control the Coin Vibration Motor using an Arduino UNO:

Circuit Diagram

  • Connect the red wire of the motor to the collector of an NPN transistor (e.g., 2N2222).
  • Connect the black wire of the motor to GND.
  • Connect the emitter of the transistor to GND.
  • Connect a 1kΩ resistor between the base of the transistor and a PWM-capable pin on the Arduino (e.g., pin 9).
  • Connect a diode (e.g., 1N4007) across the motor terminals to protect against back EMF (cathode to red wire, anode to black wire).

Arduino Code

// Coin Vibration Motor Control with Arduino UNO
// Connect the motor control circuit to pin 9 (PWM-capable pin)

const int motorPin = 9; // Pin connected to the transistor base

void setup() {
  pinMode(motorPin, OUTPUT); // Set motorPin as an output
}

void loop() {
  analogWrite(motorPin, 128); // Set motor to 50% intensity (PWM value: 128)
  delay(1000);                // Run motor for 1 second
  analogWrite(motorPin, 0);   // Turn off motor
  delay(1000);                // Wait for 1 second
}

Important Considerations and Best Practices

  • Voltage Limits: Do not exceed the rated voltage (3.7V maximum) to avoid damaging the motor.
  • Current Handling: Use a transistor or MOSFET to handle the motor's current requirements.
  • Back EMF Protection: Always include a flyback diode across the motor terminals to protect the circuit from voltage spikes caused by the motor's inductive load.
  • Mounting: Secure the motor firmly to the device to ensure effective vibration transfer.

Troubleshooting and FAQs

Common Issues and Solutions

  1. Motor Does Not Vibrate:

    • Check the power supply voltage and ensure it is within the operating range (2.5V to 3.7V).
    • Verify the connections (red wire to VCC, black wire to GND).
    • Ensure the transistor or MOSFET is functioning correctly if used for control.
  2. Weak Vibration:

    • Confirm the power supply can provide sufficient current (80mA typical).
    • Check for loose connections or poor solder joints.
    • If using PWM, increase the duty cycle to provide more power to the motor.
  3. Overheating:

    • Ensure the motor is not being overdriven with excessive voltage or current.
    • Verify the flyback diode is installed correctly to prevent voltage spikes.
  4. Noise or Irregular Vibration:

    • Inspect the motor for physical damage or debris.
    • Ensure the motor is securely mounted to avoid resonance or rattling.

FAQs

Q: Can I power the motor directly from an Arduino pin?
A: No, the motor's current requirements (80mA typical) exceed the maximum current an Arduino pin can supply. Use a transistor or MOSFET for control.

Q: How can I adjust the vibration intensity?
A: Use PWM to vary the average voltage supplied to the motor. Higher duty cycles result in stronger vibrations.

Q: Is the motor polarity-sensitive?
A: Yes, connect the red wire to the positive voltage source and the black wire to ground. Reversing the polarity may damage the motor.

Q: Can I use the motor with a 5V power supply?
A: No, the motor is designed for a maximum voltage of 3.7V. Use a voltage regulator or resistor to step down the voltage if necessary.