Cirkit Designer Logo
Cirkit Designer
Your all-in-one circuit design IDE
Home / 
Component Documentation

How to Use Non-contact Digital Liquid Level Sensor: Examples, Pinouts, and Specs

Image of Non-contact Digital Liquid Level Sensor
Cirkit Designer LogoDesign with Non-contact Digital Liquid Level Sensor in Cirkit Designer

Introduction

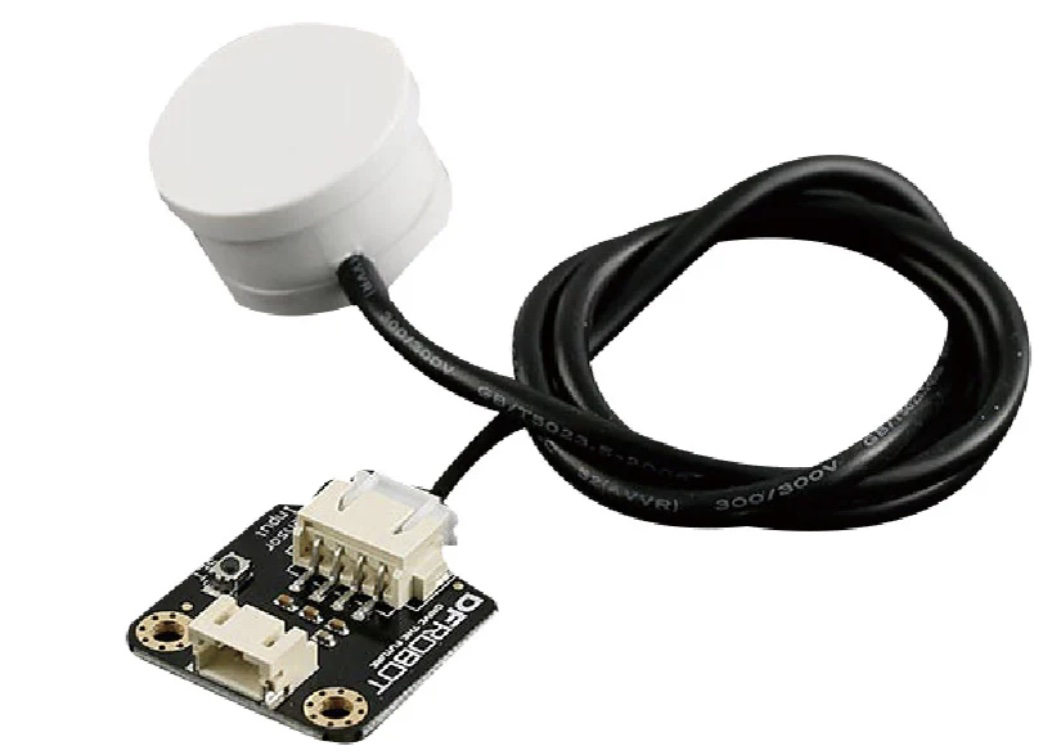
The Non-contact Digital Liquid Level Sensor is an advanced electronic component designed to detect the level of liquid in a container without making physical contact with the liquid. Utilizing digital technology, this sensor provides accurate and reliable measurements, making it ideal for a variety of applications where hygiene, safety, and precision are paramount.

Explore Projects Built with Non-contact Digital Liquid Level Sensor

Use Cirkit Designer to design, explore, and prototype these projects online. Some projects support real-time simulation. Click "Open Project" to start designing instantly!
Arduino-Controlled Ultrasonic Water Level Monitoring and Pump Management System
Image of auto water: A project utilizing Non-contact Digital Liquid Level Sensor in a practical application
This circuit is designed to monitor water levels using an HC-SR04 Ultrasonic Sensor and display the information on a 20x4 LCD with I2C interface, controlled by an Arduino UNO. When the water level falls below a predefined threshold, the Arduino activates a relay module, which in turn powers a mini diaphragm water pump to refill the tank. The system aims to maintain water levels within set boundaries, automating the process of water level management.
Cirkit Designer LogoOpen Project in Cirkit Designer
ESP32-Controlled Water Level Monitoring System with LCD Display and Alert Indicators
Image of FYP: A project utilizing Non-contact Digital Liquid Level Sensor in a practical application
This circuit is designed to monitor water levels using two non-contact water level sensors, with the ability to display the status on an LCD I2C display and alert through a buzzer and two green LEDs. The ESP32 microcontroller serves as the central processing unit, reading sensor signals and controlling the display and alert system. The circuit is likely intended for applications where water level monitoring is critical, such as in tanks or reservoirs, with visual and audible indicators for high or low water conditions.
Cirkit Designer LogoOpen Project in Cirkit Designer
Arduino-Controlled Ultrasonic Water Level Indicator with LCD Display and Relay Switching
Image of water: A project utilizing Non-contact Digital Liquid Level Sensor in a practical application
This circuit is designed to monitor water levels using an HC-SR04 Ultrasonic Sensor and display the information on an LCD I2C Display. An Arduino UNO controls the sensor to measure distance, calculates the water level as a percentage, and toggles a relay to control a pump based on the water level and manual input from a pushbutton. The system allows for manual override of the pump operation and stores the set water level threshold in EEPROM for persistent control across power cycles.
Cirkit Designer LogoOpen Project in Cirkit Designer
Arduino-Based Ultrasonic Water Level Monitoring System with LCD Display and Automatic Pump Control
Image of auto water level ultrasonic sensor: A project utilizing Non-contact Digital Liquid Level Sensor in a practical application
This circuit is a water level monitoring and control system using an Arduino UNO, an ultrasonic sensor, an LCD display, a relay module, and a water pump. The ultrasonic sensor measures the water level in a tank, and the Arduino controls the relay to turn the water pump on or off based on the measured water level, displaying the status on the LCD.
Cirkit Designer LogoOpen Project in Cirkit Designer

Explore Projects Built with Non-contact Digital Liquid Level Sensor

Use Cirkit Designer to design, explore, and prototype these projects online. Some projects support real-time simulation. Click "Open Project" to start designing instantly!
Image of auto water: A project utilizing Non-contact Digital Liquid Level Sensor in a practical application
Arduino-Controlled Ultrasonic Water Level Monitoring and Pump Management System
This circuit is designed to monitor water levels using an HC-SR04 Ultrasonic Sensor and display the information on a 20x4 LCD with I2C interface, controlled by an Arduino UNO. When the water level falls below a predefined threshold, the Arduino activates a relay module, which in turn powers a mini diaphragm water pump to refill the tank. The system aims to maintain water levels within set boundaries, automating the process of water level management.
Cirkit Designer LogoOpen Project in Cirkit Designer
Image of FYP: A project utilizing Non-contact Digital Liquid Level Sensor in a practical application
ESP32-Controlled Water Level Monitoring System with LCD Display and Alert Indicators
This circuit is designed to monitor water levels using two non-contact water level sensors, with the ability to display the status on an LCD I2C display and alert through a buzzer and two green LEDs. The ESP32 microcontroller serves as the central processing unit, reading sensor signals and controlling the display and alert system. The circuit is likely intended for applications where water level monitoring is critical, such as in tanks or reservoirs, with visual and audible indicators for high or low water conditions.
Cirkit Designer LogoOpen Project in Cirkit Designer
Image of water: A project utilizing Non-contact Digital Liquid Level Sensor in a practical application
Arduino-Controlled Ultrasonic Water Level Indicator with LCD Display and Relay Switching
This circuit is designed to monitor water levels using an HC-SR04 Ultrasonic Sensor and display the information on an LCD I2C Display. An Arduino UNO controls the sensor to measure distance, calculates the water level as a percentage, and toggles a relay to control a pump based on the water level and manual input from a pushbutton. The system allows for manual override of the pump operation and stores the set water level threshold in EEPROM for persistent control across power cycles.
Cirkit Designer LogoOpen Project in Cirkit Designer
Image of auto water level ultrasonic sensor: A project utilizing Non-contact Digital Liquid Level Sensor in a practical application
Arduino-Based Ultrasonic Water Level Monitoring System with LCD Display and Automatic Pump Control
This circuit is a water level monitoring and control system using an Arduino UNO, an ultrasonic sensor, an LCD display, a relay module, and a water pump. The ultrasonic sensor measures the water level in a tank, and the Arduino controls the relay to turn the water pump on or off based on the measured water level, displaying the status on the LCD.
Cirkit Designer LogoOpen Project in Cirkit Designer

Common Applications and Use Cases

  • Medical Devices: Monitoring liquid levels in IV bags, dialysis machines, and other medical equipment.
  • Industrial Automation: Managing liquid levels in tanks, reservoirs, and pipelines.
  • Consumer Electronics: Used in smart appliances like coffee makers and water dispensers.
  • Environmental Monitoring: Measuring water levels in natural and artificial reservoirs.
  • Automotive: Monitoring coolant and fuel levels in vehicles.

Technical Specifications

Key Technical Details

Parameter Value
Operating Voltage 5V DC
Operating Current ≤ 5mA
Output Type Digital (High/Low)
Response Time ≤ 500ms
Detection Range 0-20mm (distance from sensor)
Operating Temperature -10°C to 70°C
Humidity Range 5% to 100% RH
Waterproof Rating IP67

Pin Configuration and Descriptions

Pin Number Pin Name Description
1 VCC Power supply (5V DC)
2 GND Ground
3 OUT Digital output (High when liquid is detected)

Usage Instructions

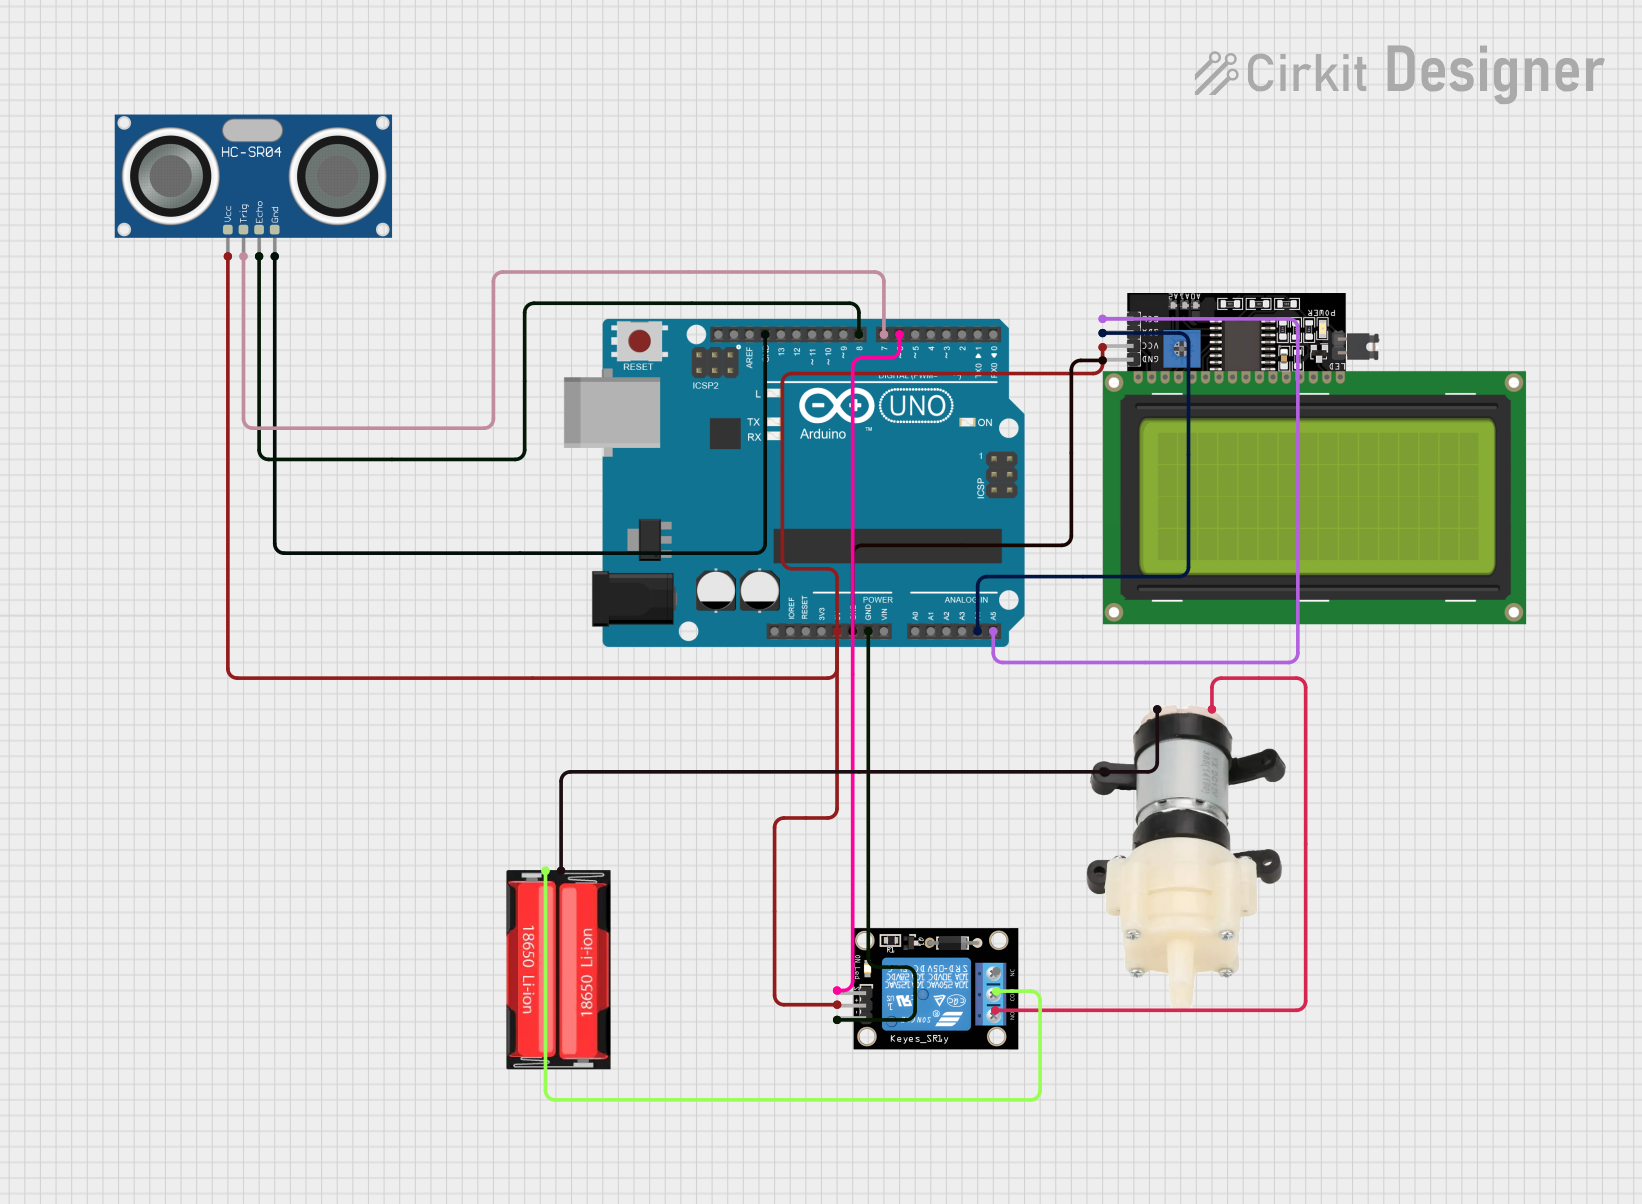
How to Use the Component in a Circuit

  1. Power Connection: Connect the VCC pin to a 5V DC power supply and the GND pin to the ground of your circuit.
  2. Output Connection: Connect the OUT pin to a digital input pin on your microcontroller (e.g., Arduino UNO).

Example Circuit Diagram

  +5V  --------------------+
                          |
                         [VCC]
                          |
                         [OUT] ----> Digital Input Pin (e.g., D2 on Arduino)
                          |
                         [GND]
                          |
  GND  --------------------+

Important Considerations and Best Practices

  • Mounting: Ensure the sensor is securely mounted at the desired height on the container.
  • Calibration: Some sensors may require calibration for optimal performance. Refer to the manufacturer's guidelines.
  • Interference: Avoid placing the sensor near strong electromagnetic fields or metal objects that could interfere with its operation.
  • Environment: Ensure the sensor is used within its specified temperature and humidity ranges.

Sample Arduino Code

// Define the pin connected to the sensor's OUT pin
const int sensorPin = 2;

// Variable to store the sensor state
int sensorState = 0;

void setup() {
  // Initialize the serial communication
  Serial.begin(9600);
  
  // Set the sensor pin as an input
  pinMode(sensorPin, INPUT);
}

void loop() {
  // Read the state of the sensor
  sensorState = digitalRead(sensorPin);
  
  // Check if the sensor detects liquid
  if (sensorState == HIGH) {
    Serial.println("Liquid detected!");
  } else {
    Serial.println("No liquid detected.");
  }
  
  // Wait for a short period before reading again
  delay(500);
}

Troubleshooting and FAQs

Common Issues Users Might Face

  1. False Positives/Negatives:

    • Solution: Ensure the sensor is properly mounted and calibrated. Check for any sources of interference.
  2. No Output Signal:

    • Solution: Verify the power connections and ensure the sensor is receiving 5V DC. Check the wiring to the microcontroller.
  3. Intermittent Readings:

    • Solution: Ensure stable power supply and secure connections. Check for environmental factors affecting the sensor.

FAQs

Q1: Can this sensor detect any type of liquid?

  • A1: Yes, the sensor is designed to detect a wide range of liquids, including water, oil, and chemicals.

Q2: How do I clean the sensor?

  • A2: The sensor is waterproof (IP67 rated), so you can clean it with a damp cloth. Avoid using harsh chemicals.

Q3: Can I use this sensor with a 3.3V microcontroller?

  • A3: The sensor is designed for 5V operation. Using it with a 3.3V microcontroller may require a level shifter.

Q4: What is the maximum distance the sensor can detect liquid?

  • A4: The sensor can detect liquid up to 20mm away from its surface.

By following this documentation, users can effectively integrate and utilize the Non-contact Digital Liquid Level Sensor in their projects, ensuring accurate and reliable liquid level measurements.