How to Use Fingers Webcam: Examples, Pinouts, and Specs
Introduction
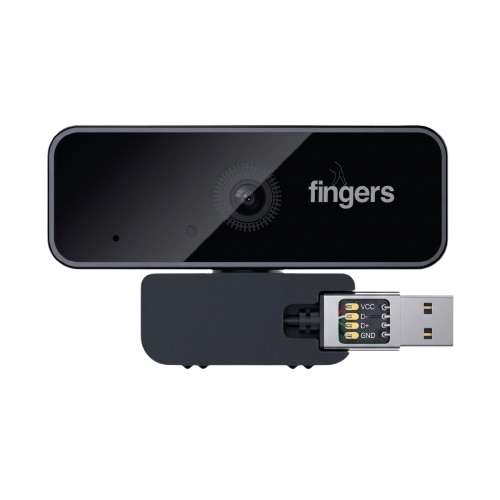
The Fingers Webcam by Dynamic Conglomerate Pvt. Ltd. (Part ID: Camera) is a versatile and high-quality webcam designed for capturing video and images. It is widely used for applications such as video conferencing, live streaming, online communication, and content creation. With features like a built-in microphone, autofocus, and low-light correction, this webcam ensures clear and professional-quality video and audio output, even in challenging lighting conditions.
Explore Projects Built with Fingers Webcam


Explore Projects Built with Fingers Webcam
Common Applications
- Video conferencing for remote work or online meetings
- Live streaming for platforms like YouTube, Twitch, or social media
- Online education and virtual classrooms
- Recording video content for vlogs or tutorials
- General-purpose video and image capture
Technical Specifications
Key Technical Details
| Specification | Value |
|---|---|
| Manufacturer | Dynamic Conglomerate Pvt. Ltd. |
| Part ID | Camera |
| Resolution | Up to 1920 x 1080 (Full HD) |
| Frame Rate | 30 fps (Full HD) |
| Lens Type | Autofocus |
| Field of View (FOV) | 78° |
| Microphone | Built-in, omnidirectional |
| Connectivity | USB 2.0 |
| Power Supply | USB-powered |
| Operating System Support | Windows, macOS, Linux |
| Dimensions | 90 mm x 30 mm x 25 mm |
| Weight | 120 grams |
Pin Configuration and Descriptions
The Fingers Webcam connects via a USB interface. Below is the pin configuration for the USB connector:
| Pin Number | Pin Name | Description |
|---|---|---|
| 1 | VBUS | Power supply (+5V) |
| 2 | D- | USB data line (-) |
| 3 | D+ | USB data line (+) |
| 4 | GND | Ground |
Usage Instructions
How to Use the Fingers Webcam
- Connect the Webcam: Plug the USB connector of the webcam into an available USB port on your computer or laptop.
- Install Drivers (if required): Most modern operating systems will automatically detect and install the necessary drivers. If not, download the drivers from the manufacturer's website.
- Position the Webcam: Place the webcam on a flat surface or mount it on top of your monitor using the built-in clip.
- Adjust Settings: Use video conferencing or streaming software to adjust resolution, frame rate, and other settings as needed.
- Test the Microphone: Ensure the built-in microphone is selected as the audio input device in your software.
Important Considerations and Best Practices
- Lighting: For optimal video quality, ensure the room is well-lit. The webcam's low-light correction feature can help in dim environments, but proper lighting will yield the best results.
- Privacy: When not in use, consider covering the webcam lens with a privacy cover to protect against unauthorized access.
- USB Port Selection: Use a USB 2.0 or higher port for stable performance. Avoid using unpowered USB hubs.
- Software Compatibility: The webcam is compatible with popular applications like Zoom, Microsoft Teams, OBS Studio, and Skype.
Arduino UNO Integration
While the Fingers Webcam is not directly designed for microcontroller use, it can be interfaced with an Arduino UNO for basic control (e.g., turning the webcam on/off via a relay). Below is an example of how to control the power to the webcam using a relay module:
// Example: Controlling Webcam Power with Arduino UNO and Relay Module

const int relayPin = 7; // Pin connected to the relay module

void setup() {
  pinMode(relayPin, OUTPUT); // Set relay pin as output
  digitalWrite(relayPin, LOW); // Ensure relay is off at startup
}

void loop() {
  // Turn on the webcam (relay ON)
  digitalWrite(relayPin, HIGH);
  delay(10000); // Keep webcam on for 10 seconds

  // Turn off the webcam (relay OFF)
  digitalWrite(relayPin, LOW);
  delay(5000); // Keep webcam off for 5 seconds
}
Note: This example assumes the webcam is powered via a USB cable connected to a relay-controlled power source. Ensure proper electrical isolation when working with relays.
Troubleshooting and FAQs
Common Issues and Solutions
Webcam Not Detected
- Cause: USB connection issue or missing drivers.
- Solution: Check the USB connection and try a different port. Install or update the drivers from the manufacturer's website.
Poor Video Quality
- Cause: Low lighting or incorrect software settings.
- Solution: Improve room lighting and adjust resolution settings in the software.
Microphone Not Working
- Cause: Incorrect audio input device selected.
- Solution: Go to your system's audio settings and select the webcam's microphone as the input device.
Webcam Freezes During Use
- Cause: Insufficient system resources or outdated drivers.
- Solution: Close unnecessary applications and update the webcam drivers.
FAQs
Q: Can the webcam be used with a smartphone?
A: Yes, with an appropriate USB OTG adapter and compatible apps, the webcam can be used with smartphones.Q: Does the webcam support 60 fps?
A: No, the maximum supported frame rate is 30 fps at Full HD resolution.Q: Is the webcam compatible with Linux?
A: Yes, the webcam is compatible with most Linux distributions that support USB video devices.Q: How do I clean the webcam lens?
A: Use a soft, lint-free cloth slightly dampened with water or a lens cleaning solution. Avoid using abrasive materials.
This concludes the documentation for the Fingers Webcam. For further assistance, refer to the manufacturer's support resources.