How to Use REX-100: Examples, Pinouts, and Specs
Introduction
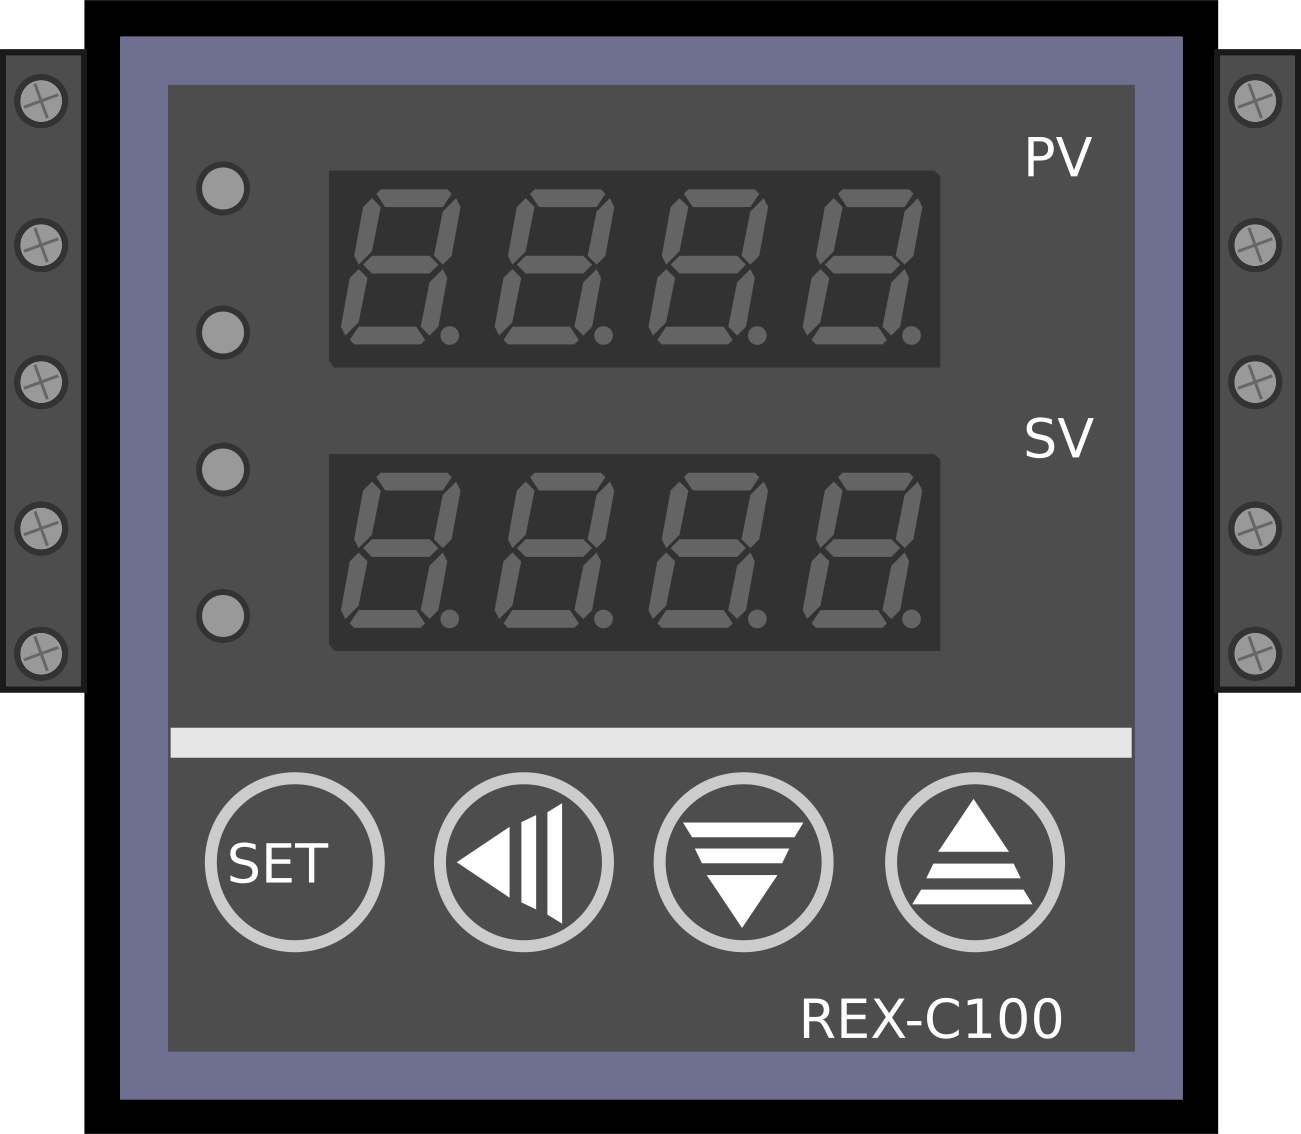
The REX-100 is a precision temperature controller designed for industrial applications. It features a digital display for real-time temperature monitoring, programmable set points for precise control, and versatile input/output options for seamless integration into a variety of control systems. This component is ideal for maintaining stable temperatures in processes such as manufacturing, chemical processing, and laboratory experiments.
Explore Projects Built with REX-100


Explore Projects Built with REX-100
Common Applications:
- Industrial heating and cooling systems
- Laboratory temperature regulation
- Food processing and storage
- Chemical and pharmaceutical manufacturing
- HVAC systems
Technical Specifications
Key Technical Details:
| Parameter | Specification |
|---|---|
| Input Voltage | 100-240V AC, 50/60 Hz |
| Power Consumption | < 5W |
| Temperature Range | -50°C to 400°C |
| Temperature Accuracy | ±0.5°C |
| Display Type | 4-digit LED display |
| Input Types | Thermocouple (K, J, T, E) or RTD (Pt100) |
| Output Types | Relay (250V AC, 3A) or SSR (Solid State Relay) |
| Control Mode | PID, ON/OFF |
| Dimensions | 48mm x 48mm x 110mm |
| Mounting Style | Panel mount |
Pin Configuration and Descriptions:
| Pin Number | Label | Description |
|---|---|---|
| 1 | Input+ | Positive terminal for temperature sensor input |
| 2 | Input- | Negative terminal for temperature sensor input |
| 3 | Relay NO | Normally Open terminal for relay output |
| 4 | Relay COM | Common terminal for relay output |
| 5 | Relay NC | Normally Closed terminal for relay output |
| 6 | SSR+ | Positive terminal for SSR output |
| 7 | SSR- | Negative terminal for SSR output |
| 8 | AC L | Live terminal for AC power input |
| 9 | AC N | Neutral terminal for AC power input |
Usage Instructions
How to Use the REX-100 in a Circuit:
- Power Connection: Connect the AC power supply to the
AC LandAC Nterminals. Ensure the voltage matches the specified input range (100-240V AC). - Sensor Connection: Attach the temperature sensor (e.g., thermocouple or RTD) to the
Input+andInput-terminals. Verify the sensor type is compatible with the REX-100. - Output Connection:
- For relay output, connect the load to the
Relay NO,Relay COM, andRelay NCterminals as needed. - For SSR output, connect the load to the
SSR+andSSR-terminals.
- For relay output, connect the load to the
- Set Parameters: Use the front panel buttons to configure the desired temperature set point and control mode (PID or ON/OFF).
- Mounting: Secure the REX-100 in a panel cutout (48mm x 48mm) using the provided mounting brackets.
Important Considerations:
- Ensure proper grounding to avoid electrical noise or interference.
- Use shielded cables for sensor connections in noisy environments.
- Avoid exceeding the rated current and voltage for the output terminals.
- For PID control, perform auto-tuning (if available) to optimize performance.
Example: Connecting to an Arduino UNO
The REX-100 can be used with an Arduino UNO to monitor and control temperature. Below is an example of how to read the temperature data from the REX-100 using a thermocouple sensor and display it on the Arduino Serial Monitor.
#include <SoftwareSerial.h>

// Define RX and TX pins for communication with the REX-100
SoftwareSerial rexSerial(10, 11); // RX = pin 10, TX = pin 11

void setup() {
  Serial.begin(9600); // Initialize Serial Monitor
  rexSerial.begin(9600); // Initialize communication with REX-100

  Serial.println("REX-100 Temperature Controller");
  Serial.println("Reading temperature data...");
}

void loop() {
  if (rexSerial.available()) {
    // Read data from REX-100
    String temperatureData = rexSerial.readStringUntil('\n');

    // Display the temperature data on Serial Monitor
    Serial.print("Temperature: ");
    Serial.println(temperatureData);
  }

  delay(1000); // Wait 1 second before the next reading
}
Notes:
- Ensure the REX-100 is configured to output temperature data via serial communication.
- Use a level shifter if the REX-100 operates at a voltage level incompatible with the Arduino UNO.
Troubleshooting and FAQs
Common Issues:
No Display or Power:
- Check the AC power supply connection to
AC LandAC N. - Verify the input voltage is within the specified range (100-240V AC).
- Check the AC power supply connection to
Incorrect Temperature Reading:
- Ensure the correct sensor type (thermocouple or RTD) is selected in the settings.
- Check for loose or incorrect sensor connections.
Output Not Activating:
- Verify the load is connected to the correct output terminals (Relay or SSR).
- Ensure the set point and control mode are configured properly.
PID Control Not Stable:
- Perform auto-tuning to optimize PID parameters.
- Check for external factors causing temperature fluctuations.
FAQs:
Q: Can the REX-100 handle multiple sensors simultaneously?
A: No, the REX-100 supports only one sensor input at a time. Ensure the correct sensor type is selected in the settings.
Q: How do I reset the REX-100 to factory settings?
A: Refer to the user manual for the specific reset procedure, typically involving a combination of button presses.
Q: Can I use the REX-100 with a DC power supply?
A: No, the REX-100 requires an AC power supply within the range of 100-240V AC.
Q: What is the maximum load the relay output can handle?
A: The relay output can handle up to 250V AC at 3A. For higher loads, use an external relay or contactor.
By following this documentation, users can effectively integrate the REX-100 into their temperature control systems and troubleshoot common issues with ease.