How to Use MAX4466: Examples, Pinouts, and Specs
Introduction
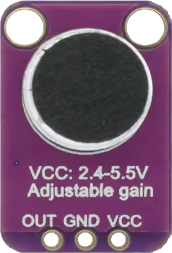
The MAX4466 is a low-noise microphone amplifier designed for high-quality audio applications. It is particularly well-suited for use in portable devices due to its low power consumption and wide supply voltage range. The gain of the amplifier can be adjusted using an external resistor, providing flexibility for various use cases. Its low noise performance ensures clear audio signal amplification, making it ideal for applications such as voice recognition systems, audio recording devices, and sound level monitoring.
Explore Projects Built with MAX4466


Explore Projects Built with MAX4466
Common Applications
- Voice recognition systems
- Audio recording devices
- Sound level monitoring
- Portable audio equipment
- Microphone preamplifiers
Technical Specifications
Below are the key technical details of the MAX4466:
| Parameter | Value |
|---|---|
| Supply Voltage Range | 2.4V to 5.5V |
| Quiescent Current | 24 µA (typical) |
| Gain | Adjustable via external resistor |
| Input Noise Density | 20 nV/√Hz (typical) |
| Output Voltage Swing | Rail-to-rail |
| Bandwidth | 20 kHz |
| Operating Temperature Range | -40°C to +85°C |
Pin Configuration and Descriptions
The MAX4466 is typically available in an 8-pin package. Below is the pin configuration:
| Pin Number | Pin Name | Description |
|---|---|---|
| 1 | VDD | Positive supply voltage |
| 2 | GND | Ground |
| 3 | OUT | Amplified audio signal output |
| 4 | IN+ | Non-inverting input (connect to microphone) |
| 5 | IN- | Inverting input (connect to ground or feedback) |
| 6-8 | NC | No connection (leave unconnected or grounded) |
Usage Instructions
How to Use the MAX4466 in a Circuit
- Power Supply: Connect the VDD pin to a power supply within the range of 2.4V to 5.5V. Connect the GND pin to the ground of the circuit.
- Microphone Connection: Connect the microphone's output to the IN+ pin. The IN- pin is typically connected to ground or used in a feedback loop for gain adjustment.
- Gain Adjustment: Use an external resistor between the IN- pin and the OUT pin to set the desired gain. The gain can be calculated using the formula provided in the MAX4466 datasheet.
- Output Signal: The amplified audio signal will be available at the OUT pin. Connect this pin to the next stage of your circuit, such as an ADC or audio processor.
Important Considerations
- Power Supply Decoupling: Place a decoupling capacitor (e.g., 0.1 µF) close to the VDD pin to reduce noise and ensure stable operation.
- Microphone Biasing: If using an electret microphone, ensure it is properly biased with a resistor and capacitor as per the microphone's datasheet.
- Gain Selection: Avoid setting the gain too high, as it may introduce distortion or amplify noise.
- Output Load: Ensure the output is not heavily loaded, as this may affect performance.
Example: Connecting MAX4466 to an Arduino UNO
The MAX4466 can be used with an Arduino UNO to capture audio signals. Below is an example circuit and code:
Circuit
- Connect the VDD pin of the MAX4466 to the 5V pin of the Arduino.
- Connect the GND pin of the MAX4466 to the GND pin of the Arduino.
- Connect the OUT pin of the MAX4466 to an analog input pin (e.g., A0) on the Arduino.
Code
// MAX4466 Microphone Amplifier Example with Arduino UNO
// This code reads the amplified audio signal from the MAX4466 and prints
// the analog values to the Serial Monitor.

const int micPin = A0; // Analog pin connected to MAX4466 OUT pin

void setup() {
  Serial.begin(9600); // Initialize serial communication at 9600 baud
}

void loop() {
  int audioSignal = analogRead(micPin); // Read the analog signal from MAX4466
  Serial.println(audioSignal); // Print the signal value to the Serial Monitor
  delay(10); // Small delay to avoid overwhelming the Serial Monitor
}
Troubleshooting and FAQs
Common Issues and Solutions
No Output Signal
- Cause: Incorrect wiring or power supply issues.
- Solution: Double-check all connections, ensure the VDD pin is connected to a proper power source, and verify the GND connection.
Distorted Audio Output
- Cause: Gain set too high or microphone improperly biased.
- Solution: Reduce the gain by adjusting the external resistor. Verify the microphone's biasing circuit.
High Noise in Output
- Cause: Poor power supply decoupling or external interference.
- Solution: Add a decoupling capacitor near the VDD pin. Minimize noise sources near the circuit.
Low Signal Amplitude
- Cause: Gain set too low or weak microphone signal.
- Solution: Increase the gain by adjusting the external resistor. Ensure the microphone is functioning correctly.
FAQs
Q: Can the MAX4466 be used with a digital microphone?
A: No, the MAX4466 is designed for use with analog microphones, such as electret microphones. Digital microphones require a different interface.
Q: What is the maximum gain achievable with the MAX4466?
A: The maximum gain depends on the external resistor used. Refer to the MAX4466 datasheet for the gain formula and resistor selection guidelines.
Q: Can the MAX4466 operate at 3.3V?
A: Yes, the MAX4466 can operate with a supply voltage as low as 2.4V, making it compatible with 3.3V systems.
Q: How do I reduce noise in my circuit?
A: Use proper power supply decoupling, shield the circuit from external interference, and ensure the microphone is properly biased.
By following this documentation, you can effectively integrate the MAX4466 into your audio applications and achieve optimal performance.