Cirkit Designer Logo
Cirkit Designer
Your all-in-one circuit design IDE
Home / 
Component Documentation

How to Use APDS-9960 RGB and Gesture Sensor: Examples, Pinouts, and Specs

Image of APDS-9960 RGB and Gesture Sensor
Cirkit Designer LogoDesign with APDS-9960 RGB and Gesture Sensor in Cirkit Designer

Introduction

The APDS-9960 RGB and Gesture Sensor is a versatile sensing device that offers advanced gesture detection, ambient light sensing, proximity sensing, and color sensing capabilities. This sensor is widely used in applications such as touchless control systems, light color temperature measurement, and mobile device screen brightness adjustment based on ambient conditions. Its ability to detect simple gestures like swipes and taps makes it ideal for interactive projects and user interfaces.

Explore Projects Built with APDS-9960 RGB and Gesture Sensor

Use Cirkit Designer to design, explore, and prototype these projects online. Some projects support real-time simulation. Click "Open Project" to start designing instantly!
Arduino Nano-Controlled Lighting System with Gesture and Sound Interaction
Image of 4 load controll using hand gesture and sound controll: A project utilizing APDS-9960 RGB and Gesture Sensor in a practical application
This circuit features an Arduino Nano microcontroller interfaced with an APDS-9960 RGB and Gesture Sensor for color and gesture detection, and a KY-038 microphone module for sound detection. The Arduino controls a 4-channel relay module, which in turn switches four AC bulbs on and off. The 12V power supply is used to power the relay module, and the bulbs are connected to the normally open (N.O.) contacts of the relays, allowing the Arduino to control the lighting based on sensor inputs.
Cirkit Designer LogoOpen Project in Cirkit Designer
ESP32-Based Gesture-Controlled Smart Lighting System
Image of HOME AUTOMATION BASED ON HAND GESTURE: A project utilizing APDS-9960 RGB and Gesture Sensor in a practical application
This circuit uses an ESP32 microcontroller to control two relays based on gestures detected by an APDS-9960 RGB and Gesture Sensor. The relays are used to switch two bulbs on and off, with the ESP32 interpreting gesture inputs to toggle the relays accordingly.
Cirkit Designer LogoOpen Project in Cirkit Designer
Gesture and Sound Controlled Relay Switching with Arduino Nano
Image of 4 load controll using hand gesture and sound controll..: A project utilizing APDS-9960 RGB and Gesture Sensor in a practical application
This circuit features an Arduino Nano microcontroller interfaced with an APDS-9960 RGB and Gesture Sensor for gesture detection and a KY-038 sound sensor for clap detection. It controls a 4-channel relay module to toggle power to connected loads, such as bulbs and fans, based on gesture and clap inputs. The code provided enables gesture recognition and clap detection to toggle the state of the relays, which in turn control the power to the loads.
Cirkit Designer LogoOpen Project in Cirkit Designer
Gesture-Controlled Servo Motor Using Arduino Nano and APDS-9960 Sensor
Image of A Magician's Box gesture sensor.: A project utilizing APDS-9960 RGB and Gesture Sensor in a practical application
This circuit uses an Arduino Nano to control a micro servo motor based on gestures detected by an APDS-9960 RGB and Gesture Sensor. The sensor communicates with the Arduino via I2C, and specific gesture patterns trigger the servo to rotate to predefined angles.
Cirkit Designer LogoOpen Project in Cirkit Designer

Explore Projects Built with APDS-9960 RGB and Gesture Sensor

Use Cirkit Designer to design, explore, and prototype these projects online. Some projects support real-time simulation. Click "Open Project" to start designing instantly!
Image of 4 load controll using hand gesture and sound controll: A project utilizing APDS-9960 RGB and Gesture Sensor in a practical application
Arduino Nano-Controlled Lighting System with Gesture and Sound Interaction
This circuit features an Arduino Nano microcontroller interfaced with an APDS-9960 RGB and Gesture Sensor for color and gesture detection, and a KY-038 microphone module for sound detection. The Arduino controls a 4-channel relay module, which in turn switches four AC bulbs on and off. The 12V power supply is used to power the relay module, and the bulbs are connected to the normally open (N.O.) contacts of the relays, allowing the Arduino to control the lighting based on sensor inputs.
Cirkit Designer LogoOpen Project in Cirkit Designer
Image of HOME AUTOMATION BASED ON HAND GESTURE: A project utilizing APDS-9960 RGB and Gesture Sensor in a practical application
ESP32-Based Gesture-Controlled Smart Lighting System
This circuit uses an ESP32 microcontroller to control two relays based on gestures detected by an APDS-9960 RGB and Gesture Sensor. The relays are used to switch two bulbs on and off, with the ESP32 interpreting gesture inputs to toggle the relays accordingly.
Cirkit Designer LogoOpen Project in Cirkit Designer
Image of 4 load controll using hand gesture and sound controll..: A project utilizing APDS-9960 RGB and Gesture Sensor in a practical application
Gesture and Sound Controlled Relay Switching with Arduino Nano
This circuit features an Arduino Nano microcontroller interfaced with an APDS-9960 RGB and Gesture Sensor for gesture detection and a KY-038 sound sensor for clap detection. It controls a 4-channel relay module to toggle power to connected loads, such as bulbs and fans, based on gesture and clap inputs. The code provided enables gesture recognition and clap detection to toggle the state of the relays, which in turn control the power to the loads.
Cirkit Designer LogoOpen Project in Cirkit Designer
Image of A Magician's Box gesture sensor.: A project utilizing APDS-9960 RGB and Gesture Sensor in a practical application
Gesture-Controlled Servo Motor Using Arduino Nano and APDS-9960 Sensor
This circuit uses an Arduino Nano to control a micro servo motor based on gestures detected by an APDS-9960 RGB and Gesture Sensor. The sensor communicates with the Arduino via I2C, and specific gesture patterns trigger the servo to rotate to predefined angles.
Cirkit Designer LogoOpen Project in Cirkit Designer

Technical Specifications

Key Technical Details

  • Operating Voltage: 2.4V to 3.6V
  • Supply Current: 100 μA (typical)
  • Proximity Detection Range: Up to 10 cm
  • Ambient Light Sensing Range: 0.01 lux to 64,000 lux
  • I2C Interface: 400 kHz (fast mode)
  • Interrupt Driven: Yes, with programmable upper and lower thresholds
  • Operating Temperature Range: -30°C to +85°C

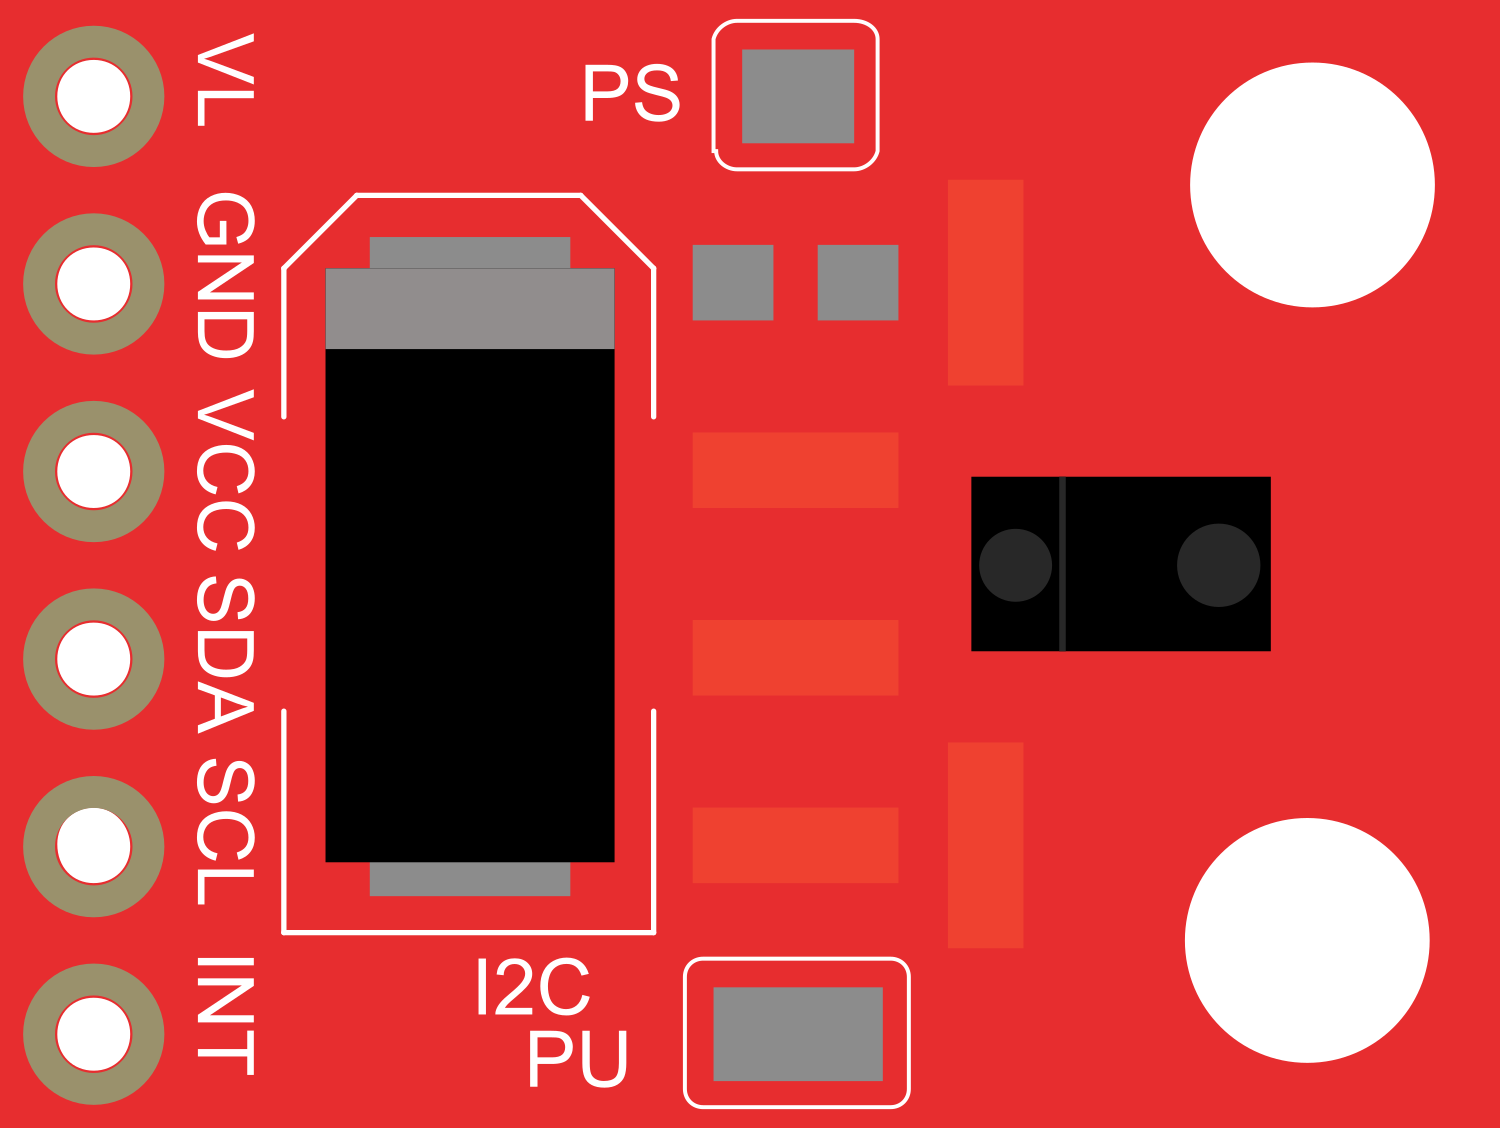
Pin Configuration and Descriptions

Pin Number Name Description
1 VDD Power supply (2.4V to 3.6V)
2 GND Ground connection
3 SDA I2C Data Line
4 SCL I2C Clock Line
5 INT Interrupt output (active low)
6 VL Optional IR LED power supply for proximity sensor

Usage Instructions

Integration with a Circuit

  1. Power Connections: Connect VDD to a 3.3V supply and GND to the ground on your circuit.
  2. I2C Connections: Connect SDA and SCL to your microcontroller's I2C data and clock lines respectively.
  3. Interrupt (Optional): Connect the INT pin to an external interrupt on your microcontroller if you wish to use interrupt-driven measurements.
  4. IR LED Power (Optional): If additional IR LED power is required for proximity sensing, connect VL to a power source as per the LED specifications.

Best Practices

  • Use pull-up resistors on the I2C data and clock lines.
  • Keep the sensor away from direct sunlight or other strong light sources that may interfere with readings.
  • Avoid placing objects too close to the sensor to prevent false proximity readings.
  • Ensure that the sensor is mounted securely and is not subject to mechanical vibrations.

Example Code for Arduino UNO

#include <Wire.h>
#include <SparkFun_APDS9960.h>

// Instantiate APDS9960 object
SparkFun_APDS9960 apds = SparkFun_APDS9960();

void setup() {
  Serial.begin(9600);
  Wire.begin();

  // Initialize APDS-9960 (configure I2C and initial values)
  if (apds.init()) {
    Serial.println("APDS-9960 initialization complete");
  } else {
    Serial.println("Something went wrong during APDS-9960 init!");
  }

  // Start running the APDS-9960 gesture sensor engine
  if (apds.enableGestureSensor(true)) {
    Serial.println("Gesture sensor is now running");
  } else {
    Serial.println("Something went wrong during gesture sensor init!");
  }
}

void loop() {
  if (apds.isGestureAvailable()) {
    switch (apds.readGesture()) {
      case DIR_UP:
        Serial.println("UP");
        break;
      case DIR_DOWN:
        Serial.println("DOWN");
        break;
      case DIR_LEFT:
        Serial.println("LEFT");
        break;
      case DIR_RIGHT:
        Serial.println("RIGHT");
        break;
      case DIR_NEAR:
        Serial.println("NEAR");
        break;
      case DIR_FAR:
        Serial.println("FAR");
        break;
      default:
        Serial.println("NONE");
    }
  }
}

Troubleshooting and FAQs

Common Issues

  • Gesture Detection Not Working: Ensure that the sensor is not exposed to direct sunlight or strong artificial light.
  • Inaccurate Color Readings: Calibrate the sensor for the specific lighting conditions in your application.
  • I2C Communication Errors: Check the pull-up resistors on the I2C lines and ensure proper connections.

FAQs

Q: Can the APDS-9960 sensor work with 5V systems? A: The sensor operates at 2.4V to 3.6V. For 5V systems, level shifters should be used for I2C lines, and a 3.3V voltage regulator should be used for VDD.

Q: How can I extend the proximity detection range? A: The proximity detection range can be extended by adjusting the gain settings in the sensor's configuration, but this may also increase the sensor's susceptibility to noise.

Q: What should I do if the sensor is not responding? A: Check the power supply, verify the I2C connections, and ensure that the correct I2C address is being used in your code. Resetting the sensor or microcontroller can also help.

For further assistance, consult the APDS-9960 datasheet and your microcontroller's documentation.