How to Use 74HC157: Examples, Pinouts, and Specs
Introduction
The 74HC157 is a high-speed CMOS quad 2-to-1 multiplexer. This versatile component is designed to select four bits of data from two sources under the control of a common data select input. The enable input is active low and can be used to strobe the outputs, making it a valuable component in digital circuits where data routing and selection are required.
Explore Projects Built with 74HC157


Explore Projects Built with 74HC157
Common Applications and Use Cases
- Data Routing: Directing data from multiple sources to a single destination.
- Signal Switching: Switching between different signal sources.
- Microcontroller Interfacing: Connecting multiple sensors or peripherals to a microcontroller.
- Digital Systems: Used in digital systems for data selection and routing.
Technical Specifications
Key Technical Details
| Parameter | Value |
|---|---|
| Supply Voltage | 2V to 6V |
| Input Voltage | 0V to Vcc |
| Output Voltage | 0V to Vcc |
| High-Level Input | 2V (min) |
| Low-Level Input | 0.8V (max) |
| High-Level Output | Vcc - 0.1V (min) |
| Low-Level Output | 0.1V (max) |
| Propagation Delay | 10ns (typical) |
| Power Dissipation | 500mW (max) |
| Operating Temp | -40°C to 85°C |
Pin Configuration and Descriptions
| Pin No. | Name | Description |
|---|---|---|
| 1 | A1 | Data Input from Source 1 (Bit 1) |
| 2 | B1 | Data Input from Source 2 (Bit 1) |
| 3 | Y1 | Multiplexer Output (Bit 1) |
| 4 | A2 | Data Input from Source 1 (Bit 2) |
| 5 | B2 | Data Input from Source 2 (Bit 2) |
| 6 | Y2 | Multiplexer Output (Bit 2) |
| 7 | A3 | Data Input from Source 1 (Bit 3) |
| 8 | GND | Ground |
| 9 | Y3 | Multiplexer Output (Bit 3) |
| 10 | B3 | Data Input from Source 2 (Bit 3) |
| 11 | A4 | Data Input from Source 1 (Bit 4) |
| 12 | B4 | Data Input from Source 2 (Bit 4) |
| 13 | Y4 | Multiplexer Output (Bit 4) |
| 14 | SEL | Data Select Input |
| 15 | EN | Enable Input (Active Low) |
| 16 | Vcc | Supply Voltage |
Usage Instructions
How to Use the Component in a Circuit
- Power Supply: Connect the Vcc pin (Pin 16) to a power supply (2V to 6V) and the GND pin (Pin 8) to ground.
- Data Inputs: Connect the data inputs (A1 to A4 and B1 to B4) to the data sources you want to multiplex.
- Data Select: Connect the SEL pin (Pin 14) to a control signal that will select between the two data sources.
- Enable Input: Connect the EN pin (Pin 15) to ground to enable the outputs. If you want to disable the outputs, connect this pin to Vcc.
- Outputs: Connect the outputs (Y1 to Y4) to the destination where you want the selected data to be routed.
Important Considerations and Best Practices
- Decoupling Capacitor: Place a 0.1µF decoupling capacitor close to the Vcc pin to filter out noise.
- Signal Integrity: Ensure that the input signals are within the specified voltage range to avoid damage.
- Enable Control: Use the enable pin to control when the multiplexer outputs are active, which can help in reducing power consumption.
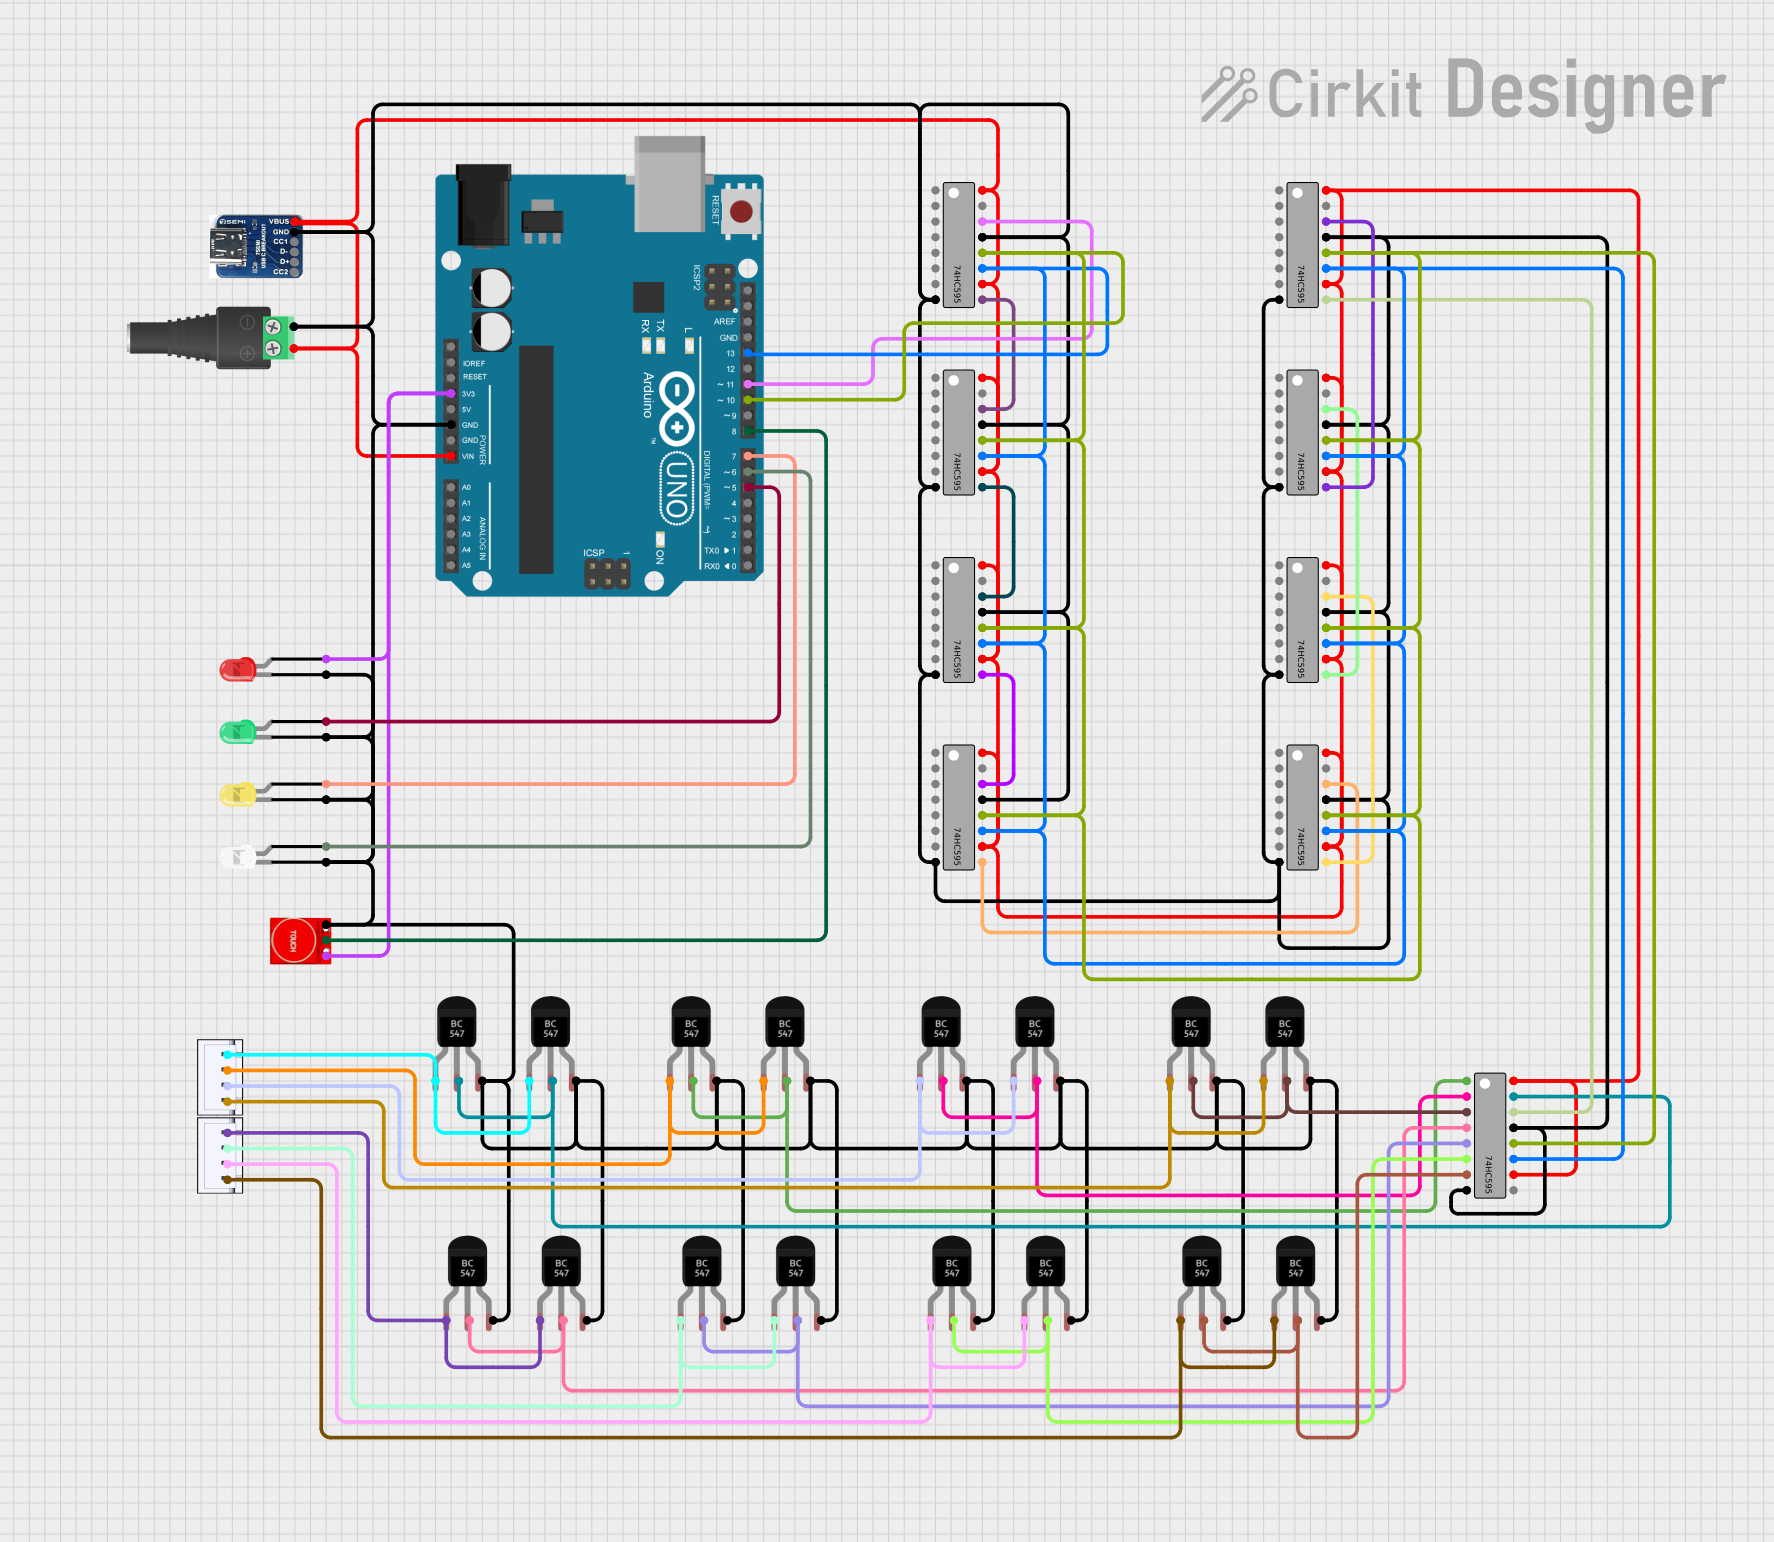
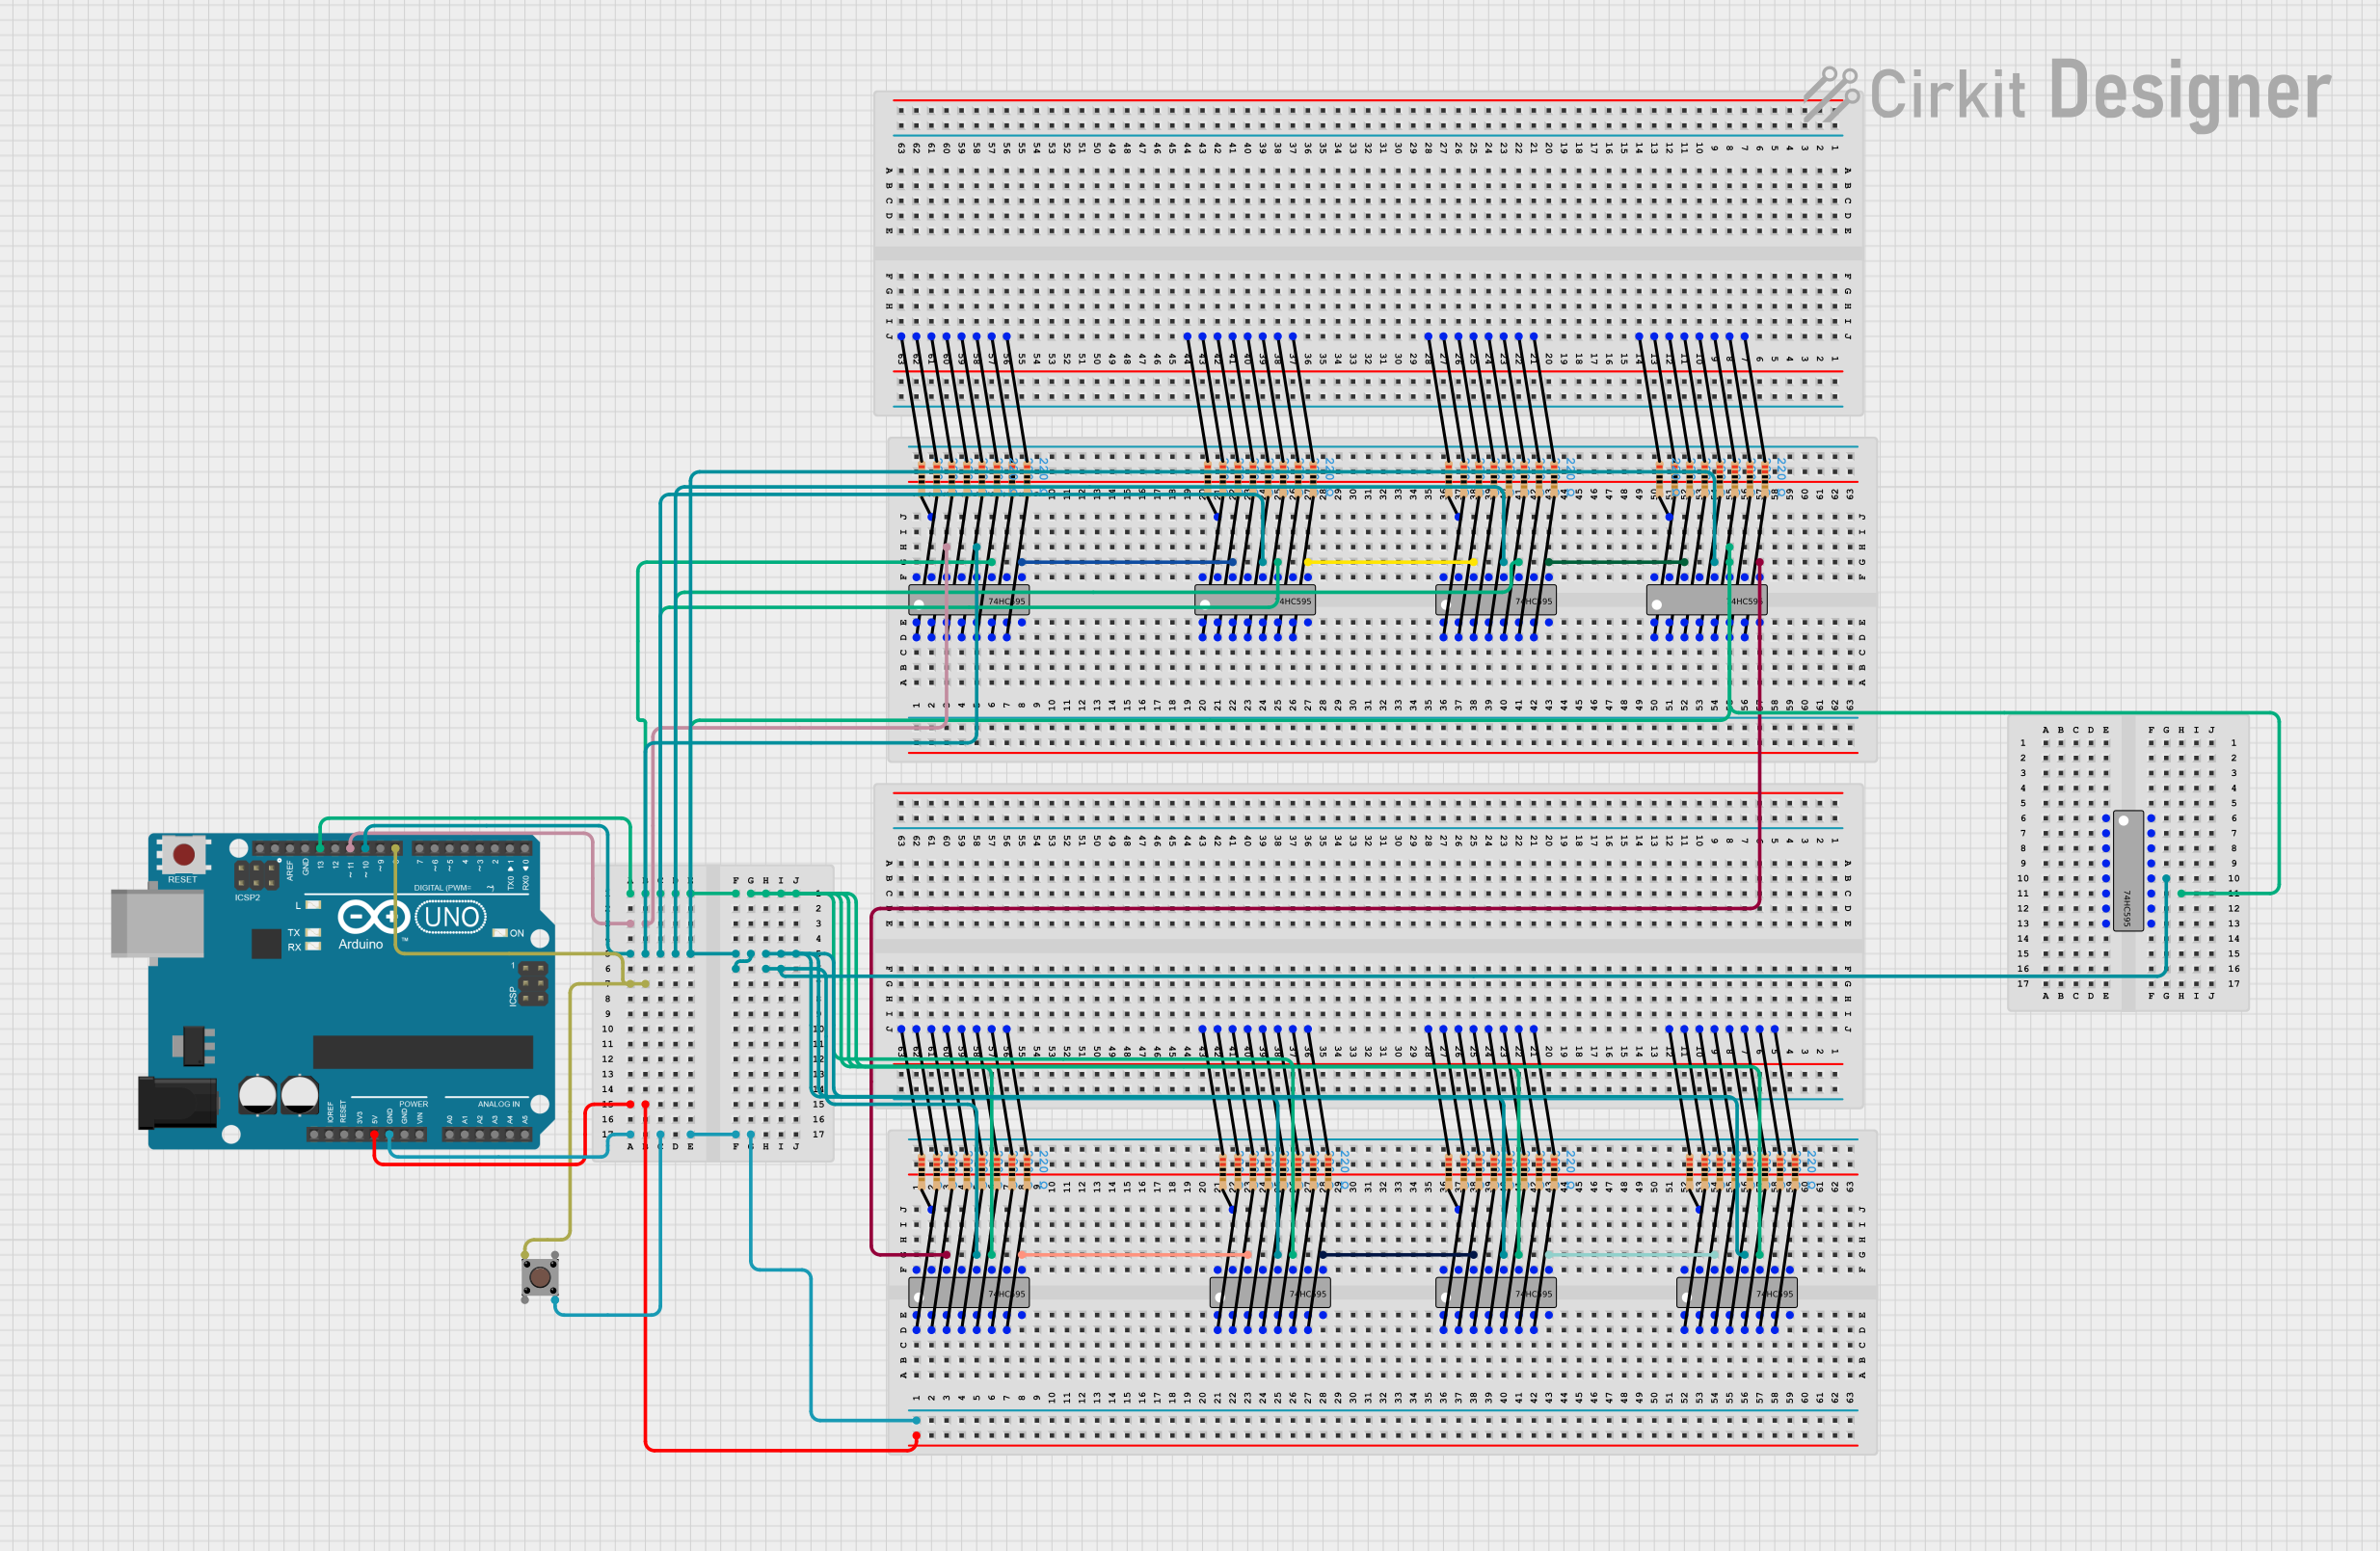
Example Circuit with Arduino UNO
// Example code to use 74HC157 with Arduino UNO

const int selPin = 2;  // Data select pin
const int enPin = 3;   // Enable pin (active low)
const int a1Pin = 4;   // Data input A1
const int b1Pin = 5;   // Data input B1
const int y1Pin = 6;   // Output Y1

void setup() {
  pinMode(selPin, OUTPUT);
  pinMode(enPin, OUTPUT);
  pinMode(a1Pin, INPUT);
  pinMode(b1Pin, INPUT);
  pinMode(y1Pin, OUTPUT);

  digitalWrite(enPin, LOW);  // Enable the multiplexer
}

void loop() {
  int a1 = digitalRead(a1Pin);  // Read data from source A1
  int b1 = digitalRead(b1Pin);  // Read data from source B1

  digitalWrite(selPin, LOW);  // Select source A
  digitalWrite(y1Pin, a1);    // Output data from source A1

  delay(1000);  // Wait for 1 second

  digitalWrite(selPin, HIGH);  // Select source B
  digitalWrite(y1Pin, b1);     // Output data from source B1

  delay(1000);  // Wait for 1 second
}
Troubleshooting and FAQs
Common Issues Users Might Face
No Output Signal:
- Solution: Ensure the enable pin (EN) is connected to ground. Check the power supply connections and verify that the input signals are within the specified voltage range.
Incorrect Data Output:
- Solution: Verify the data select pin (SEL) is correctly connected and toggling as expected. Check the connections of the data input pins (A1 to A4 and B1 to B4).
High Power Consumption:
- Solution: Ensure the enable pin is used to disable the outputs when not needed. Check for any short circuits or incorrect connections.
FAQs
Q1: Can the 74HC157 be used with a 3.3V power supply?
- A1: Yes, the 74HC157 can operate with a power supply ranging from 2V to 6V, so a 3.3V supply is within the acceptable range.
Q2: What happens if the enable pin is left floating?
- A2: The enable pin should not be left floating. It should be connected to ground to enable the outputs or to Vcc to disable the outputs.
Q3: Can I use the 74HC157 to multiplex analog signals?
- A3: The 74HC157 is designed for digital signals. For analog signals, consider using an analog multiplexer like the 74HC4051.
This documentation provides a comprehensive guide to using the 74HC157 quad 2-to-1 multiplexer. Whether you are a beginner or an experienced user, this guide will help you effectively integrate the 74HC157 into your projects.