
How to Use CRYSTAL: Examples, Pinouts, and Specs
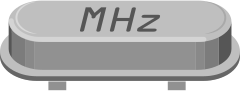
 Design with CRYSTAL in Cirkit Designer
Introduction
A crystal is a passive electronic component that oscillates at a specific frequency when an electric current is applied. It is primarily used for frequency stabilization in oscillators, clocks, and timing circuits. Crystals are highly valued for their precision and stability, making them essential in applications such as microcontrollers, communication systems, and digital electronics.
Explore Projects Built with CRYSTAL
 Open Project in Cirkit Designer
 Open Project in Cirkit Designer
 Open Project in Cirkit Designer
 Open Project in Cirkit Designer
Explore Projects Built with CRYSTAL
Open Project in Cirkit DesignerOpen Project in Cirkit DesignerOpen Project in Cirkit DesignerOpen Project in Cirkit DesignerCommon Applications and Use Cases
- Microcontroller clock sources (e.g., Arduino, PIC, STM32)
- Frequency stabilization in RF circuits
- Real-time clocks (RTC) for timekeeping
- Communication systems (e.g., radios, modems)
- Precision timing in digital systems
Technical Specifications
Below are the general technical specifications for a standard quartz crystal:
| Parameter | Value |
|---|---|
| Frequency Range | 32.768 kHz to 100 MHz (typical) |
| Load Capacitance | 6 pF to 32 pF |
| Frequency Tolerance | ±10 ppm to ±50 ppm |
| Operating Temperature | -20°C to +70°C (standard) |
| Equivalent Series Resistance (ESR) | 30 Ω to 200 Ω |
| Drive Level | 1 µW to 500 µW |
Pin Configuration and Descriptions
Crystals typically have two pins, as shown in the table below:
| Pin | Description |
|---|---|
| Pin 1 | Crystal terminal 1 (connect to oscillator circuit) |
| Pin 2 | Crystal terminal 2 (connect to oscillator circuit) |
Note: Crystals are non-polarized components, so the pins are interchangeable.
Usage Instructions
How to Use a Crystal in a Circuit
- Connect to an Oscillator Circuit: Crystals are typically used with an external oscillator circuit, such as a Pierce oscillator. The circuit requires additional components like capacitors and resistors to function properly.
- Select Proper Load Capacitance: Ensure the load capacitance matches the crystal's specifications. This is critical for accurate frequency generation.
- Place Near the Microcontroller: For microcontroller applications, place the crystal as close as possible to the microcontroller's clock input pins to minimize noise and signal degradation.
- Use Decoupling Capacitors: Add decoupling capacitors near the power supply pins of the microcontroller to reduce noise.
Example: Using a 16 MHz Crystal with Arduino UNO
The Arduino UNO uses a 16 MHz crystal for its clock. Below is an example of how to connect a crystal to an ATmega328P microcontroller (used in Arduino UNO):
Circuit Diagram
- Connect the two pins of the 16 MHz crystal to the XTAL1 and XTAL2 pins of the ATmega328P.
- Add two 22 pF capacitors, one from each crystal pin to ground.
Sample Code
The crystal itself does not require programming, but here is an example of how the Arduino UNO uses the crystal for timing in a basic blink program:
// Blink an LED connected to pin 13
void setup() {
  pinMode(13, OUTPUT); // Set pin 13 as an output
}

void loop() {
  digitalWrite(13, HIGH); // Turn the LED on
  delay(1000);            // Wait for 1 second (timing depends on crystal)
  digitalWrite(13, LOW);  // Turn the LED off
  delay(1000);            // Wait for 1 second
}
Note: The crystal ensures the microcontroller operates at the correct clock frequency, which directly affects the timing of functions like
delay().
Important Considerations and Best Practices
- Avoid Excessive Drive Levels: Operating the crystal beyond its rated drive level can damage it or reduce its lifespan.
- Minimize Noise: Keep the crystal and associated components away from high-frequency or high-current traces to avoid interference.
- Use Proper PCB Layout: Ensure short and direct traces between the crystal and the oscillator circuit to maintain signal integrity.
Troubleshooting and FAQs
Common Issues
Crystal Not Oscillating
- Cause: Incorrect load capacitance or improper circuit design.
- Solution: Verify the load capacitance matches the crystal's specifications and check the oscillator circuit connections.
Frequency Drift
- Cause: Temperature variations or aging of the crystal.
- Solution: Use a temperature-compensated crystal oscillator (TCXO) for applications requiring high stability.
Microcontroller Not Booting
- Cause: Faulty crystal or incorrect placement.
- Solution: Ensure the crystal is functional and placed close to the microcontroller's clock pins.
FAQs
Q: Can I use any crystal with my microcontroller?
A: No, you must use a crystal with a frequency and load capacitance compatible with your microcontroller's specifications.
Q: How do I test if a crystal is working?
A: Use an oscilloscope to check for oscillation at the crystal's specified frequency when connected to an oscillator circuit.
Q: What happens if I use the wrong load capacitance?
A: The crystal may oscillate at an incorrect frequency or fail to oscillate entirely.
By following this documentation, you can effectively use a crystal in your electronic projects and troubleshoot common issues.