Cirkit Designer
Your all-in-one circuit design IDE
Home /
Component Documentation
How to Use MQ 138: Examples, Pinouts, and Specs
Introduction
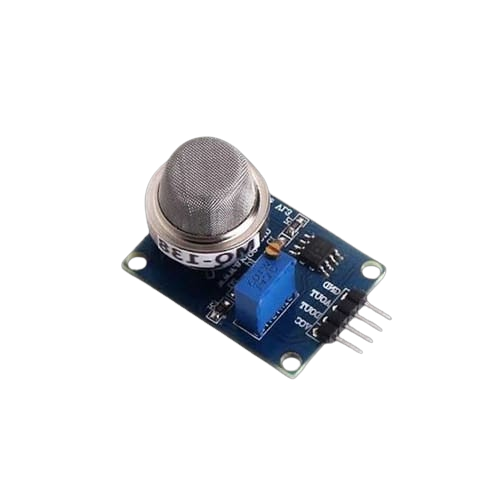
The MQ-138 is a versatile gas sensor designed to detect a variety of gases, including benzene, alcohol, and smoke. Manufactured by Arduino, this sensor is widely used in air quality monitoring systems and industrial applications. Its high sensitivity and fast response time make it an ideal choice for detecting harmful gases in the environment.
Explore Projects Built with MQ 138
Arduino UNO Based Air Quality Monitoring and GSM Notification System
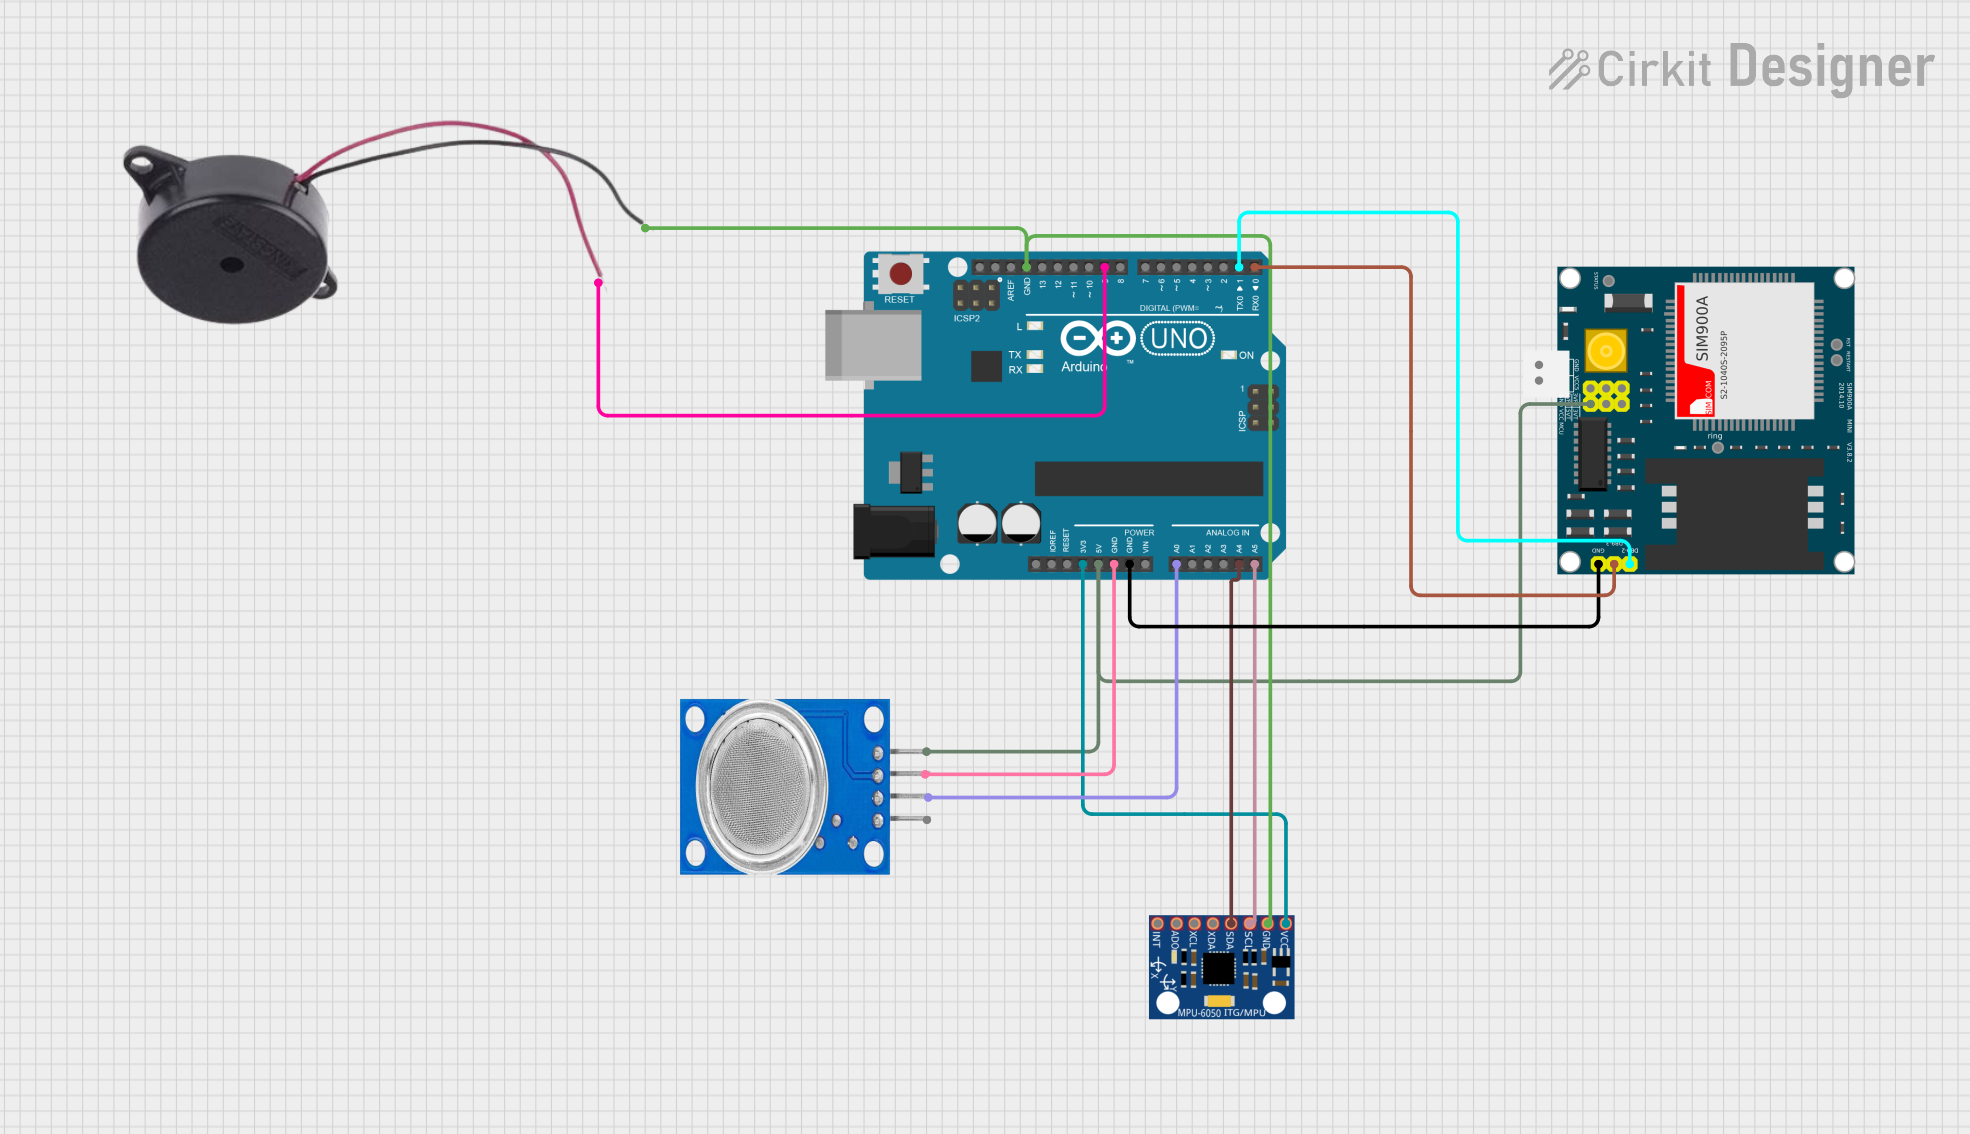
This circuit features an Arduino UNO microcontroller interfaced with an MQ135 air quality sensor, an MPU-6050 accelerometer/gyroscope, a SIM900A GSM communication module, and a buzzer. The Arduino reads analog data from the MQ135 sensor and communicates with the MPU-6050 via I2C, while also controlling the buzzer and handling serial communication with the SIM900A module. The purpose of this circuit is likely to monitor air quality and motion, provide alerts through the buzzer, and enable remote communication via GSM.
Solar-Powered Environmental Monitoring Station with ESP32 and Gas Sensors
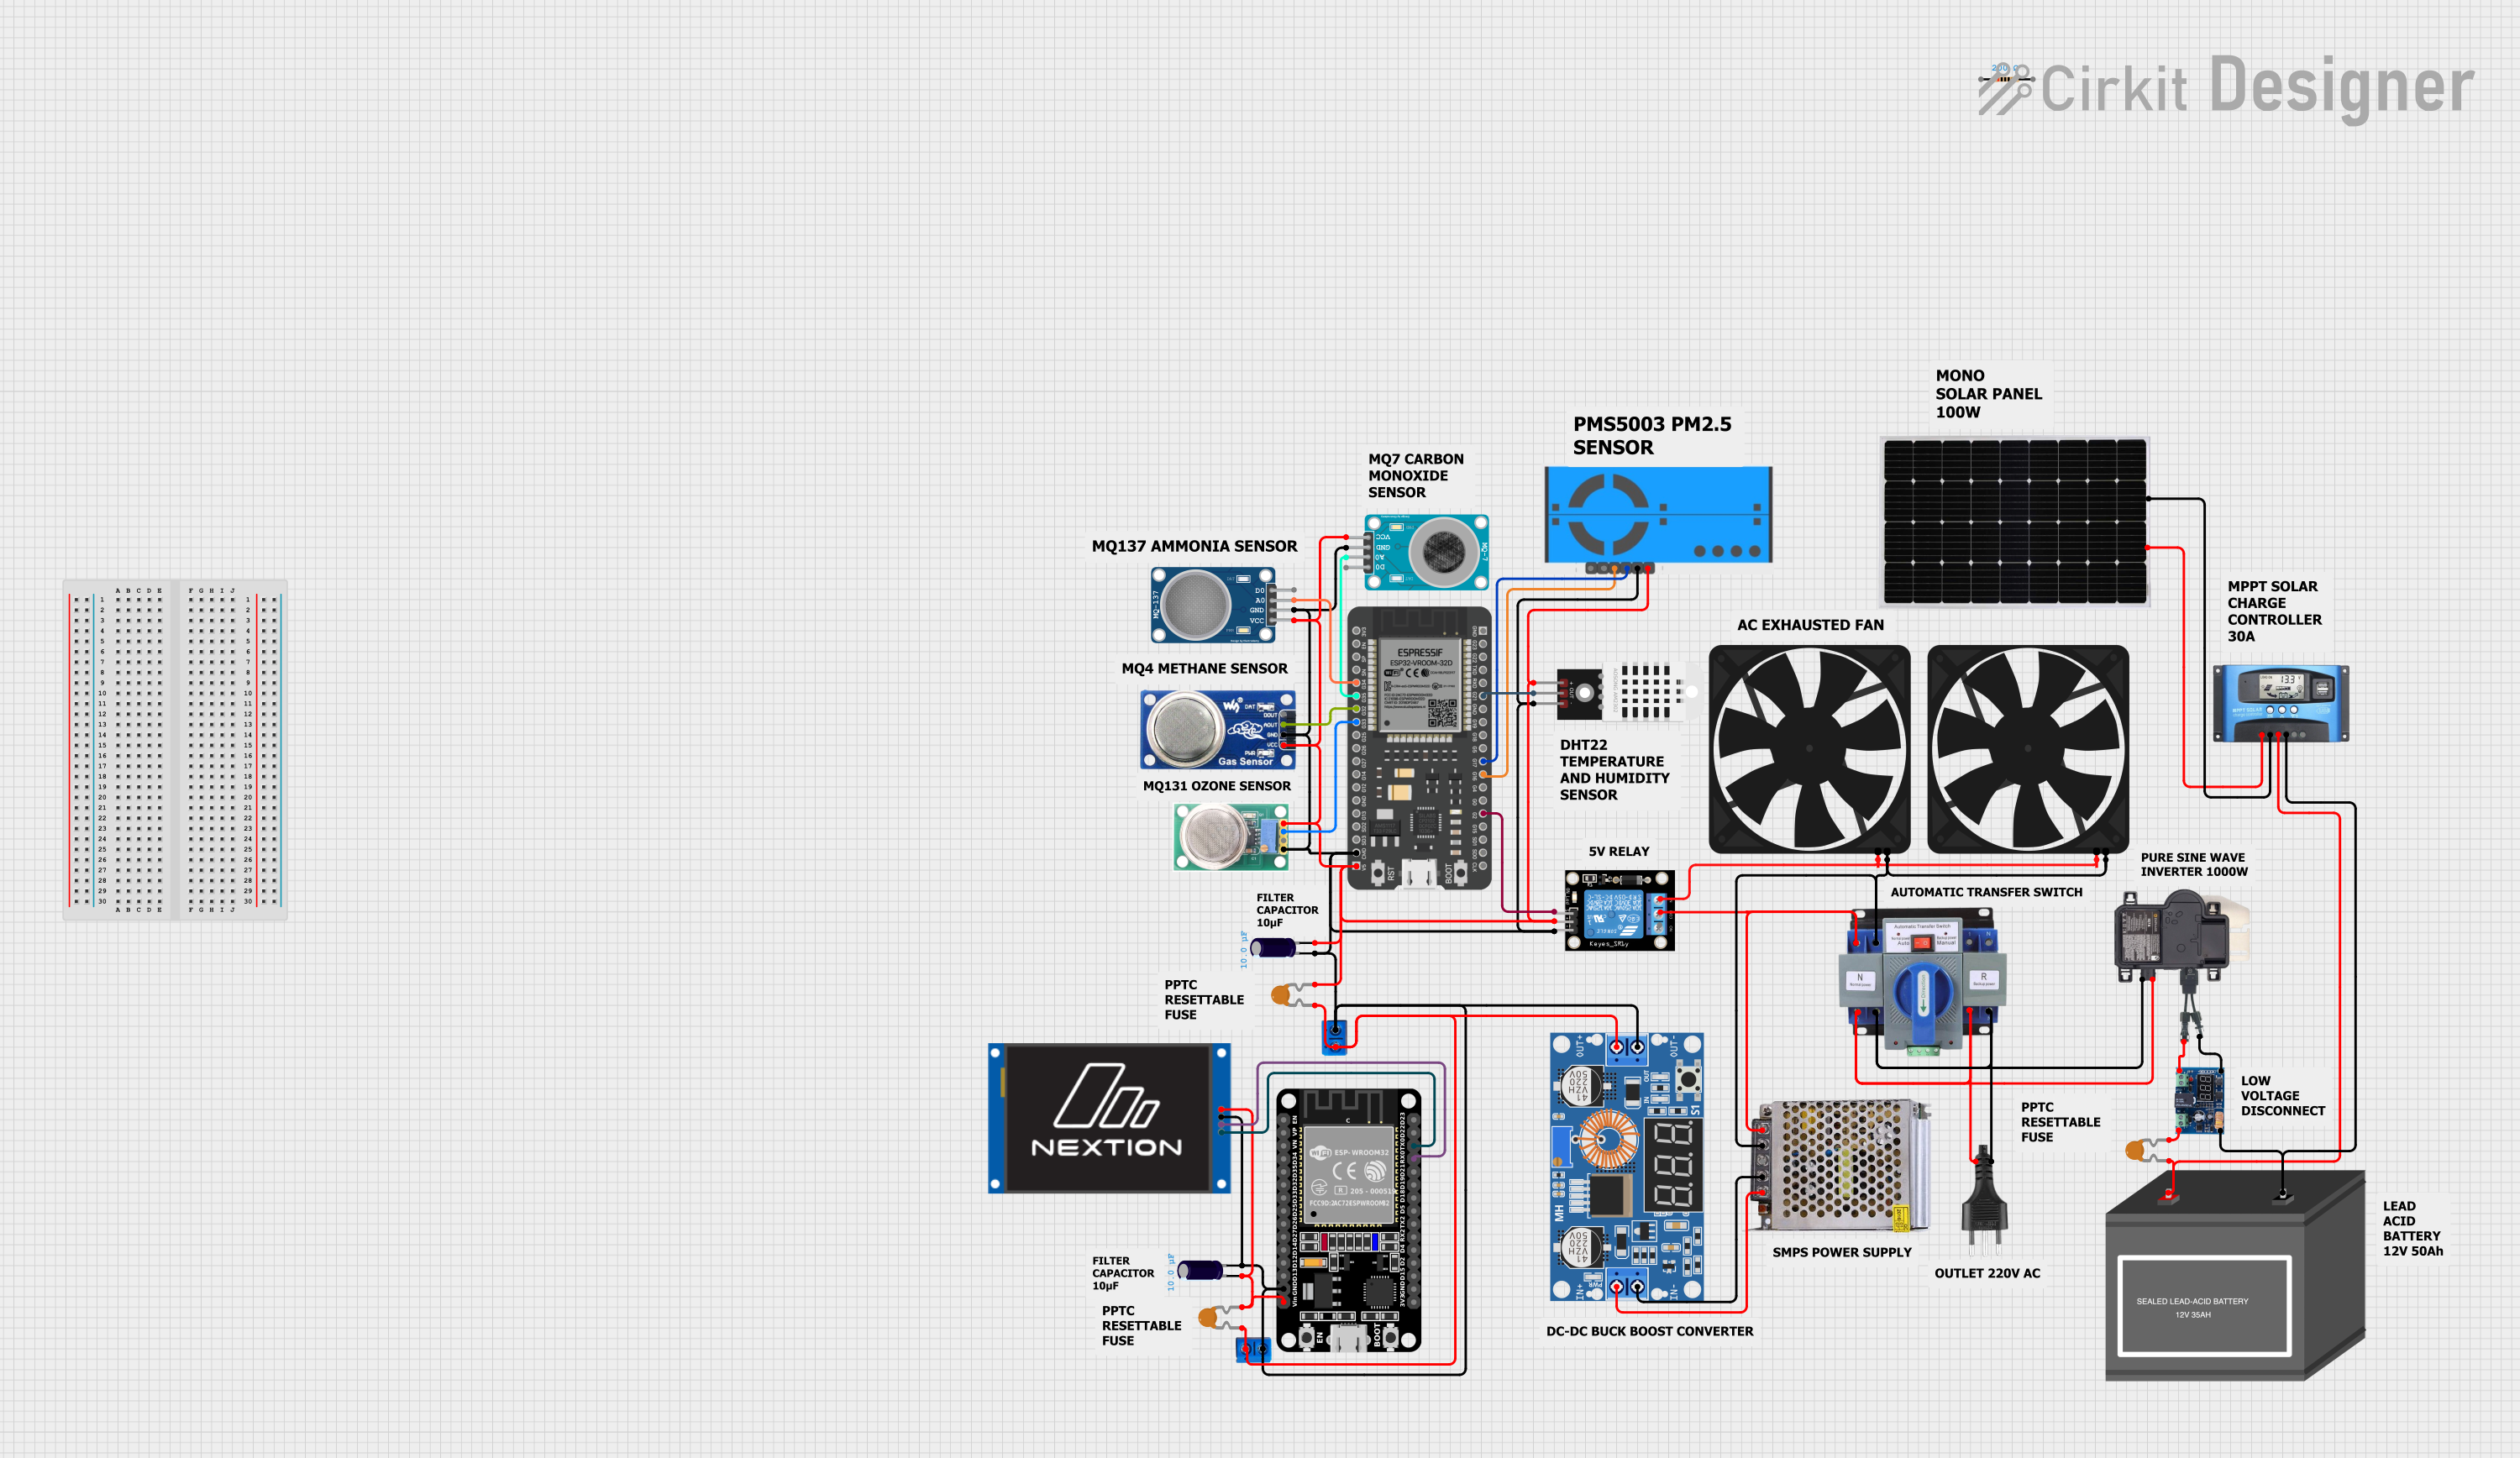
This circuit is designed to monitor various gas levels and air quality using a set of sensors (MQ-136, MQ-6, MQ-137, MQ-7, and PMS5003) interfaced with an ESP32 microcontroller. The ESP32 collects sensor data and can control a relay module potentially for activating systems like fans or alarms based on the sensor readings. Additional components include a DHT22 for temperature and humidity readings, a power supply with a step-down converter, and safety features like resettable fuses and an LVD (Low Voltage Disconnect) to protect the battery and circuit.
Arduino UNO Air Quality Monitor with LED Indicator and Piezo Speaker
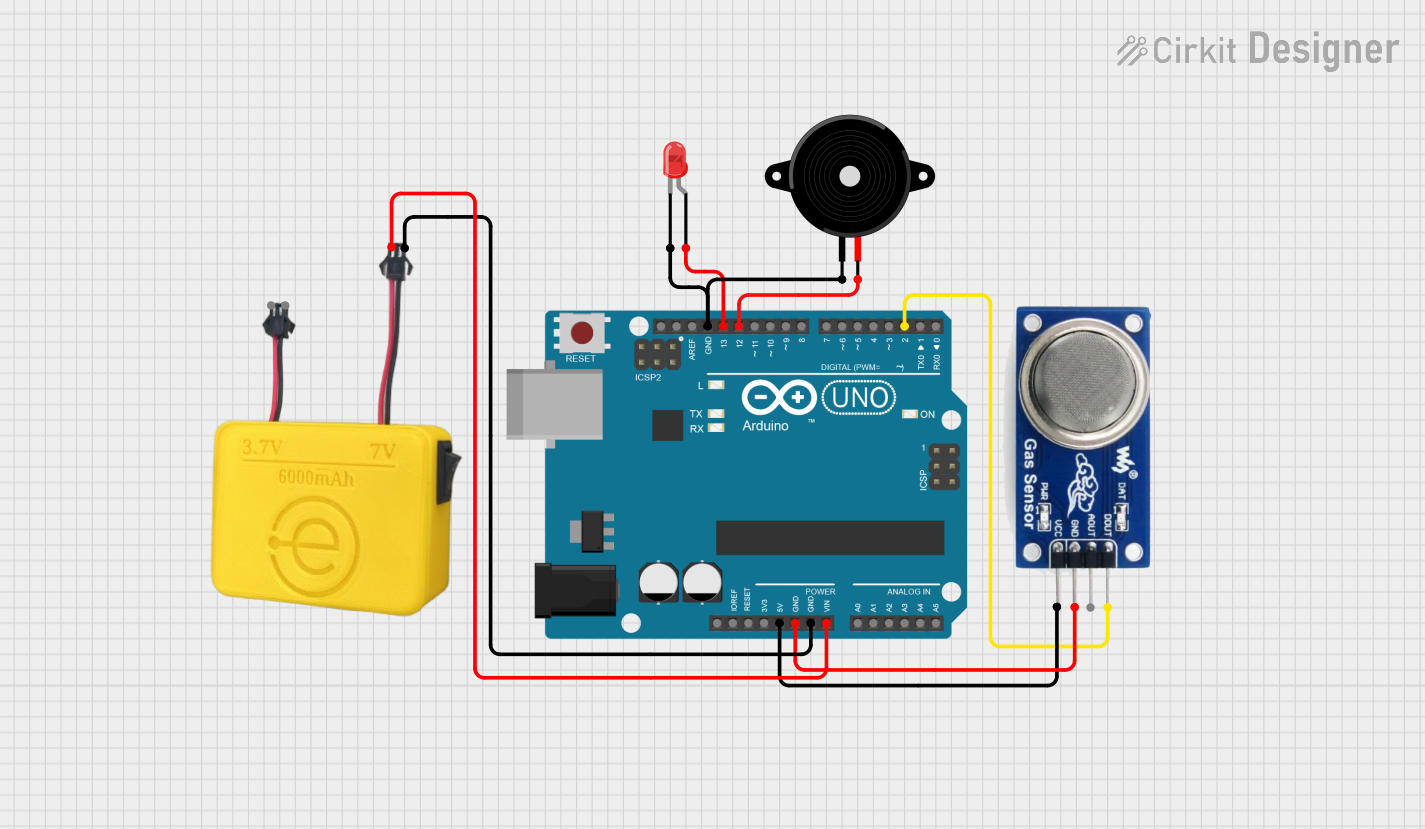
This circuit uses an Arduino UNO to monitor air quality via an MQ 135 sensor and provides visual and auditory feedback using an LED and a piezo speaker. The Arduino is powered by a MAHIR 7.0 power supply, and the LED and speaker are controlled through digital pins D13 and D12, respectively.
Multi-Gas Detection System with Arduino and MQ Sensors
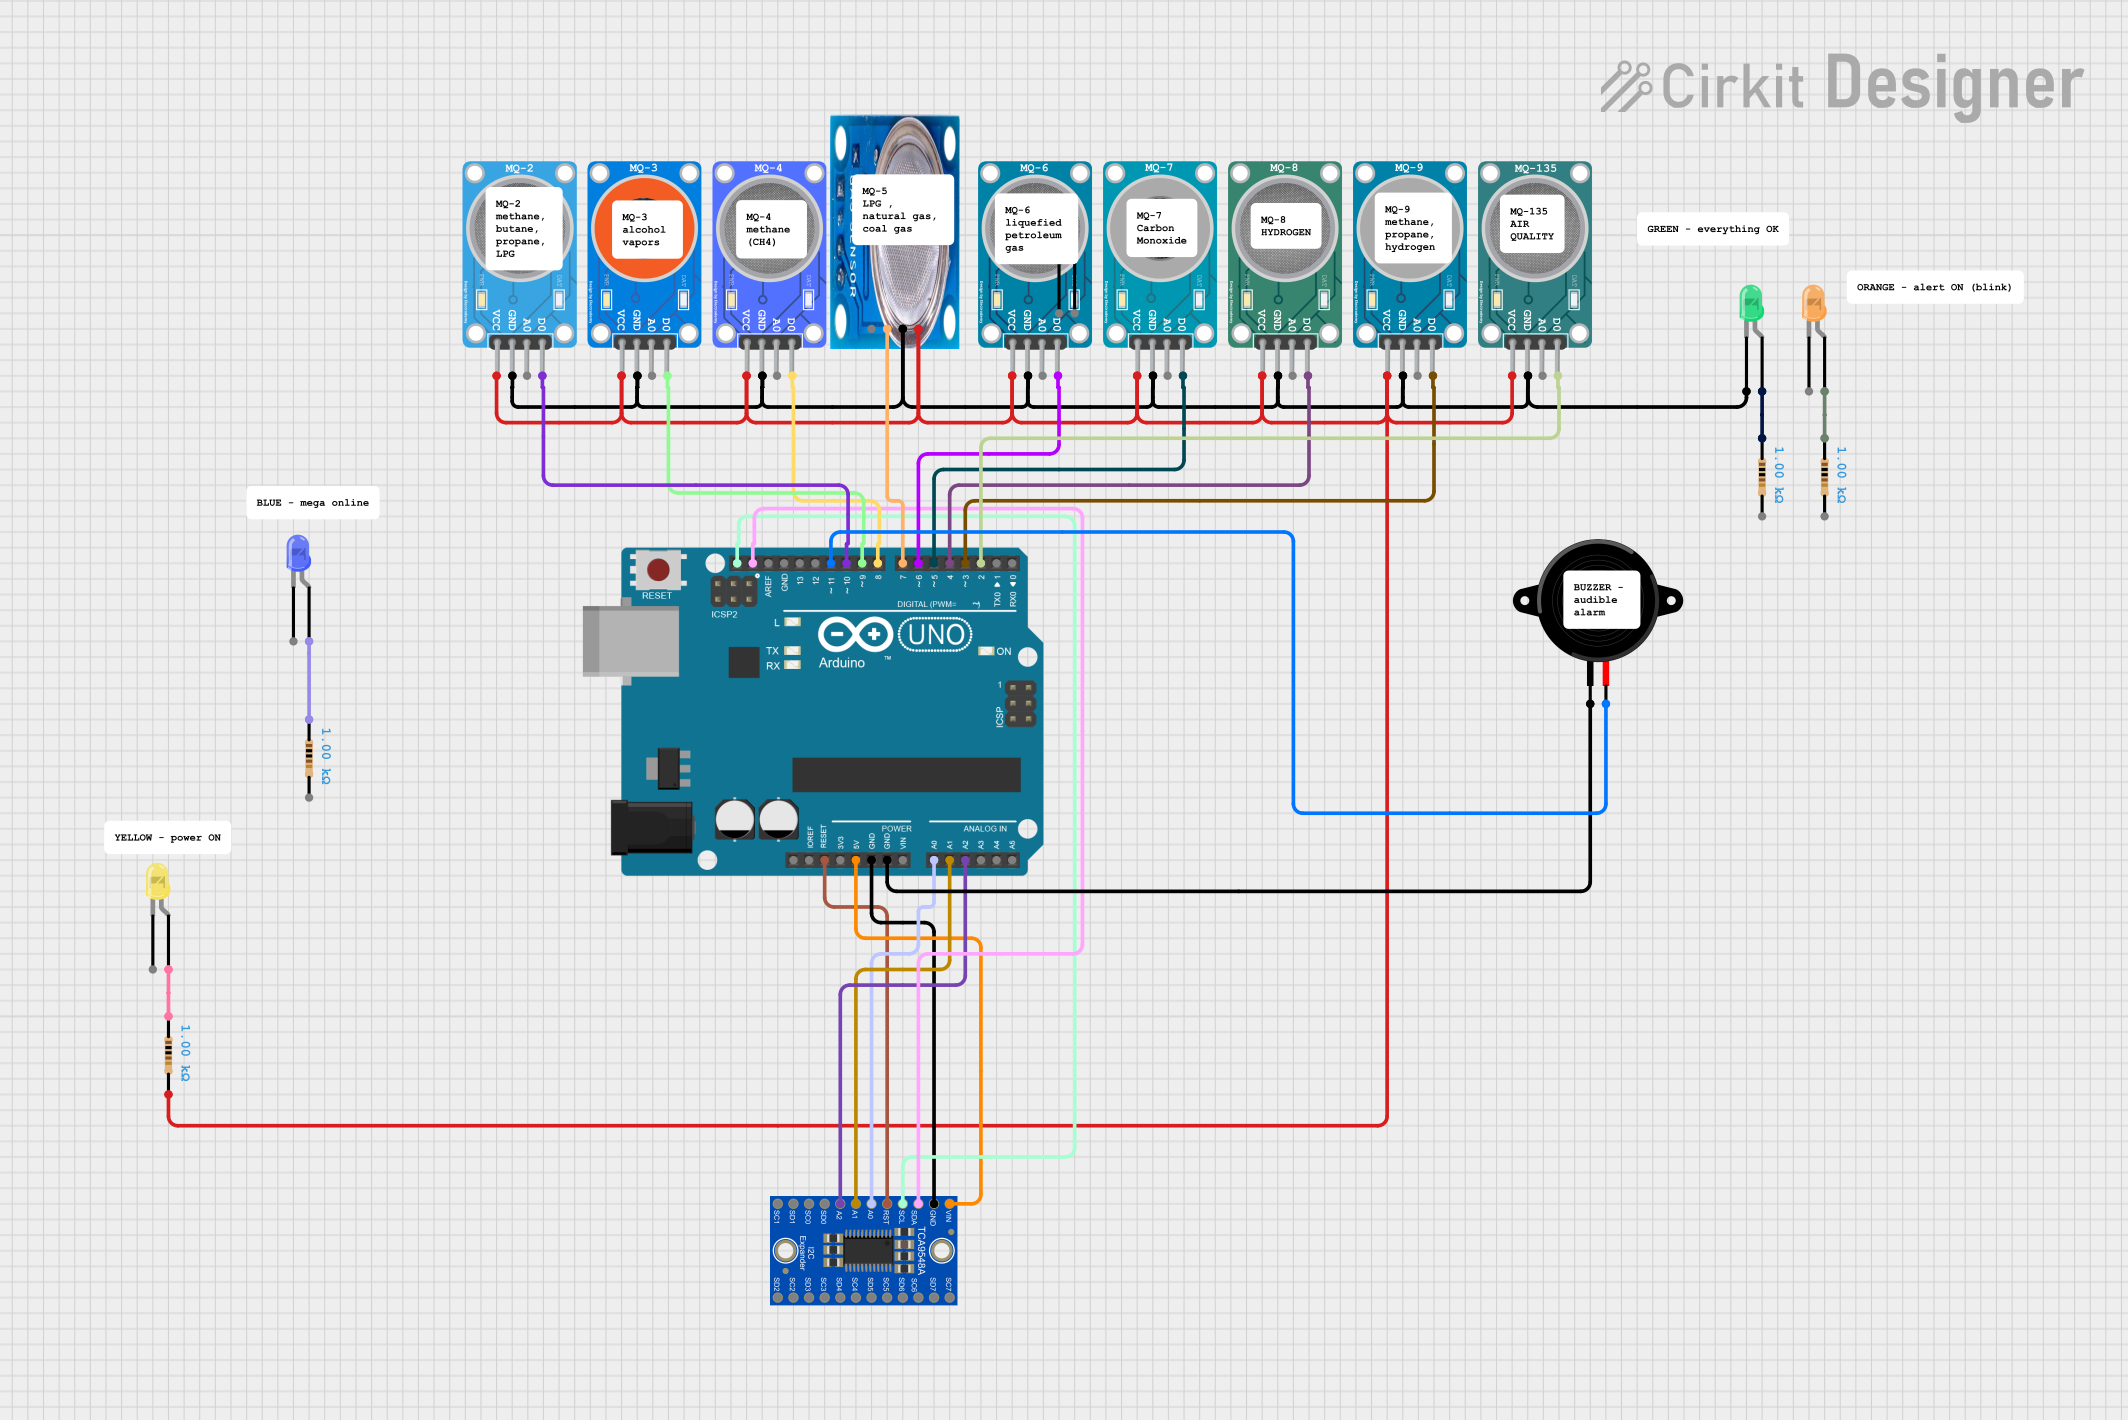
This circuit is designed to monitor various gases using a series of MQ gas sensors (MQ-2, MQ-3, MQ-4, MQ-5, MQ-6, MQ-7, MQ-8, MQ-9, and MQ-135), each providing digital outputs to an Arduino UNO microcontroller. The Arduino is also connected to a piezo speaker for audible alerts and multiple LEDs with resistors, likely for visual status indicators. An Adafruit TCA9548A I2C multiplexer is included, suggesting the potential for I2C sensor expansion or managing multiple I2C devices.
Explore Projects Built with MQ 138
Arduino UNO Based Air Quality Monitoring and GSM Notification System
This circuit features an Arduino UNO microcontroller interfaced with an MQ135 air quality sensor, an MPU-6050 accelerometer/gyroscope, a SIM900A GSM communication module, and a buzzer. The Arduino reads analog data from the MQ135 sensor and communicates with the MPU-6050 via I2C, while also controlling the buzzer and handling serial communication with the SIM900A module. The purpose of this circuit is likely to monitor air quality and motion, provide alerts through the buzzer, and enable remote communication via GSM.
Solar-Powered Environmental Monitoring Station with ESP32 and Gas Sensors
This circuit is designed to monitor various gas levels and air quality using a set of sensors (MQ-136, MQ-6, MQ-137, MQ-7, and PMS5003) interfaced with an ESP32 microcontroller. The ESP32 collects sensor data and can control a relay module potentially for activating systems like fans or alarms based on the sensor readings. Additional components include a DHT22 for temperature and humidity readings, a power supply with a step-down converter, and safety features like resettable fuses and an LVD (Low Voltage Disconnect) to protect the battery and circuit.
Arduino UNO Air Quality Monitor with LED Indicator and Piezo Speaker
This circuit uses an Arduino UNO to monitor air quality via an MQ 135 sensor and provides visual and auditory feedback using an LED and a piezo speaker. The Arduino is powered by a MAHIR 7.0 power supply, and the LED and speaker are controlled through digital pins D13 and D12, respectively.
Multi-Gas Detection System with Arduino and MQ Sensors
This circuit is designed to monitor various gases using a series of MQ gas sensors (MQ-2, MQ-3, MQ-4, MQ-5, MQ-6, MQ-7, MQ-8, MQ-9, and MQ-135), each providing digital outputs to an Arduino UNO microcontroller. The Arduino is also connected to a piezo speaker for audible alerts and multiple LEDs with resistors, likely for visual status indicators. An Adafruit TCA9548A I2C multiplexer is included, suggesting the potential for I2C sensor expansion or managing multiple I2C devices.
Technical Specifications
Key Technical Details
| Parameter | Value |
|---|---|
| Operating Voltage | 5V |
| Load Resistance | 10kΩ |
| Heating Resistance | 33Ω ± 5% |
| Heating Power | ≤ 800mW |
| Sensitivity Range | 10 - 1000 ppm (benzene) |
| Preheat Time | ≥ 24 hours |
| Response Time | ≤ 10 seconds |
| Recovery Time | ≤ 30 seconds |
| Operating Temperature | -20°C to 50°C |
| Humidity Range | 95% RH |
Pin Configuration and Descriptions
| Pin No. | Pin Name | Description |
|---|---|---|
| 1 | VCC | Power supply (5V) |
| 2 | GND | Ground |
| 3 | AOUT | Analog output voltage |
| 4 | DOUT | Digital output voltage (threshold-based) |
| 5 | H1 | Heater coil connection 1 |
| 6 | H2 | Heater coil connection 2 |
Usage Instructions
How to Use the Component in a Circuit
- Power Supply: Connect the VCC pin to a 5V power supply and the GND pin to the ground.
- Analog Output: Connect the AOUT pin to an analog input pin on your microcontroller (e.g., Arduino UNO).
- Digital Output: Connect the DOUT pin to a digital input pin on your microcontroller if you want to use the threshold-based digital output.
- Heater Connections: Connect H1 and H2 to the heater coil as per the datasheet instructions.
Important Considerations and Best Practices
- Preheat Time: Ensure the sensor is preheated for at least 24 hours before initial use to achieve accurate readings.
- Calibration: Calibrate the sensor in a clean air environment to set a baseline for gas detection.
- Placement: Place the sensor in a well-ventilated area to avoid false readings due to stagnant air.
- Power Supply: Use a stable 5V power supply to ensure consistent sensor performance.
Sample Arduino Code
// MQ-138 Gas Sensor with Arduino UNO
const int analogPin = A0; // Analog input pin for AOUT
const int digitalPin = 2; // Digital input pin for DOUT
int analogValue = 0;      // Variable to store the analog value
int digitalValue = 0;     // Variable to store the digital value

void setup() {
  Serial.begin(9600);     // Initialize serial communication
  pinMode(digitalPin, INPUT); // Set digital pin as input
}

void loop() {
  analogValue = analogRead(analogPin); // Read the analog value
  digitalValue = digitalRead(digitalPin); // Read the digital value

  // Print the values to the Serial Monitor
  Serial.print("Analog Value: ");
  Serial.print(analogValue);
  Serial.print(" | Digital Value: ");
  Serial.println(digitalValue);

  delay(1000); // Wait for 1 second before the next reading
}
Troubleshooting and FAQs
Common Issues Users Might Face
- Inaccurate Readings: If the sensor provides inaccurate readings, ensure it has been preheated for at least 24 hours and is placed in a well-ventilated area.
- No Output: If there is no output from the sensor, check the power supply connections and ensure the sensor is receiving 5V.
- Fluctuating Readings: Fluctuating readings can be caused by unstable power supply or environmental factors. Use a stable power source and place the sensor away from direct airflow.
Solutions and Tips for Troubleshooting
- Check Connections: Ensure all connections are secure and correct as per the pin configuration.
- Stable Power Supply: Use a regulated power supply to avoid fluctuations in sensor readings.
- Environmental Factors: Place the sensor in a stable environment to avoid false readings due to sudden changes in temperature or humidity.
By following this documentation, users can effectively integrate the MQ-138 gas sensor into their projects, ensuring accurate and reliable gas detection.