How to Use Thermal protection KSD9700: Examples, Pinouts, and Specs
Introduction
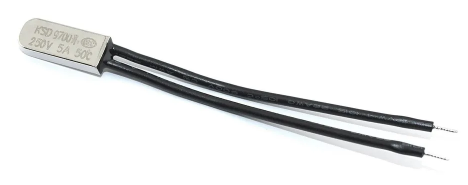
The KSD9700 is a thermal protection switch designed to safeguard electrical devices from overheating. Manufactured by N with the part ID 123321, this component operates by automatically opening or closing a circuit when a specific temperature threshold is reached. It is widely used in applications requiring over-temperature protection, ensuring the safety and longevity of electronic systems.
Explore Projects Built with Thermal protection KSD9700


Explore Projects Built with Thermal protection KSD9700
Common Applications
- Over-temperature protection in motors, transformers, and power supplies
- Temperature control in household appliances (e.g., irons, heaters, coffee makers)
- Thermal management in battery packs and chargers
- Industrial equipment requiring thermal safety mechanisms
Technical Specifications
Key Technical Details
| Parameter | Value |
|---|---|
| Manufacturer | N |
| Part ID | 123321 |
| Operating Voltage | AC 250V / DC 48V (maximum) |
| Rated Current | 5A (maximum) |
| Operating Temperature | 0°C to 150°C (varies by model) |
| Temperature Tolerance | ±5°C |
| Contact Type | Normally Closed (NC) or Normally Open (NO) |
| Insulation Resistance | ≥100MΩ |
| Dielectric Strength | AC 1500V for 1 minute |
| Housing Material | Plastic or metal |
| Dimensions | 20mm x 7mm x 3.5mm (approximate) |
Pin Configuration and Descriptions
The KSD9700 is a two-terminal device with no polarity. The terminals are connected as follows:
| Pin Number | Description |
|---|---|
| 1 | Input terminal for circuit connection |
| 2 | Output terminal for circuit connection |
Usage Instructions
How to Use the KSD9700 in a Circuit
- Determine the Temperature Threshold: Select the appropriate KSD9700 model based on the desired operating temperature. The temperature threshold is typically printed on the component.
- Identify the Contact Type: Verify whether the KSD9700 is Normally Closed (NC) or Normally Open (NO).
- NC: The circuit remains closed until the temperature exceeds the threshold.
- NO: The circuit remains open until the temperature exceeds the threshold.
- Connect the Terminals:
- For NC models, connect the KSD9700 in series with the load to interrupt the circuit when overheating occurs.
- For NO models, connect the KSD9700 in parallel with the load to close the circuit when the temperature rises.
- Secure the Component: Attach the KSD9700 to the surface or device requiring thermal protection using a thermal adhesive or mounting bracket. Ensure good thermal contact for accurate temperature sensing.
- Test the Circuit: Power the circuit and verify that the KSD9700 operates as expected at the specified temperature threshold.
Important Considerations
- Temperature Tolerance: Account for the ±5°C tolerance when selecting the KSD9700 model.
- Current Rating: Ensure the load current does not exceed the 5A maximum rating.
- Mounting: Avoid excessive mechanical stress on the component during installation.
- Insulation: If using a metal-housed KSD9700, ensure proper insulation to prevent short circuits.
Example: Using KSD9700 with Arduino UNO
The KSD9700 can be used with an Arduino UNO to monitor temperature changes. Below is an example of how to connect and program the KSD9700 (NC model) with an LED indicator.
Circuit Diagram
- Connect one terminal of the KSD9700 to Arduino digital pin 2.
- Connect the other terminal to GND.
- Add a pull-up resistor (10kΩ) between digital pin 2 and 5V.
- Connect an LED to digital pin 13 with a 220Ω resistor.
Arduino Code
// Define pin connections
const int ksdPin = 2;  // KSD9700 connected to digital pin 2
const int ledPin = 13; // LED connected to digital pin 13

void setup() {
  pinMode(ksdPin, INPUT_PULLUP); // Set KSD9700 pin as input with pull-up
  pinMode(ledPin, OUTPUT);       // Set LED pin as output
  digitalWrite(ledPin, LOW);     // Turn off LED initially
  Serial.begin(9600);            // Initialize serial communication
}

void loop() {
  int ksdState = digitalRead(ksdPin); // Read the state of the KSD9700

  if (ksdState == HIGH) {
    // KSD9700 is open (temperature exceeded threshold)
    digitalWrite(ledPin, HIGH); // Turn on LED
    Serial.println("Over-temperature detected!");
  } else {
    // KSD9700 is closed (temperature below threshold)
    digitalWrite(ledPin, LOW);  // Turn off LED
    Serial.println("Temperature is normal.");
  }

  delay(500); // Wait for 500ms before next reading
}
Troubleshooting and FAQs
Common Issues and Solutions
| Issue | Possible Cause | Solution |
|---|---|---|
| KSD9700 does not trigger at the expected temperature | Incorrect model or temperature tolerance | Verify the model and ensure it matches the desired threshold. |
| Circuit does not open/close as expected | Incorrect wiring or contact type | Double-check the wiring and confirm the contact type (NC or NO). |
| Component overheats or fails | Exceeded current or voltage rating | Ensure the load does not exceed the rated 5A or 250V. |
| Inconsistent operation | Poor thermal contact or loose connections | Secure the KSD9700 firmly to the surface and check connections. |
FAQs
Can the KSD9700 be used for both AC and DC circuits? Yes, the KSD9700 supports both AC (up to 250V) and DC (up to 48V) circuits.
How do I identify the temperature threshold of my KSD9700? The temperature threshold is typically printed on the component housing (e.g., "75°C").
What happens if I exceed the rated current or voltage? Exceeding the ratings can damage the KSD9700 or cause it to fail prematurely. Always operate within the specified limits.
Can I use the KSD9700 for precise temperature control? The KSD9700 is designed for thermal protection, not precise temperature control. For precise control, consider using a thermistor or temperature sensor.
By following this documentation, you can effectively integrate the KSD9700 into your projects for reliable thermal protection.