
How to Use Arduino NANO terminal adapter: Examples, Pinouts, and Specs
 Design with Arduino NANO terminal adapter in Cirkit Designer
Introduction
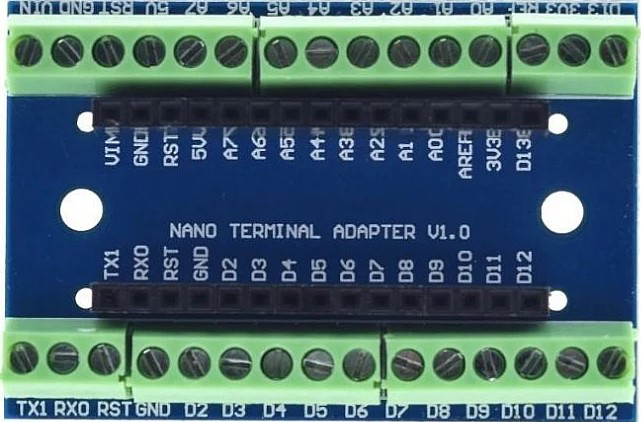
The Arduino NANO Terminal Adapter is a compact interface board designed to simplify the connection of external devices to an Arduino NANO microcontroller. It provides a convenient way to access all the pins of the Arduino NANO via screw terminals, making it ideal for prototyping and development. This adapter eliminates the need for soldering and ensures secure and reliable connections, especially in projects requiring frequent modifications.
Explore Projects Built with Arduino NANO terminal adapter
 Open Project in Cirkit Designer
 Open Project in Cirkit Designer
 Open Project in Cirkit Designer
 Open Project in Cirkit Designer
Explore Projects Built with Arduino NANO terminal adapter
Open Project in Cirkit DesignerOpen Project in Cirkit DesignerOpen Project in Cirkit DesignerOpen Project in Cirkit DesignerCommon Applications and Use Cases
- Rapid prototyping of Arduino NANO-based projects
- Educational purposes for learning microcontroller interfacing
- Robotics and IoT projects requiring secure connections
- Testing and debugging circuits with external sensors or actuators
- Projects requiring frequent reconfiguration of connections
Technical Specifications
- Compatible Microcontroller: Arduino NANO (all versions)
- Input Voltage: Matches the Arduino NANO's input voltage (typically 5V or 3.3V)
- Pin Access: All Arduino NANO pins are broken out to screw terminals
- Dimensions: Approximately 60mm x 30mm
- Mounting: Includes mounting holes for secure installation
- Additional Features:
- Power indicator LED
- Reset button accessible via the adapter
- Screw terminals for secure and reliable connections
- Pin headers for optional jumper wire connections
Pin Configuration and Descriptions
The Arduino NANO Terminal Adapter provides access to all the pins of the Arduino NANO. Below is a table describing the pin layout:
| Pin Name | Description | Screw Terminal | Header Pin |
|---|---|---|---|
| VIN | Input voltage for the Arduino NANO | Yes | Yes |
| GND | Ground connection | Yes | Yes |
| 5V | 5V output from the Arduino NANO | Yes | Yes |
| 3.3V | 3.3V output from the Arduino NANO | Yes | Yes |
| A0 - A7 | Analog input pins | Yes | Yes |
| D0 - D13 | Digital I/O pins | Yes | Yes |
| TX, RX | Serial communication pins | Yes | Yes |
| RESET | Reset pin for the Arduino NANO | Yes | Yes |
Usage Instructions
How to Use the Component in a Circuit
- Insert the Arduino NANO: Align the Arduino NANO's pins with the corresponding female headers on the terminal adapter and gently press it into place.
- Connect External Devices: Use the screw terminals to securely connect wires from external devices (e.g., sensors, motors, LEDs) to the appropriate pins.
- Power the Board: Provide power to the Arduino NANO through the VIN pin, USB port, or an external power source.
- Upload Code: Connect the Arduino NANO to your computer via USB and upload your code using the Arduino IDE.
- Test Connections: Verify that all connections are secure and that the circuit functions as expected.
Important Considerations and Best Practices
- Avoid Over-Tightening: When using the screw terminals, avoid over-tightening the screws to prevent damage to the wires or the terminal block.
- Check Polarity: Ensure correct polarity when connecting power and other components to avoid damaging the Arduino NANO or external devices.
- Use Proper Wire Gauge: Use wires of appropriate gauge (e.g., 22-26 AWG) for secure connections in the screw terminals.
- Secure Mounting: If the adapter is used in a permanent setup, use the mounting holes to secure it to a base or enclosure.
- Reset Button Access: The reset button on the adapter can be used to restart the Arduino NANO without disconnecting power.
Example Code for Arduino NANO
Below is an example code snippet for blinking an LED connected to pin D13 via the terminal adapter:
// Blink an LED connected to pin D13
// Ensure the LED's anode is connected to D13 and cathode to GND

void setup() {
  pinMode(13, OUTPUT); // Set pin D13 as an output
}

void loop() {
  digitalWrite(13, HIGH); // Turn the LED on
  delay(1000);            // Wait for 1 second
  digitalWrite(13, LOW);  // Turn the LED off
  delay(1000);            // Wait for 1 second
}
Troubleshooting and FAQs
Common Issues Users Might Face
Loose Connections:
- Problem: Wires may come loose from the screw terminals.
- Solution: Ensure wires are securely fastened and use proper wire gauge.
Incorrect Pin Mapping:
- Problem: Devices do not function as expected due to incorrect pin connections.
- Solution: Double-check the pin mapping and ensure connections match the Arduino NANO's pinout.
Power Issues:
- Problem: The Arduino NANO does not power on or external devices do not function.
- Solution: Verify the power source and ensure correct voltage is supplied to the VIN or USB port.
Reset Button Not Working:
- Problem: Pressing the reset button does not restart the Arduino NANO.
- Solution: Ensure the Arduino NANO is properly seated in the adapter and that the reset button is not obstructed.
Solutions and Tips for Troubleshooting
- Use a multimeter to check for continuity and proper voltage levels at the screw terminals.
- If a device is not responding, test it independently to ensure it is functioning correctly.
- Refer to the Arduino NANO's datasheet for detailed pin descriptions and electrical characteristics.
By following this documentation, users can effectively utilize the Arduino NANO Terminal Adapter for their projects, ensuring secure connections and streamlined prototyping.