Cirkit Designer Logo
Cirkit Designer
Your all-in-one circuit design IDE
Home / 
Component Documentation

How to Use Adafruit USB DC Solar LiPo Charger: Examples, Pinouts, and Specs

Image of Adafruit USB DC Solar LiPo Charger
Cirkit Designer LogoDesign with Adafruit USB DC Solar LiPo Charger in Cirkit Designer

Introduction

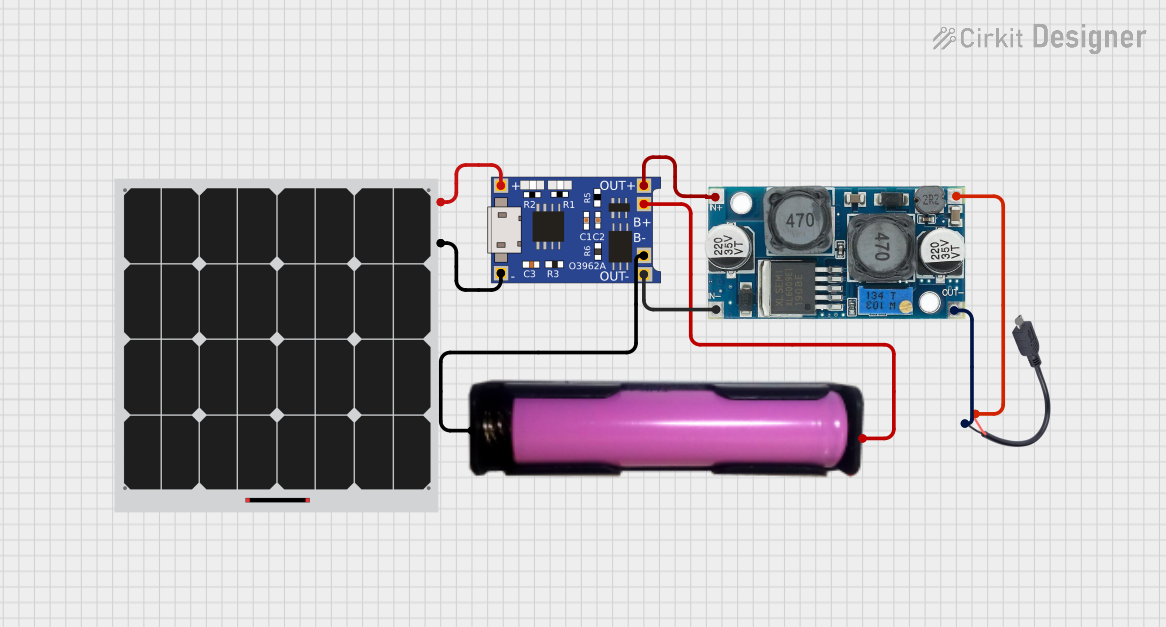
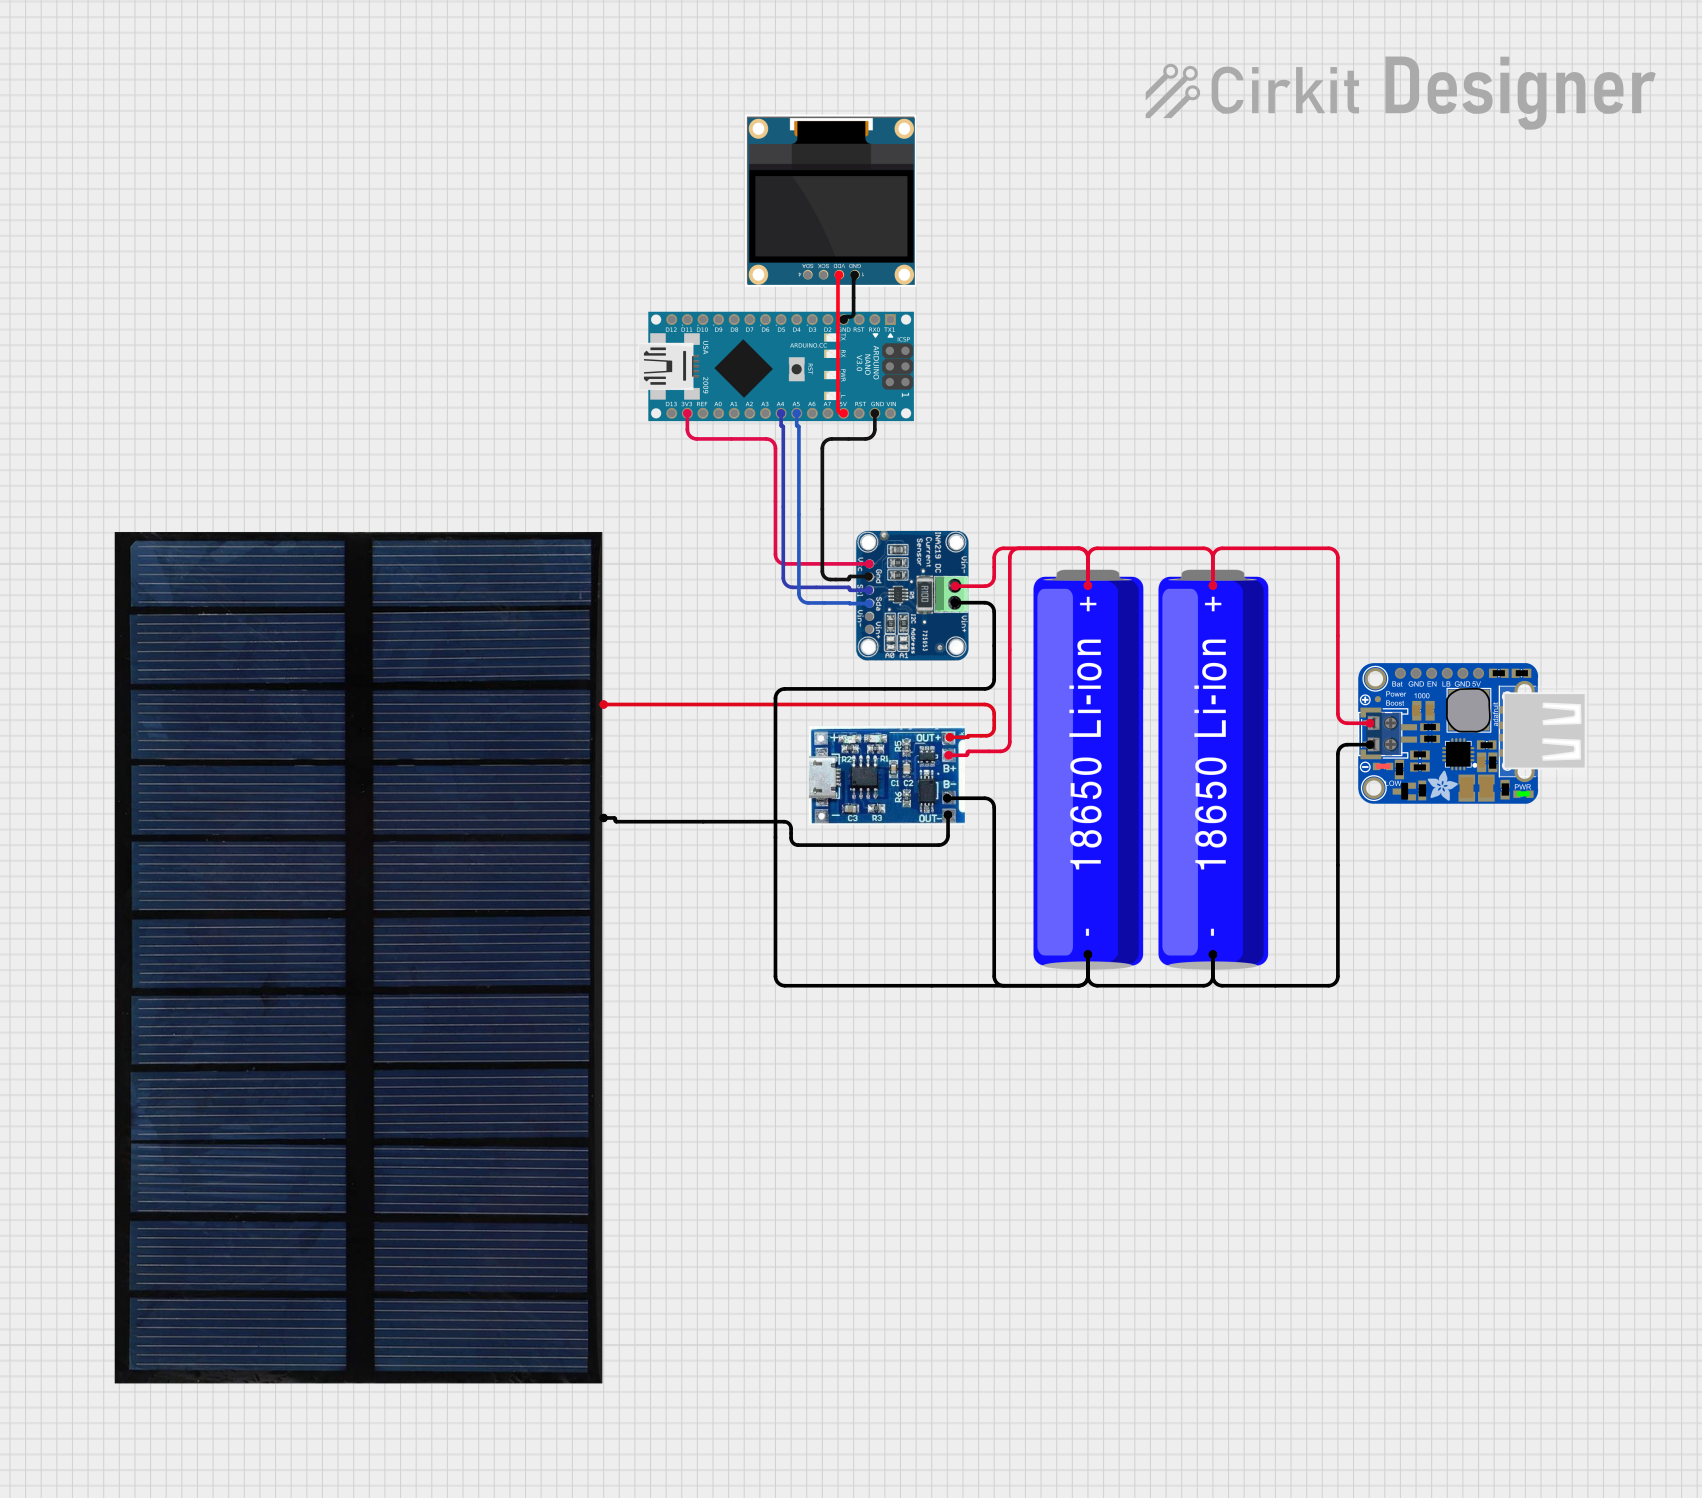
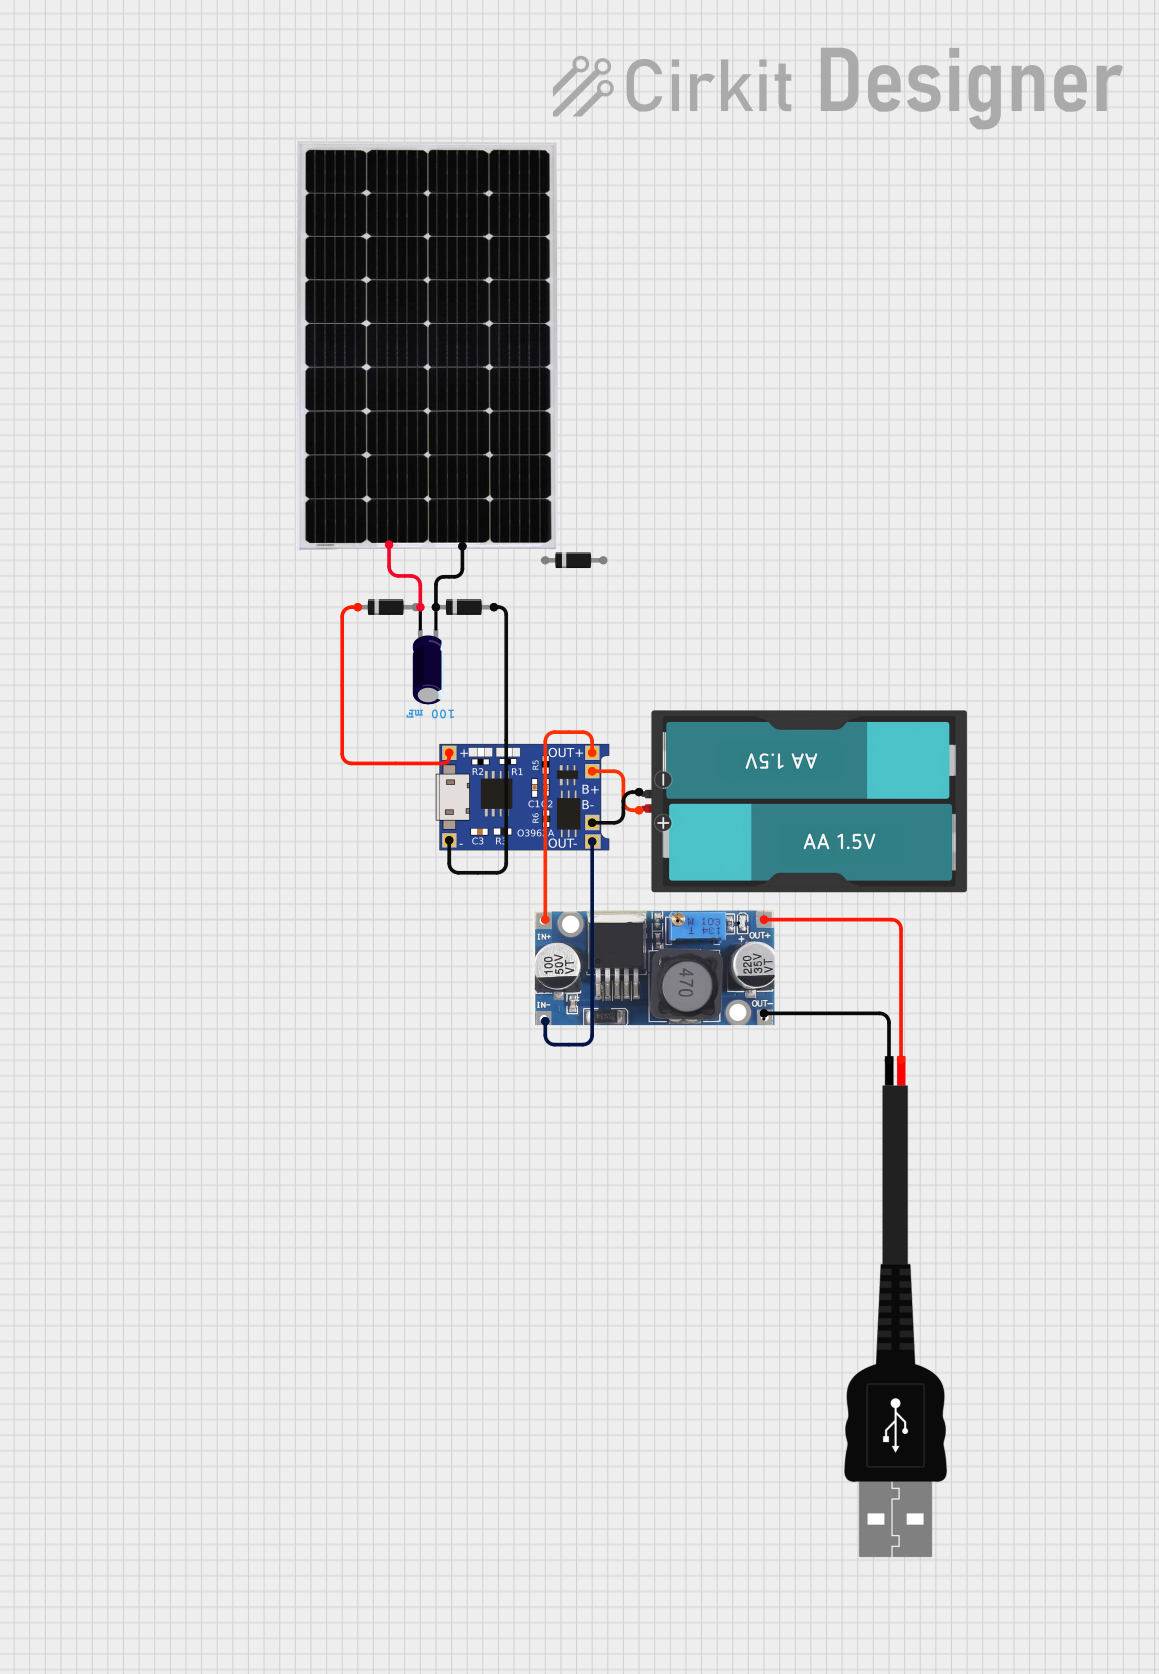
The Adafruit USB DC Solar LiPo Charger is a versatile and portable charging module designed for lithium polymer (LiPo) batteries. It allows for charging via solar panels or a USB power source, making it an ideal component for eco-friendly projects, portable electronics, and outdoor applications where conventional power sources are unavailable.

Explore Projects Built with Adafruit USB DC Solar LiPo Charger

Use Cirkit Designer to design, explore, and prototype these projects online. Some projects support real-time simulation. Click "Open Project" to start designing instantly!
Solar-Powered Battery Charger with USB Output
Image of fuente de alimentacion: A project utilizing Adafruit USB DC Solar LiPo Charger in a practical application
This circuit is a solar-powered battery charging system. It uses a solar panel to provide input power to a TP4056 charging module, which charges a 18650 battery. The output from the TP4056 is regulated by an XL6009 voltage regulator to provide a stable voltage to a connected device via a Micro USB cable.
Cirkit Designer LogoOpen Project in Cirkit Designer
Solar-Powered Battery Monitoring System with Arduino Nano and OLED Display
Image of Charger: A project utilizing Adafruit USB DC Solar LiPo Charger in a practical application
This circuit is a solar-powered battery charging and monitoring system. It uses a solar cell to charge a Li-ion battery through a lipo battery charger module, and a PowerBoost module to provide a stable 5V output. An Arduino Nano, along with an INA219 sensor, monitors the battery voltage and current, displaying the battery status and charging rate on an OLED display.
Cirkit Designer LogoOpen Project in Cirkit Designer
Solar-Powered Arduino UNO with Li-ion Battery Management and Voltage Step-Up
Image of solar_cell: A project utilizing Adafruit USB DC Solar LiPo Charger in a practical application
This circuit is designed for charging a Li-ion 18650 battery using a solar panel, with the TP4056 module managing the charging process. The XL6009 step-up buck converter boosts the voltage to power an Arduino UNO, which is programmed to perform user-defined tasks. The circuit is likely intended for solar-powered Arduino projects that require a rechargeable battery backup.
Cirkit Designer LogoOpen Project in Cirkit Designer
Solar-Powered USB Charger with Battery Management
Image of solar panel charging module: A project utilizing Adafruit USB DC Solar LiPo Charger in a practical application
This circuit appears to be a solar-powered charging system with a voltage regulation stage. A solar panel charges a battery through a TP4056 charge controller, with diodes likely serving as protection against reverse current. Additionally, a 48V to 5V converter is connected to a USB connection, possibly to provide a regulated output for USB-powered devices.
Cirkit Designer LogoOpen Project in Cirkit Designer

Explore Projects Built with Adafruit USB DC Solar LiPo Charger

Use Cirkit Designer to design, explore, and prototype these projects online. Some projects support real-time simulation. Click "Open Project" to start designing instantly!
Image of fuente de alimentacion: A project utilizing Adafruit USB DC Solar LiPo Charger in a practical application
Solar-Powered Battery Charger with USB Output
This circuit is a solar-powered battery charging system. It uses a solar panel to provide input power to a TP4056 charging module, which charges a 18650 battery. The output from the TP4056 is regulated by an XL6009 voltage regulator to provide a stable voltage to a connected device via a Micro USB cable.
Cirkit Designer LogoOpen Project in Cirkit Designer
Image of Charger: A project utilizing Adafruit USB DC Solar LiPo Charger in a practical application
Solar-Powered Battery Monitoring System with Arduino Nano and OLED Display
This circuit is a solar-powered battery charging and monitoring system. It uses a solar cell to charge a Li-ion battery through a lipo battery charger module, and a PowerBoost module to provide a stable 5V output. An Arduino Nano, along with an INA219 sensor, monitors the battery voltage and current, displaying the battery status and charging rate on an OLED display.
Cirkit Designer LogoOpen Project in Cirkit Designer
Image of solar_cell: A project utilizing Adafruit USB DC Solar LiPo Charger in a practical application
Solar-Powered Arduino UNO with Li-ion Battery Management and Voltage Step-Up
This circuit is designed for charging a Li-ion 18650 battery using a solar panel, with the TP4056 module managing the charging process. The XL6009 step-up buck converter boosts the voltage to power an Arduino UNO, which is programmed to perform user-defined tasks. The circuit is likely intended for solar-powered Arduino projects that require a rechargeable battery backup.
Cirkit Designer LogoOpen Project in Cirkit Designer
Image of solar panel charging module: A project utilizing Adafruit USB DC Solar LiPo Charger in a practical application
Solar-Powered USB Charger with Battery Management
This circuit appears to be a solar-powered charging system with a voltage regulation stage. A solar panel charges a battery through a TP4056 charge controller, with diodes likely serving as protection against reverse current. Additionally, a 48V to 5V converter is connected to a USB connection, possibly to provide a regulated output for USB-powered devices.
Cirkit Designer LogoOpen Project in Cirkit Designer

Common Applications and Use Cases

  • Solar-powered projects
  • Portable battery chargers
  • Remote sensing equipment
  • DIY power banks
  • Outdoor electronics

Technical Specifications

Key Technical Details

  • Input Voltage (Solar/USB): 6V (minimum)
  • Charge Current: 500mA (default), adjustable up to 1A
  • Battery Voltage: 3.7V LiPo batteries
  • Maximum Output Load: 1A
  • Indicator LEDs:
    • CHRG: Charging status
    • DONE: Charge complete

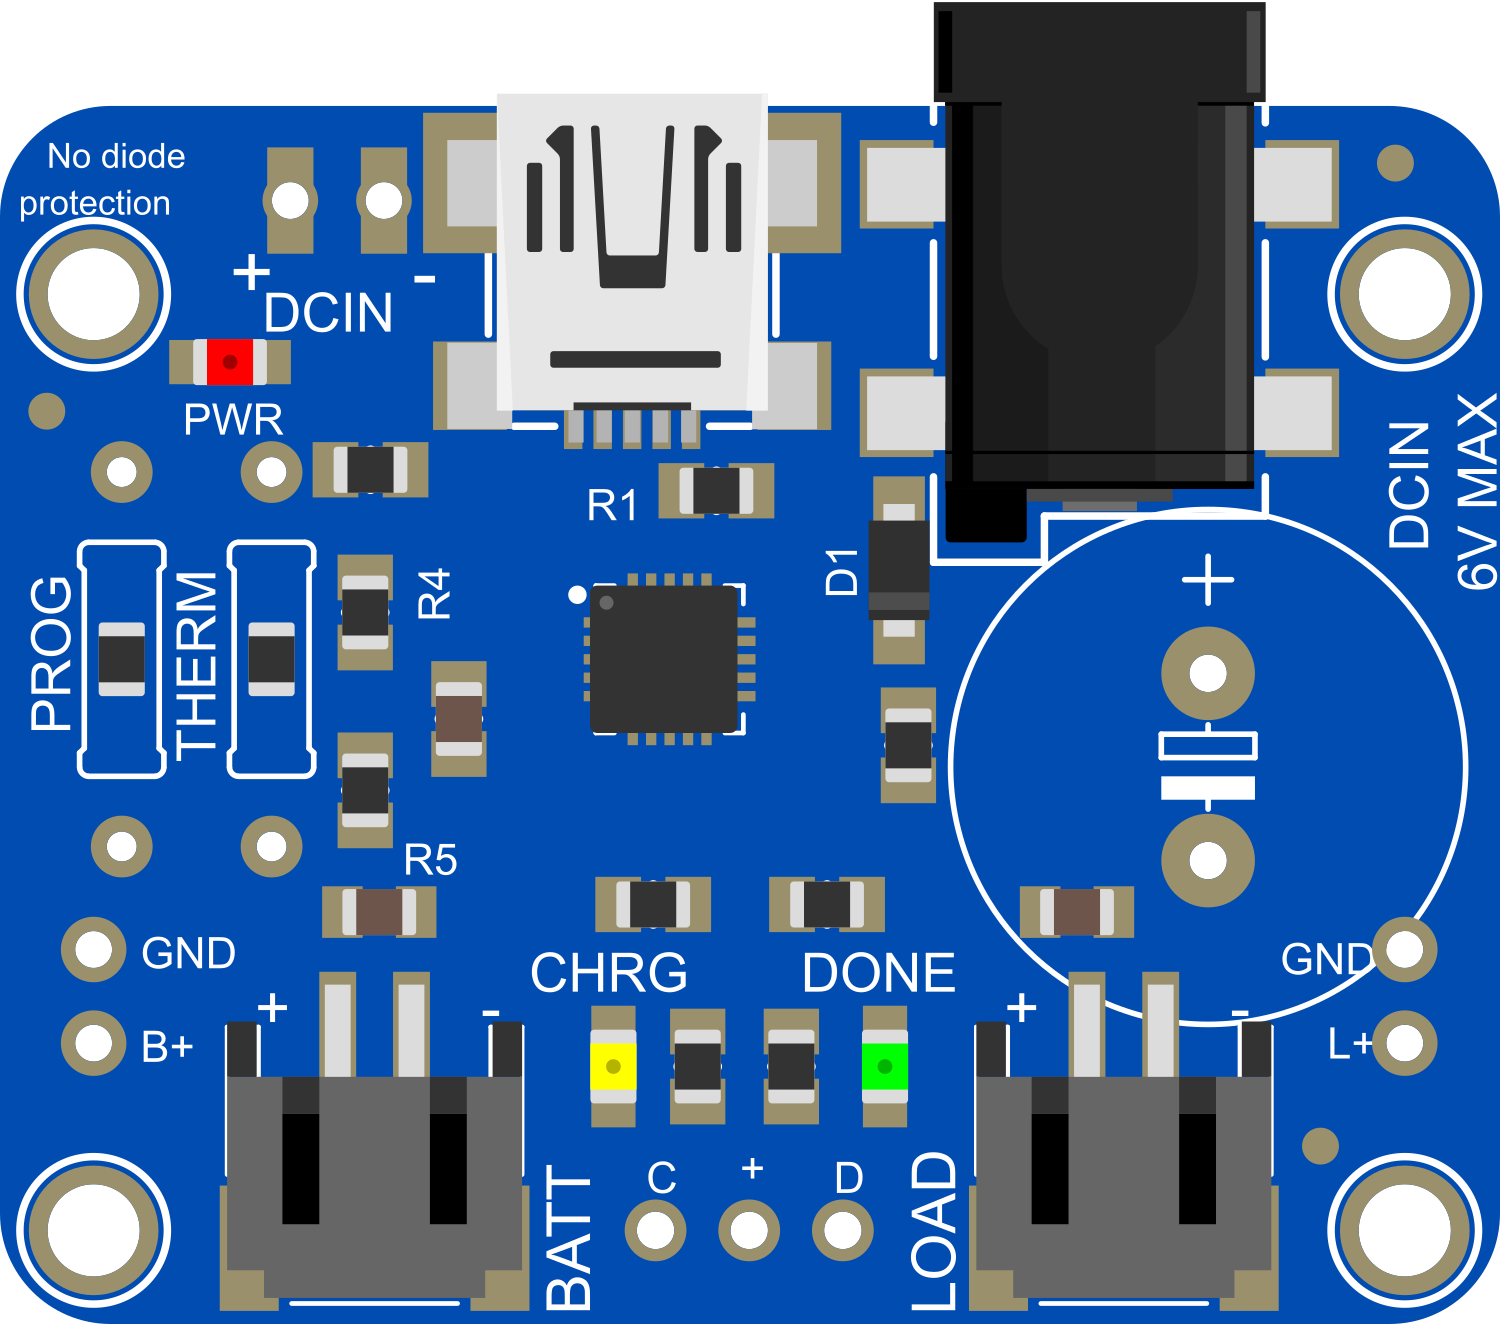
Pin Configuration and Descriptions

Pin Description
BAT Connection to the positive terminal of the LiPo battery
GND Ground connection
USB USB power input for charging
CNCT Solar panel input for charging
LOAD Connection to the load circuit

Usage Instructions

How to Use the Component in a Circuit

  1. Connecting the Battery:

    • Connect the positive terminal of the LiPo battery to the BAT pin.
    • Connect the negative terminal of the LiPo battery to the GND pin.
  2. Powering the Charger:

    • To charge via solar power, connect a 6V solar panel to the CNCT pin.
    • To charge via USB, connect a USB power source to the USB pin.
  3. Connecting the Load:

    • Connect the load circuit to the LOAD pin and GND.

Important Considerations and Best Practices

  • Ensure the LiPo battery voltage and capacity are compatible with the charger.
  • Do not exceed the recommended solar panel voltage.
  • Adjust the charge current according to the battery's specifications.
  • Avoid placing the solar panel under direct sunlight without a battery connected.
  • Monitor the charging process to prevent overcharging.

Troubleshooting and FAQs

Common Issues

  • LEDs not lighting up:

    • Check connections to the battery and power source.
    • Ensure the solar panel is receiving sufficient light or the USB source is active.
  • Battery not charging:

    • Verify the battery's health and connections.
    • Ensure the charge current is set correctly for the battery.
  • Overheating:

    • Reduce the charge current if the charger or battery becomes too hot.
    • Provide adequate ventilation.

FAQs

Q: Can I charge multiple batteries at once? A: No, the charger is designed for a single LiPo battery.

Q: What size solar panel should I use? A: A 6V solar panel with sufficient wattage to provide the desired charge current (up to 1A).

Q: How do I know when the battery is fully charged? A: The DONE LED will light up when the battery is fully charged.

Q: Can I use this charger with other types of batteries? A: This charger is specifically designed for 3.7V LiPo batteries and may not be suitable for other types.

Q: Is it safe to leave the charger unattended? A: While the charger has built-in protection, it's always best to monitor the charging process, especially when adjusting the charge current.

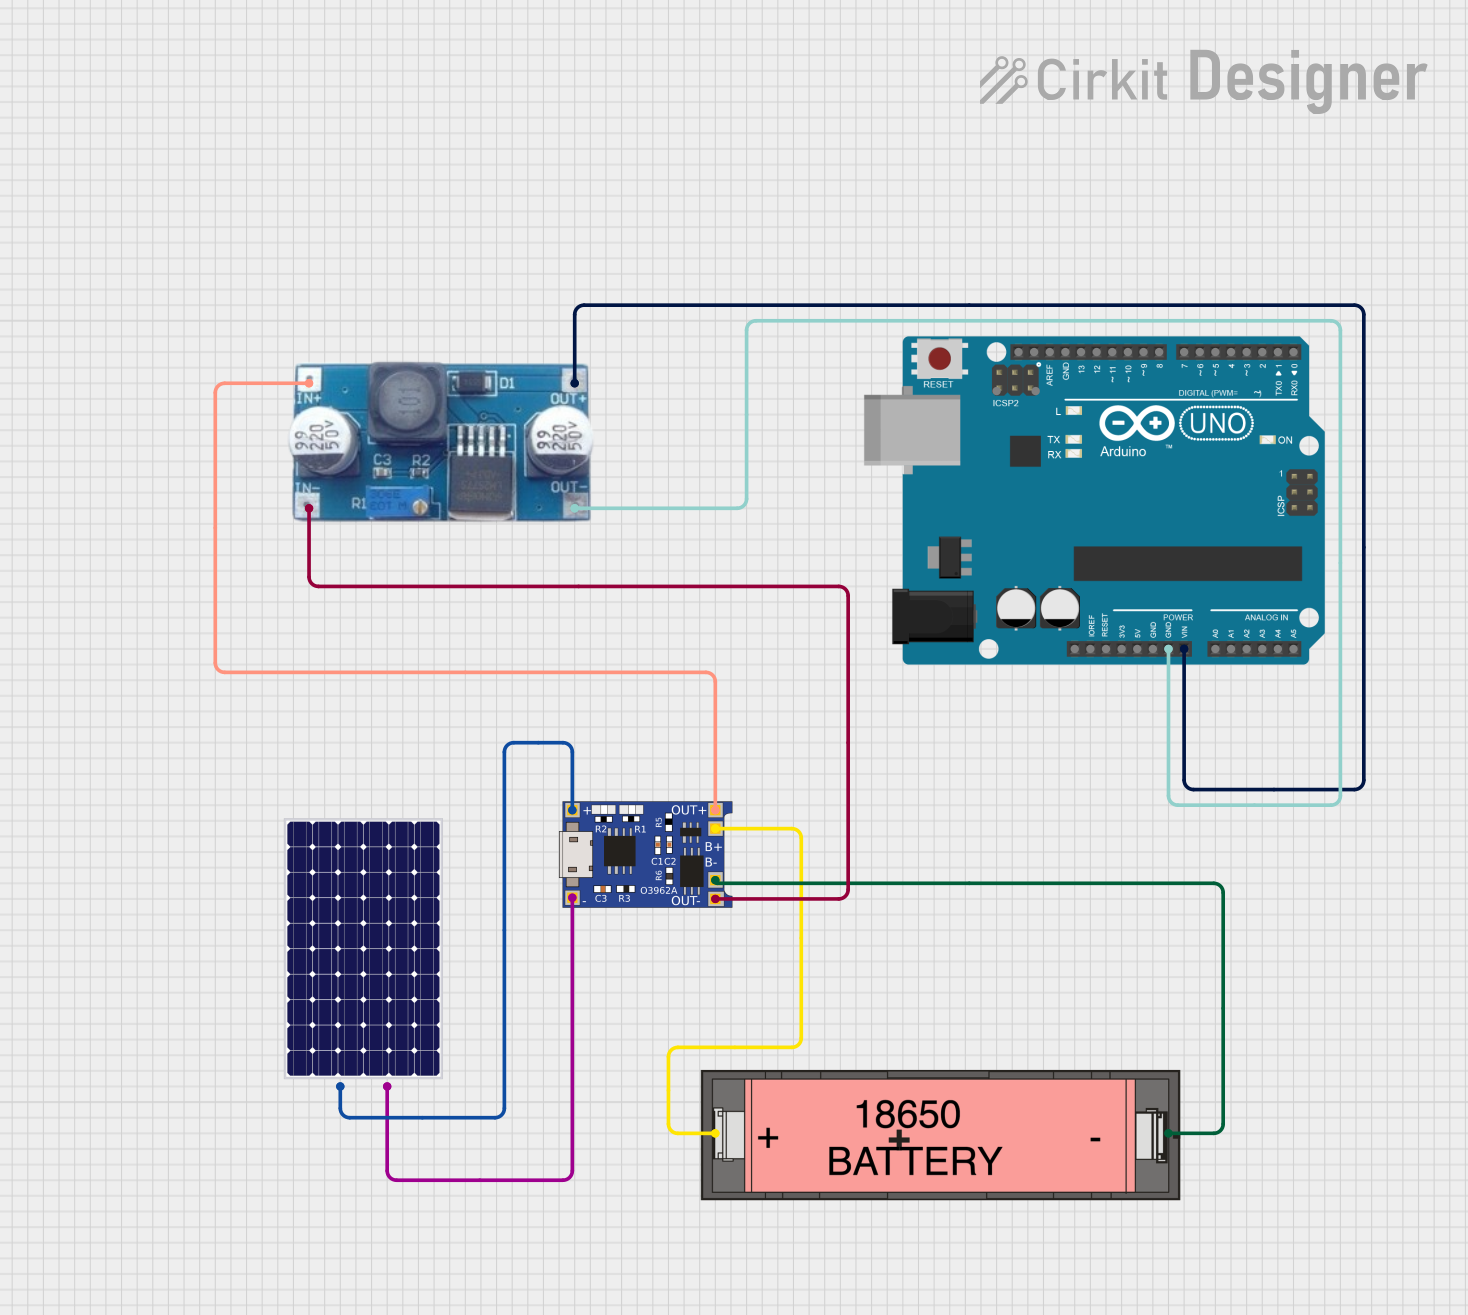
Example Arduino UNO Code

// This example assumes you are using the Adafruit USB DC Solar LiPo Charger
// to charge a battery and power an Arduino UNO indirectly via the battery.

void setup() {
  pinMode(LED_BUILTIN, OUTPUT); // Set the built-in LED as an output
}

void loop() {
  digitalWrite(LED_BUILTIN, HIGH); // Turn on the LED
  delay(1000);                     // Wait for a second
  digitalWrite(LED_BUILTIN, LOW);  // Turn off the LED
  delay(1000);                     // Wait for a second
}

// Note: This code does not interact directly with the charger.
// It's a simple blink example to demonstrate a load on the battery.

Remember, the Adafruit USB DC Solar LiPo Charger does not require any code to operate as it is a standalone charging module. The example provided is to illustrate how a charged battery might power an Arduino UNO, which in turn runs a simple blink program.