How to Use Matek 12S-PRO BEC: Examples, Pinouts, and Specs
Introduction
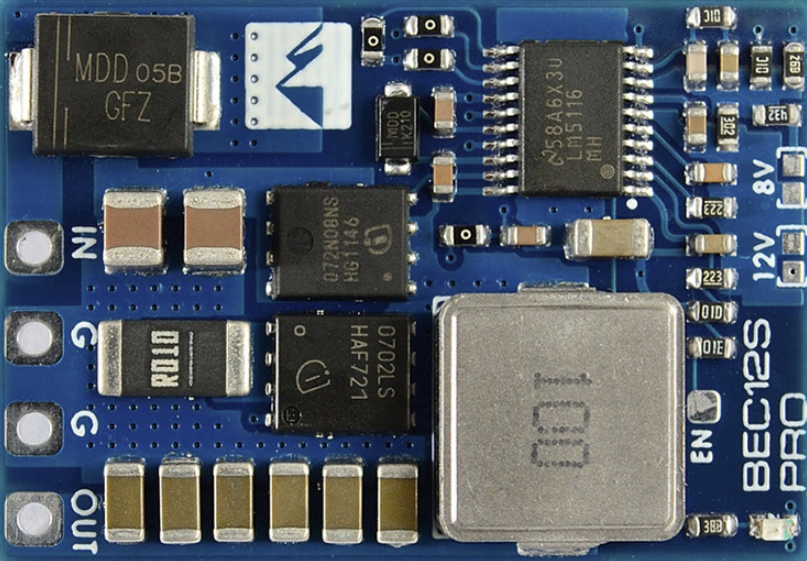
The Matek 12S-PRO BEC is a high-performance battery eliminator circuit (BEC) designed to provide a stable and reliable output voltage for powering servos, flight controllers, and other onboard electronics. It is specifically engineered for use in multi-rotor drones and fixed-wing aircraft, where high-voltage battery packs (up to 12S LiPo) are commonly used. By stepping down the voltage from the battery pack, the Matek 12S-PRO BEC eliminates the need for separate power sources, reducing weight and complexity in your setup.
Explore Projects Built with Matek 12S-PRO BEC

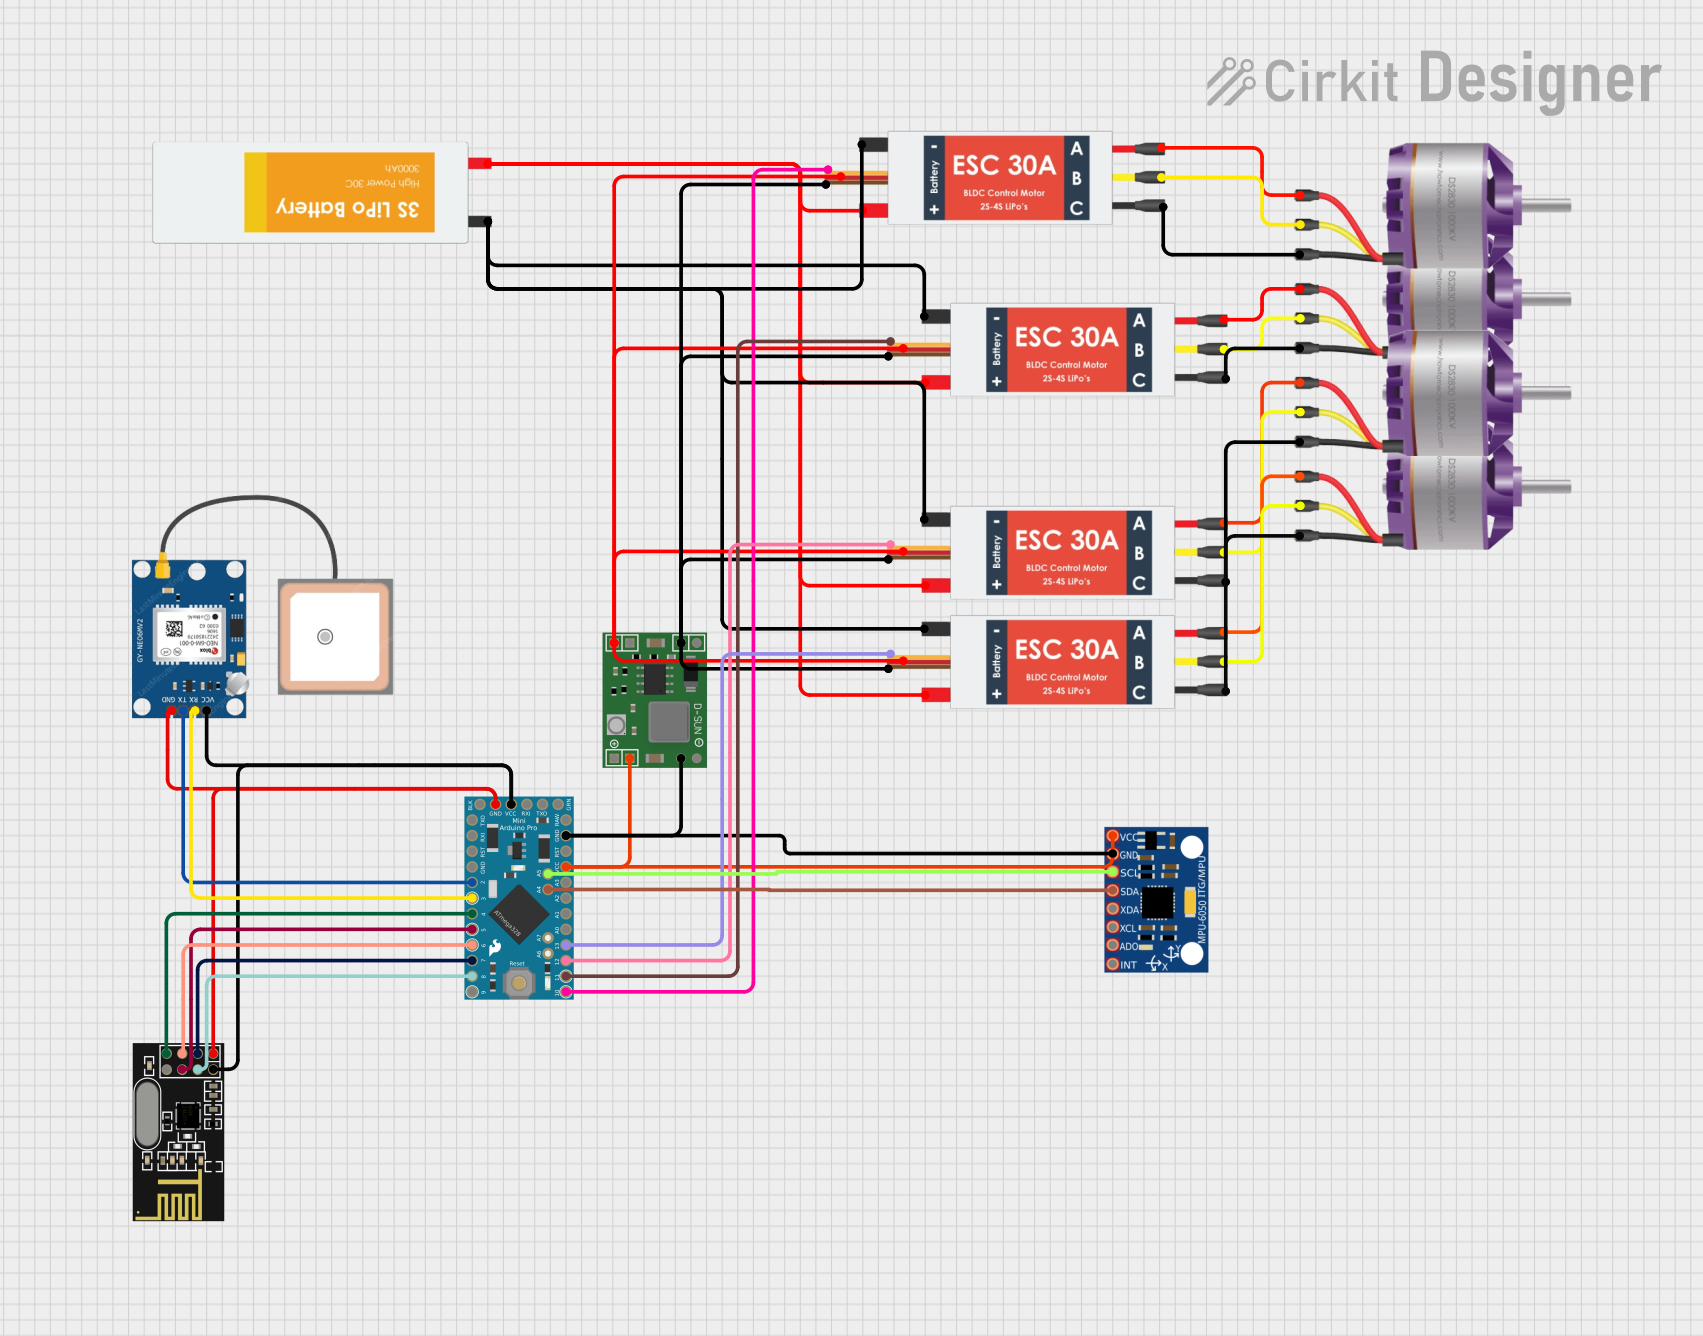
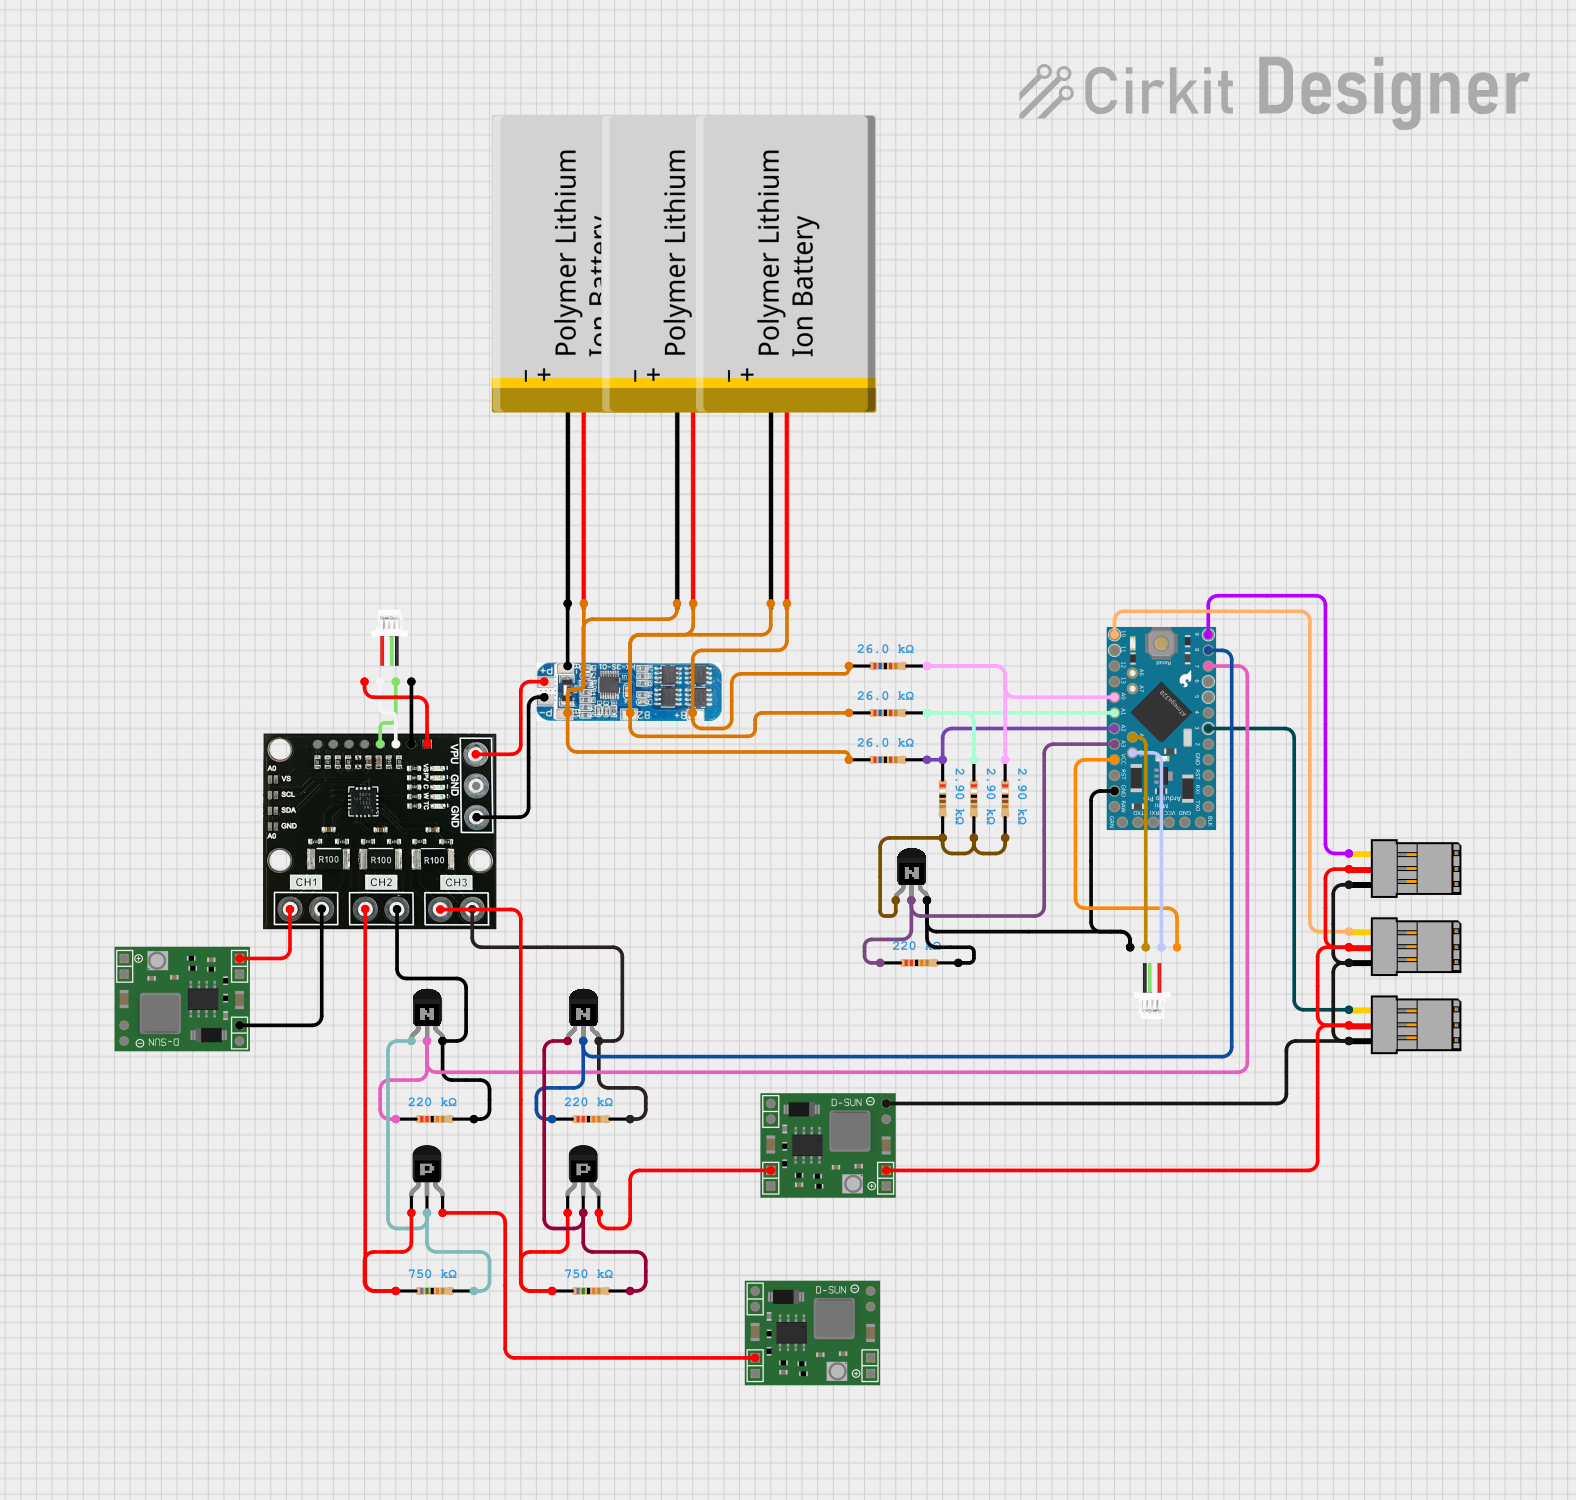

Explore Projects Built with Matek 12S-PRO BEC
Common Applications and Use Cases
- Powering servos, flight controllers, and receivers in drones and RC aircraft.
- Providing a stable voltage supply for FPV (First-Person View) systems.
- Supporting high-voltage battery packs (up to 12S LiPo) in multi-rotor and fixed-wing platforms.
- Reducing the need for additional power supplies in compact or weight-sensitive designs.
Technical Specifications
Key Technical Details
- Input Voltage Range: 9V to 60V (3S to 12S LiPo)
- Output Voltage Options: Selectable 5V, 9V, 12V, or adjustable (via potentiometer)
- Maximum Output Current: 5A continuous, 6A peak
- Efficiency: Up to 95% (depending on input/output voltage)
- Dimensions: 21mm x 21mm x 6mm
- Weight: 4g
- Protection Features: Overcurrent, over-temperature, and short-circuit protection.
Pin Configuration and Descriptions
The Matek 12S-PRO BEC has a simple pin layout for easy integration into your circuit. Below is the pin configuration:
| Pin Name | Description |
|---|---|
| VIN+ | Positive input voltage terminal (connect to the positive terminal of the battery). |
| VIN- | Negative input voltage terminal (connect to the negative terminal of the battery). |
| VOUT+ | Positive output voltage terminal (connect to the load or electronics to be powered). |
| VOUT- | Negative output voltage terminal (connect to the ground of the load or electronics). |
| ADJ | Voltage adjustment pin (used to set the output voltage when in adjustable mode). |
Usage Instructions
How to Use the Matek 12S-PRO BEC in a Circuit
Connect the Input Voltage:
- Connect the VIN+ and VIN- pins to the positive and negative terminals of your battery pack, respectively.
- Ensure the input voltage is within the supported range (9V to 60V).
Set the Output Voltage:
- If using a fixed output voltage (5V, 9V, or 12V), set the voltage selector switch or jumper to the desired setting.
- For adjustable output, use the ADJ pin and a small screwdriver to turn the potentiometer until the desired voltage is achieved. Use a multimeter to verify the output voltage.
Connect the Load:
- Connect the VOUT+ and VOUT- pins to the positive and negative terminals of the device(s) you want to power.
Verify Connections:
- Double-check all connections to ensure proper polarity and secure wiring.
Power On:
- Power on the system and monitor the output voltage to ensure it is stable and within the expected range.
Important Considerations and Best Practices
- Heat Dissipation: The Matek 12S-PRO BEC is highly efficient, but it may still generate heat under high loads. Ensure adequate airflow or heat dissipation to prevent overheating.
- Current Limits: Do not exceed the maximum continuous current rating of 5A to avoid damaging the BEC.
- Voltage Adjustment: When using the adjustable mode, always verify the output voltage with a multimeter before connecting sensitive electronics.
- Polarity: Double-check the polarity of all connections to prevent damage to the BEC or connected devices.
Example: Connecting to an Arduino UNO
The Matek 12S-PRO BEC can be used to power an Arduino UNO from a high-voltage battery pack. Below is an example setup:
- Set the output voltage of the BEC to 5V.
- Connect the VOUT+ pin of the BEC to the 5V pin on the Arduino UNO.
- Connect the VOUT- pin of the BEC to the GND pin on the Arduino UNO.
- Connect the VIN+ and VIN- pins of the BEC to the battery pack.
Here is a simple Arduino code example to blink an LED while powered by the Matek 12S-PRO BEC:
// Simple LED blink example for Arduino UNO
// Ensure the Matek 12S-PRO BEC is set to 5V output before connecting to the Arduino.

const int ledPin = 13; // Pin connected to the onboard LED

void setup() {
  pinMode(ledPin, OUTPUT); // Set the LED pin as an output
}

void loop() {
  digitalWrite(ledPin, HIGH); // Turn the LED on
  delay(1000);                // Wait for 1 second
  digitalWrite(ledPin, LOW);  // Turn the LED off
  delay(1000);                // Wait for 1 second
}
Troubleshooting and FAQs
Common Issues and Solutions
No Output Voltage:
- Cause: Incorrect input connections or insufficient input voltage.
- Solution: Verify that the VIN+ and VIN- pins are connected correctly and that the input voltage is within the supported range (9V to 60V).
Overheating:
- Cause: High current draw or insufficient cooling.
- Solution: Ensure the load does not exceed the maximum continuous current rating (5A). Improve airflow or add a heatsink if necessary.
Output Voltage Fluctuations:
- Cause: Unstable input voltage or incorrect voltage adjustment.
- Solution: Check the input voltage for stability. If using adjustable mode, recheck the output voltage with a multimeter and adjust as needed.
Short Circuit Protection Triggered:
- Cause: A short circuit on the output side.
- Solution: Disconnect the load and inspect for wiring issues or damaged components. Resolve the short circuit before reconnecting.
FAQs
Q: Can the Matek 12S-PRO BEC power multiple devices simultaneously?
A: Yes, as long as the total current draw does not exceed the maximum continuous current rating of 5A.
Q: How do I know if the BEC is overheating?
A: The BEC includes over-temperature protection, which will shut it down if it overheats. If this occurs, reduce the load or improve cooling.
Q: Can I use the adjustable output mode for sensitive electronics?
A: Yes, but always verify the output voltage with a multimeter before connecting sensitive devices to avoid damage.
Q: Is the Matek 12S-PRO BEC compatible with 12S LiPo batteries?
A: Yes, it supports input voltages up to 60V, making it compatible with 12S LiPo battery packs.
This concludes the documentation for the Matek 12S-PRO BEC.