How to Use Led Strip Driver: Examples, Pinouts, and Specs
Introduction
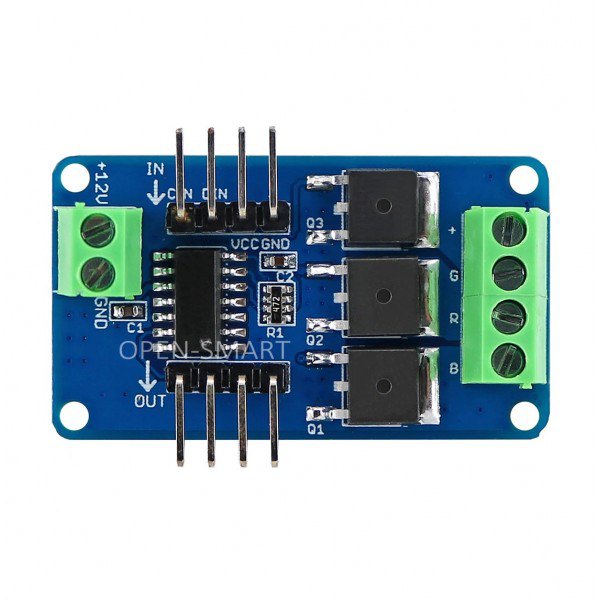
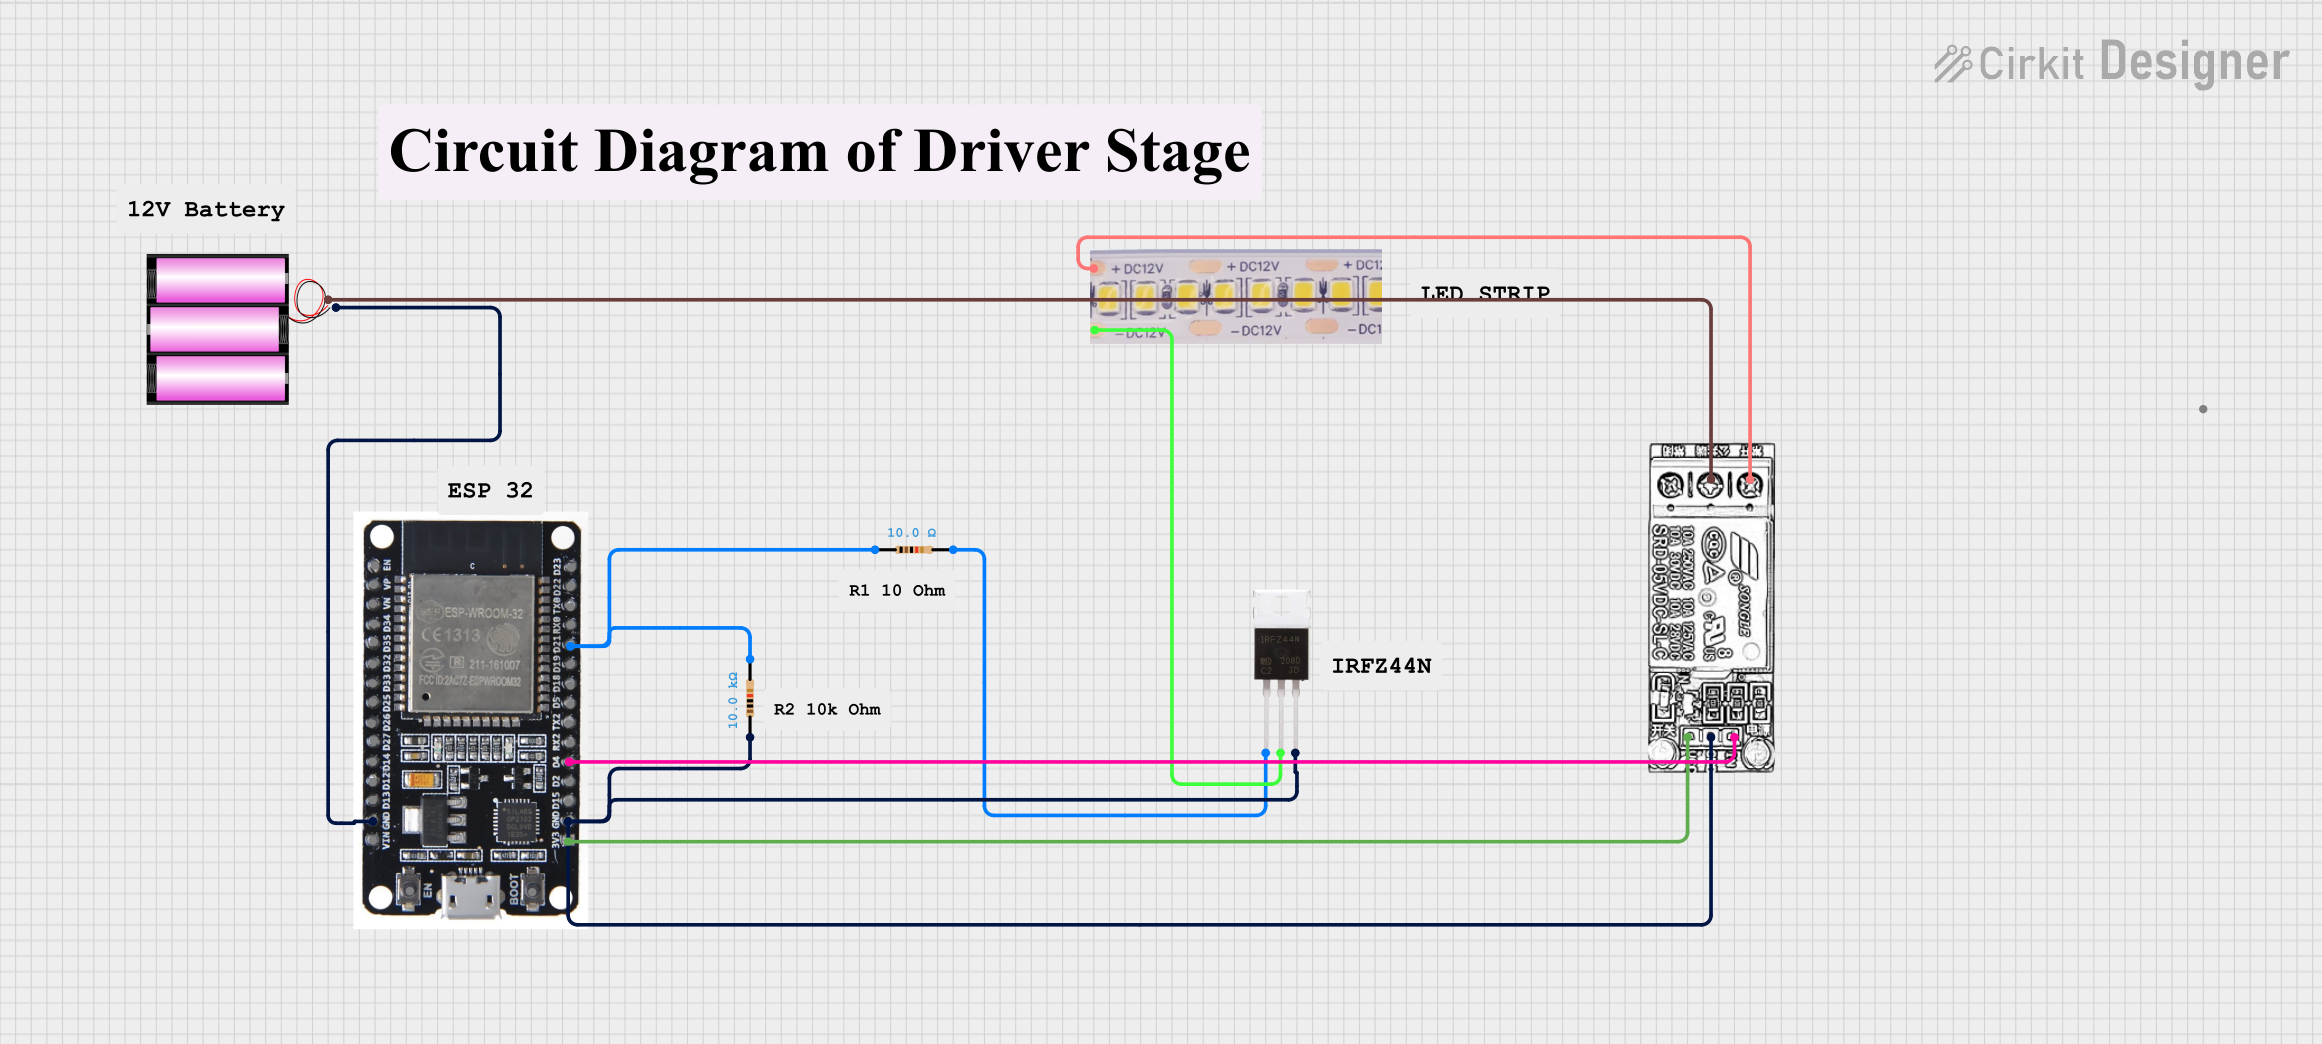
The LED Strip Driver by Open-Smart is a specialized electronic component designed to regulate the power supply to LED strips. It ensures that the connected LED strips receive the correct voltage and current, which is essential for their optimal performance, brightness, and longevity. This driver is particularly useful for powering LED strips in various applications, such as decorative lighting, signage, and architectural lighting.
Explore Projects Built with Led Strip Driver
Explore Projects Built with Led Strip Driver
Common Applications and Use Cases
- Home and Commercial Lighting: Used in ambient lighting setups, under-cabinet lighting, and accent lighting.
- Signage and Displays: Powers LED strips in advertising boards and digital displays.
- DIY Projects: Ideal for hobbyists creating custom lighting solutions.
- Architectural Lighting: Provides consistent power for large-scale lighting installations.
Technical Specifications
Key Technical Details
- Input Voltage: 12V to 24V DC
- Output Voltage: Matches the LED strip's rated voltage (e.g., 12V or 24V)
- Maximum Output Current: 5A
- Power Rating: Up to 120W (at 24V, 5A)
- Efficiency: ≥ 90%
- Control Interface: PWM (Pulse Width Modulation) for dimming
- Operating Temperature: -20°C to 60°C
- Dimensions: 50mm x 25mm x 15mm
Pin Configuration and Descriptions
The LED Strip Driver typically has the following pin configuration:
| Pin Name | Description |
|---|---|
| VIN+ | Positive input voltage terminal (connect to the power supply's positive output) |
| VIN- | Negative input voltage terminal (connect to the power supply's ground) |
| VOUT+ | Positive output terminal (connect to the LED strip's positive input) |
| VOUT- | Negative output terminal (connect to the LED strip's ground) |
| PWM | PWM input for dimming control (connect to a microcontroller or PWM signal) |
Usage Instructions
How to Use the Component in a Circuit
Power Supply Connection:
- Connect the VIN+ and VIN- pins to a DC power supply. Ensure the supply voltage matches the input voltage range of the driver (12V to 24V).
- Verify that the power supply can provide sufficient current for the connected LED strip.
LED Strip Connection:
- Connect the VOUT+ and VOUT- pins to the corresponding positive and negative terminals of the LED strip.
- Ensure the LED strip's voltage rating matches the driver's output voltage.
PWM Dimming (Optional):
- If dimming is required, connect the PWM pin to a microcontroller (e.g., Arduino UNO) or a PWM signal generator.
- Use a PWM signal with a frequency between 500Hz and 5kHz for optimal dimming performance.
Power On:
- After all connections are secure, power on the DC supply. The LED strip should light up, and brightness can be adjusted using the PWM signal.
Important Considerations and Best Practices
- Voltage Matching: Always ensure the LED strip's voltage rating matches the driver's output voltage.
- Current Limitation: Do not exceed the driver's maximum output current (5A). Overloading may damage the driver or the LED strip.
- Heat Dissipation: Ensure proper ventilation or heat sinking if the driver operates near its maximum power rating.
- Polarity Check: Double-check all connections for correct polarity to avoid damage to the driver or LED strip.
- PWM Signal: Use a clean and stable PWM signal for dimming to prevent flickering.
Example: Connecting to an Arduino UNO
To control the brightness of an LED strip using an Arduino UNO, connect the PWM pin of the driver to one of the Arduino's PWM-capable pins (e.g., pin 9). Below is an example code snippet:
// Example code to control LED strip brightness using Arduino UNO
// Connect the PWM pin of the LED Strip Driver to Arduino pin 9

int pwmPin = 9; // PWM-capable pin on Arduino

void setup() {
  pinMode(pwmPin, OUTPUT); // Set pin 9 as an output
}

void loop() {
  // Gradually increase brightness
  for (int brightness = 0; brightness <= 255; brightness++) {
    analogWrite(pwmPin, brightness); // Write PWM signal to the driver
    delay(10); // Small delay for smooth transition
  }

  // Gradually decrease brightness
  for (int brightness = 255; brightness >= 0; brightness--) {
    analogWrite(pwmPin, brightness); // Write PWM signal to the driver
    delay(10); // Small delay for smooth transition
  }
}
Troubleshooting and FAQs
Common Issues and Solutions
LED Strip Does Not Light Up:
- Cause: Incorrect wiring or insufficient power supply.
- Solution: Double-check all connections and ensure the power supply meets the voltage and current requirements.
Flickering LED Strip:
- Cause: Unstable PWM signal or insufficient power supply.
- Solution: Verify the PWM signal's frequency and stability. Ensure the power supply can handle the load.
Driver Overheating:
- Cause: Operating near or above the maximum power rating.
- Solution: Reduce the load or improve heat dissipation with a heatsink or better ventilation.
Dimming Not Working:
- Cause: Incorrect PWM connection or incompatible signal.
- Solution: Ensure the PWM pin is connected to a PWM-capable microcontroller pin and the signal frequency is within the specified range.
FAQs
Q: Can I use this driver with a 5V LED strip?
A: No, this driver is designed for 12V or 24V LED strips. Using it with a 5V strip may damage the LEDs.Q: What happens if I exceed the maximum current rating?
A: Exceeding 5A may cause the driver to overheat or fail. Always ensure the connected load is within the specified limits.Q: Can I connect multiple LED strips to this driver?
A: Yes, as long as the total current draw does not exceed 5A and the strips are of the same voltage rating.Q: Is the driver waterproof?
A: No, this driver is not waterproof. Use it in a dry environment or enclose it in a waterproof housing for outdoor applications.
This documentation provides all the necessary details to effectively use the Open-Smart LED Strip Driver in your projects. For further assistance, refer to the manufacturer's datasheet or contact technical support.