Cirkit Designer
Your all-in-one circuit design IDE
Home /
Component Documentation
How to Use Core1262 LF/HF LoRa: Examples, Pinouts, and Specs
Introduction
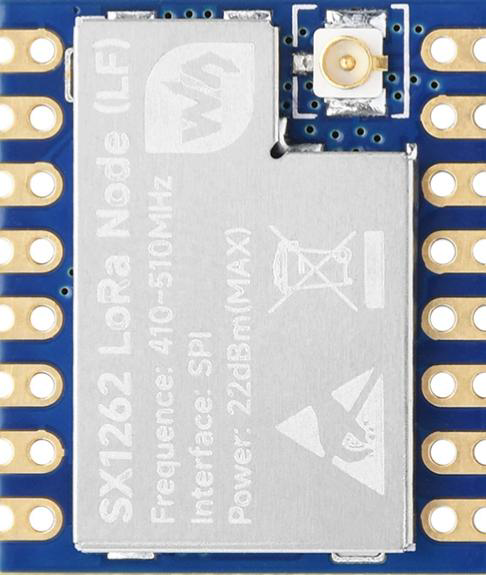
The Core1262 LF/HF LoRa module, manufactured by Waveshare, is a low-power, long-range wireless communication module designed for IoT applications. It operates in both low-frequency (LF) and high-frequency (HF) bands, making it versatile for various use cases. This module is ideal for transmitting data over long distances with minimal power consumption, making it suitable for applications such as remote sensing, smart agriculture, asset tracking, and more.
Explore Projects Built with Core1262 LF/HF LoRa
Arduino Nano and LoRa SX1278 Battery-Powered Wireless Display

This circuit is a LoRa-based wireless communication system using an Arduino Nano to receive data packets and display them on an LCD. It includes a LoRa Ra-02 SX1278 module for long-range communication, a 3.7V battery with a charger module for power, and an LED indicator controlled by the Arduino.
ESP8266 and LoRa SX1278 Based Wireless Communication Module
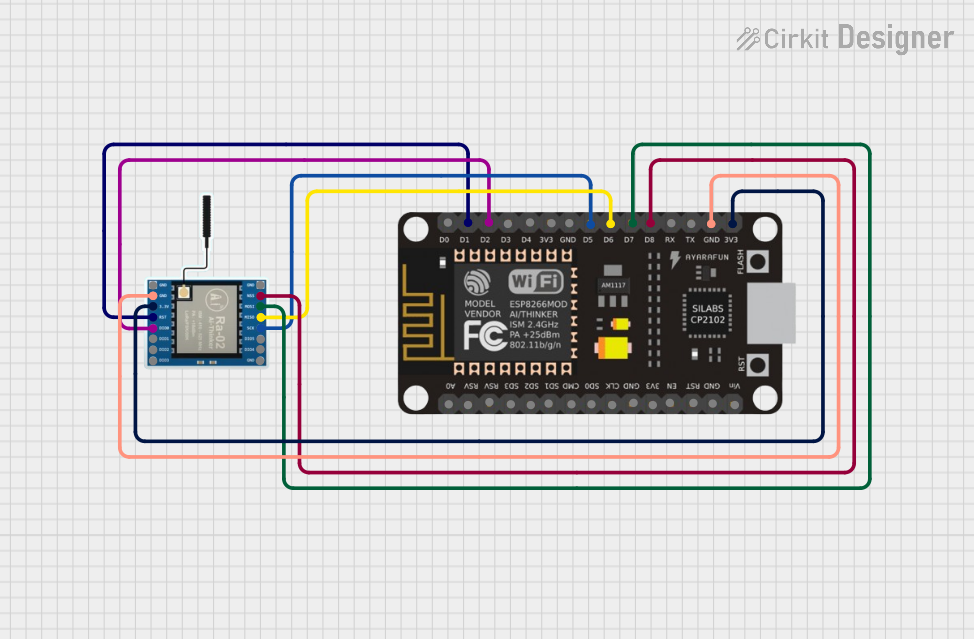
This circuit integrates a LoRa Ra-02 SX1278 module with an ESP8266 NodeMCU to enable long-range wireless communication. The ESP8266 NodeMCU handles the control and data processing, while the LoRa module provides the capability to transmit and receive data over long distances using LoRa technology.
ESP8266 NodeMCU with GPS and LoRa Connectivity
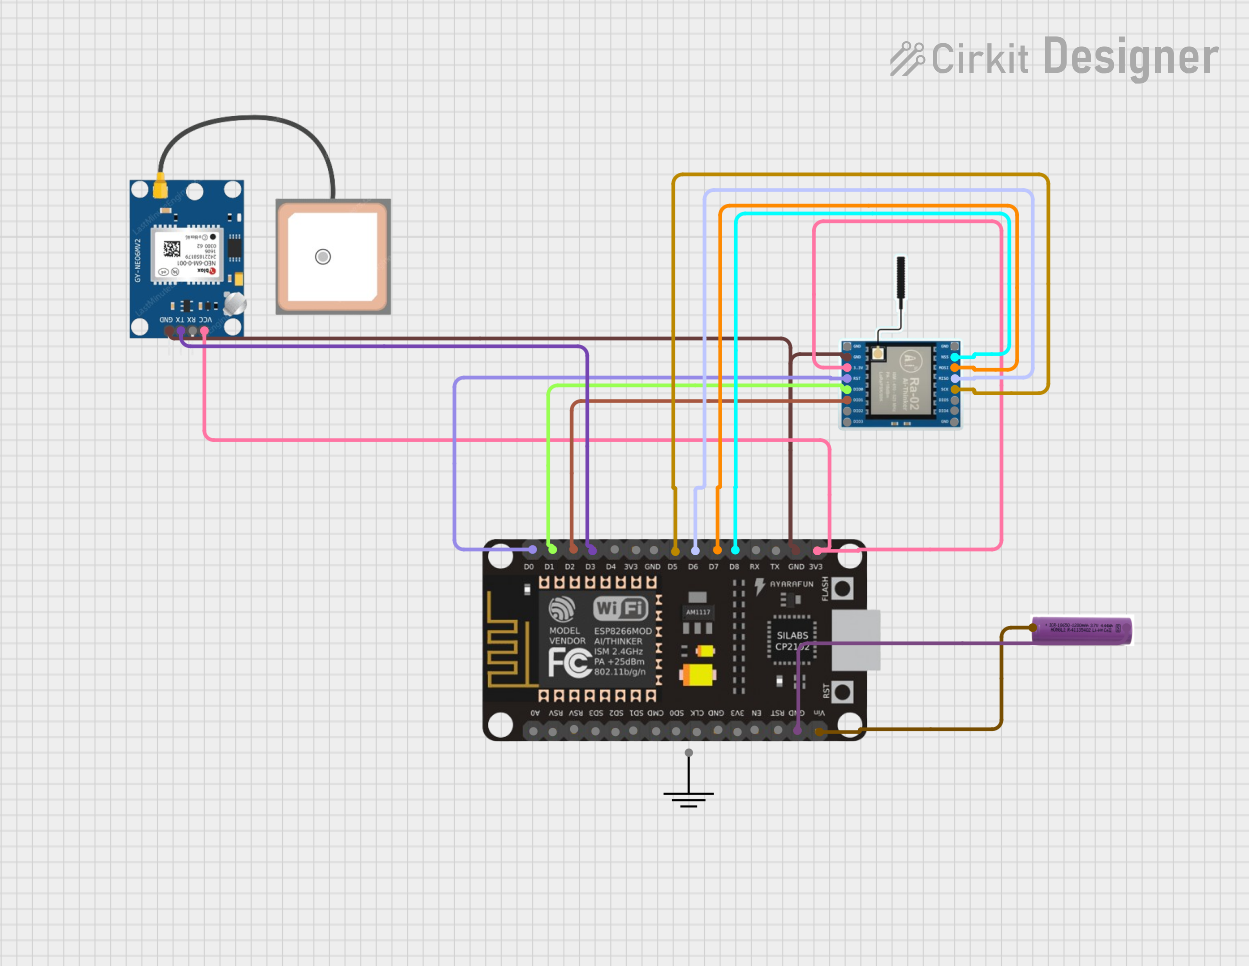
This circuit comprises an ESP8266 NodeMCU microcontroller interfaced with a LoRa Ra-02 SX1278 module for long-range communication and a GPS NEO 6M module for location tracking. The ESP8266 reads GPS data via UART and transmits it using the LoRa module, which is connected via SPI. A 3.7v battery powers the system, making it suitable for remote tracking applications.
Arduino Nano and LoRa SX1278 Wireless Communication Module
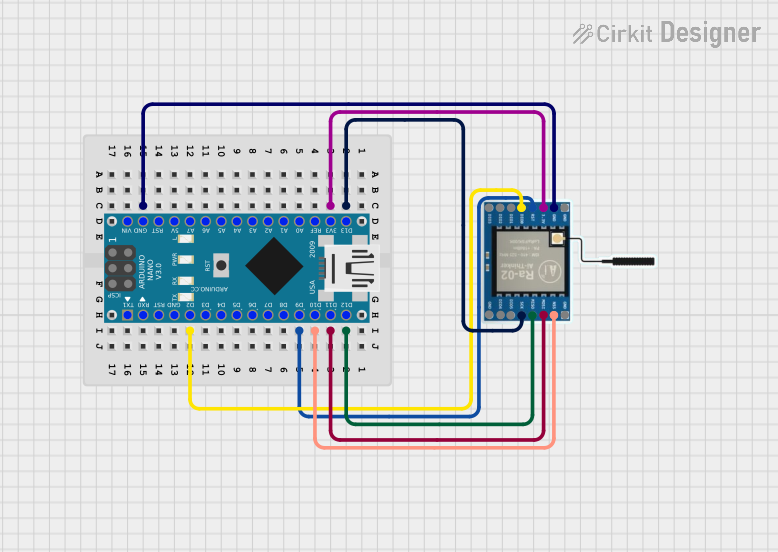
This circuit consists of an Arduino Nano microcontroller connected to a LoRa Ra-02 SX1278 module, enabling wireless communication. The Arduino handles the SPI communication with the LoRa module, with connections for SCK, MISO, MOSI, NSS, and RST, as well as power and ground connections. This setup is typically used for long-range, low-power wireless data transmission.
Explore Projects Built with Core1262 LF/HF LoRa
Arduino Nano and LoRa SX1278 Battery-Powered Wireless Display
This circuit is a LoRa-based wireless communication system using an Arduino Nano to receive data packets and display them on an LCD. It includes a LoRa Ra-02 SX1278 module for long-range communication, a 3.7V battery with a charger module for power, and an LED indicator controlled by the Arduino.
ESP8266 and LoRa SX1278 Based Wireless Communication Module
This circuit integrates a LoRa Ra-02 SX1278 module with an ESP8266 NodeMCU to enable long-range wireless communication. The ESP8266 NodeMCU handles the control and data processing, while the LoRa module provides the capability to transmit and receive data over long distances using LoRa technology.
ESP8266 NodeMCU with GPS and LoRa Connectivity
This circuit comprises an ESP8266 NodeMCU microcontroller interfaced with a LoRa Ra-02 SX1278 module for long-range communication and a GPS NEO 6M module for location tracking. The ESP8266 reads GPS data via UART and transmits it using the LoRa module, which is connected via SPI. A 3.7v battery powers the system, making it suitable for remote tracking applications.
Arduino Nano and LoRa SX1278 Wireless Communication Module
This circuit consists of an Arduino Nano microcontroller connected to a LoRa Ra-02 SX1278 module, enabling wireless communication. The Arduino handles the SPI communication with the LoRa module, with connections for SCK, MISO, MOSI, NSS, and RST, as well as power and ground connections. This setup is typically used for long-range, low-power wireless data transmission.
Technical Specifications
Key Technical Details
| Parameter | Value |
|---|---|
| Operating Voltage | 1.8V - 3.7V |
| Frequency Range | 137 MHz - 1020 MHz |
| Modulation | LoRa, FSK, GFSK, MSK, GMSK |
| Output Power | Up to +22 dBm |
| Sensitivity | -139 dBm |
| Data Rate | 0.018 kbps - 62.5 kbps |
| Communication Range | Up to 15 km (line of sight) |
| Current Consumption | 4.6 mA (Rx), 20 mA (Tx @ +14dBm) |
| Interface | SPI |
| Dimensions | 24 mm x 18 mm |
Pin Configuration and Descriptions
| Pin Number | Pin Name | Description |
|---|---|---|
| 1 | GND | Ground |
| 2 | VCC | Power Supply (1.8V - 3.7V) |
| 3 | SCK | SPI Clock |
| 4 | MISO | SPI Master In Slave Out |
| 5 | MOSI | SPI Master Out Slave In |
| 6 | NSS | SPI Chip Select |
| 7 | DIO0 | Digital I/O Pin 0 (Interrupt) |
| 8 | DIO1 | Digital I/O Pin 1 (Interrupt) |
| 9 | DIO2 | Digital I/O Pin 2 (Interrupt) |
| 10 | RESET | Reset Pin |
Usage Instructions
How to Use the Component in a Circuit
- Power Supply: Connect the VCC pin to a power supply within the range of 1.8V to 3.7V. Connect the GND pin to the ground of your circuit.
- SPI Interface: Connect the SCK, MISO, MOSI, and NSS pins to the corresponding SPI pins on your microcontroller.
- Digital I/O Pins: Connect the DIO0, DIO1, and DIO2 pins to digital I/O pins on your microcontroller if you need to use interrupts.
- Reset Pin: Connect the RESET pin to a digital I/O pin on your microcontroller to control the reset functionality.
Important Considerations and Best Practices
- Antenna: Ensure that a suitable antenna is connected to the module to achieve optimal communication range.
- Power Supply: Use a stable power supply to avoid fluctuations that could affect the module's performance.
- SPI Communication: Ensure proper SPI communication settings (mode, clock speed) on your microcontroller.
- Interrupts: Use the DIO pins for handling interrupts efficiently, especially in low-power applications.
Example Code for Arduino UNO
#include <SPI.h>
#include <LoRa.h>

// Define the pins used by the LoRa module
#define NSS 10
#define RESET 9
#define DIO0 2

void setup() {
  // Initialize serial communication
  Serial.begin(9600);
  while (!Serial);

  // Initialize the LoRa module
  LoRa.setPins(NSS, RESET, DIO0);
  if (!LoRa.begin(915E6)) {
    Serial.println("Starting LoRa failed!");
    while (1);
  }
  Serial.println("LoRa initialized successfully.");
}

void loop() {
  // Send a message every 2 seconds
  Serial.println("Sending packet...");
  LoRa.beginPacket();
  LoRa.print("Hello, world!");
  LoRa.endPacket();
  delay(2000);
}
Troubleshooting and FAQs
Common Issues Users Might Face
- Module Not Responding: Ensure that the power supply is within the specified range and that all connections are secure.
- Poor Communication Range: Check the antenna connection and ensure it is suitable for the frequency band you are using.
- SPI Communication Failure: Verify the SPI connections and settings on your microcontroller.
Solutions and Tips for Troubleshooting
- Check Connections: Double-check all wiring and connections to ensure they are correct and secure.
- Power Supply: Use a stable and clean power supply to avoid issues related to voltage fluctuations.
- Antenna: Use a high-quality antenna and ensure it is properly connected to the module.
- SPI Settings: Ensure that the SPI settings (mode, clock speed) on your microcontroller match the requirements of the LoRa module.
By following this documentation, users should be able to effectively integrate and utilize the Core1262 LF/HF LoRa module in their projects, ensuring reliable and long-range wireless communication.