How to Use Pixhawk Px4 Front: Examples, Pinouts, and Specs
Introduction
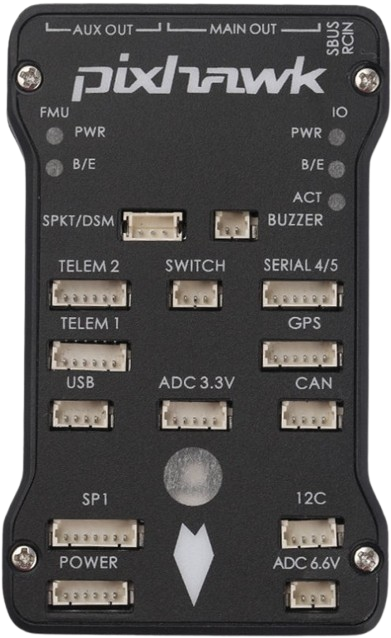
The Pixhawk Px4 Front, manufactured by 3D Robotics (Part ID: PX4), is a state-of-the-art flight control hardware designed for drones and other unmanned vehicles. It integrates advanced sensors, robust processing capabilities, and versatile connectivity options to enable autonomous navigation and precise control. This component is widely used in applications such as aerial photography, surveying, delivery drones, and research in robotics and autonomous systems.
Explore Projects Built with Pixhawk Px4 Front

Explore Projects Built with Pixhawk Px4 Front
Common Applications:
- Autonomous drones for aerial photography and videography
- Delivery drones for logistics and transportation
- Research platforms for robotics and AI
- Surveying and mapping in agriculture, construction, and environmental monitoring
- Unmanned ground or marine vehicles
Technical Specifications
Key Technical Details:
| Parameter | Specification |
|---|---|
| Processor | 32-bit ARM Cortex-M4F, 168 MHz |
| RAM | 256 KB |
| Flash Memory | 2 MB |
| IMU Sensors | Accelerometer, Gyroscope, Magnetometer, Barometer |
| Input Voltage Range | 4.1V to 5.7V |
| Power Consumption | ~2.5W (typical) |
| Communication Interfaces | UART, I2C, CAN, SPI, USB |
| Dimensions | 50 mm x 81.5 mm x 15.5 mm |
| Weight | ~38 grams |
| Operating Temperature Range | -20°C to 70°C |
Pin Configuration and Descriptions:
The Pixhawk Px4 Front features multiple connectors for peripherals, sensors, and power. Below is a summary of the key pin configurations:
Power Input:
| Pin | Label | Description |
|---|---|---|
| 1 | VCC | Main power input (4.1V to 5.7V) |
| 2 | GND | Ground |
I/O Ports:
| Pin | Label | Description |
|---|---|---|
| 1 | PWM1 | PWM output for motor control |
| 2 | PWM2 | PWM output for motor control |
| 3 | UART_TX | UART transmit |
| 4 | UART_RX | UART receive |
| 5 | I2C_SCL | I2C clock line |
| 6 | I2C_SDA | I2C data line |
Sensor Ports:
| Pin | Label | Description |
|---|---|---|
| 1 | GPS_TX | GPS module transmit |
| 2 | GPS_RX | GPS module receive |
| 3 | CAN_H | CAN bus high |
| 4 | CAN_L | CAN bus low |
Usage Instructions
How to Use the Pixhawk Px4 Front in a Circuit:
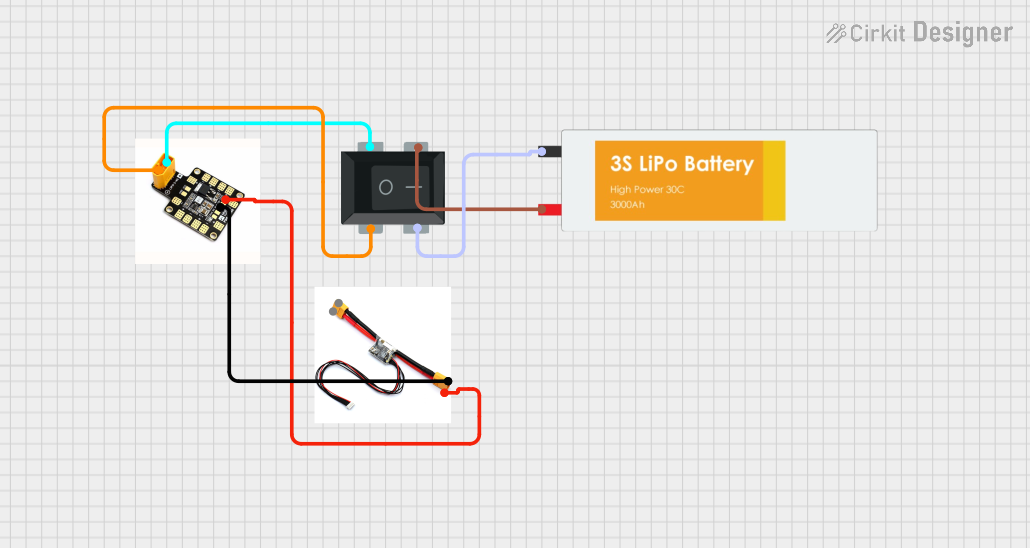
Powering the Pixhawk:
- Connect a regulated power supply (4.1V to 5.7V) to the VCC and GND pins.
- Ensure the power source can supply sufficient current for all connected peripherals.
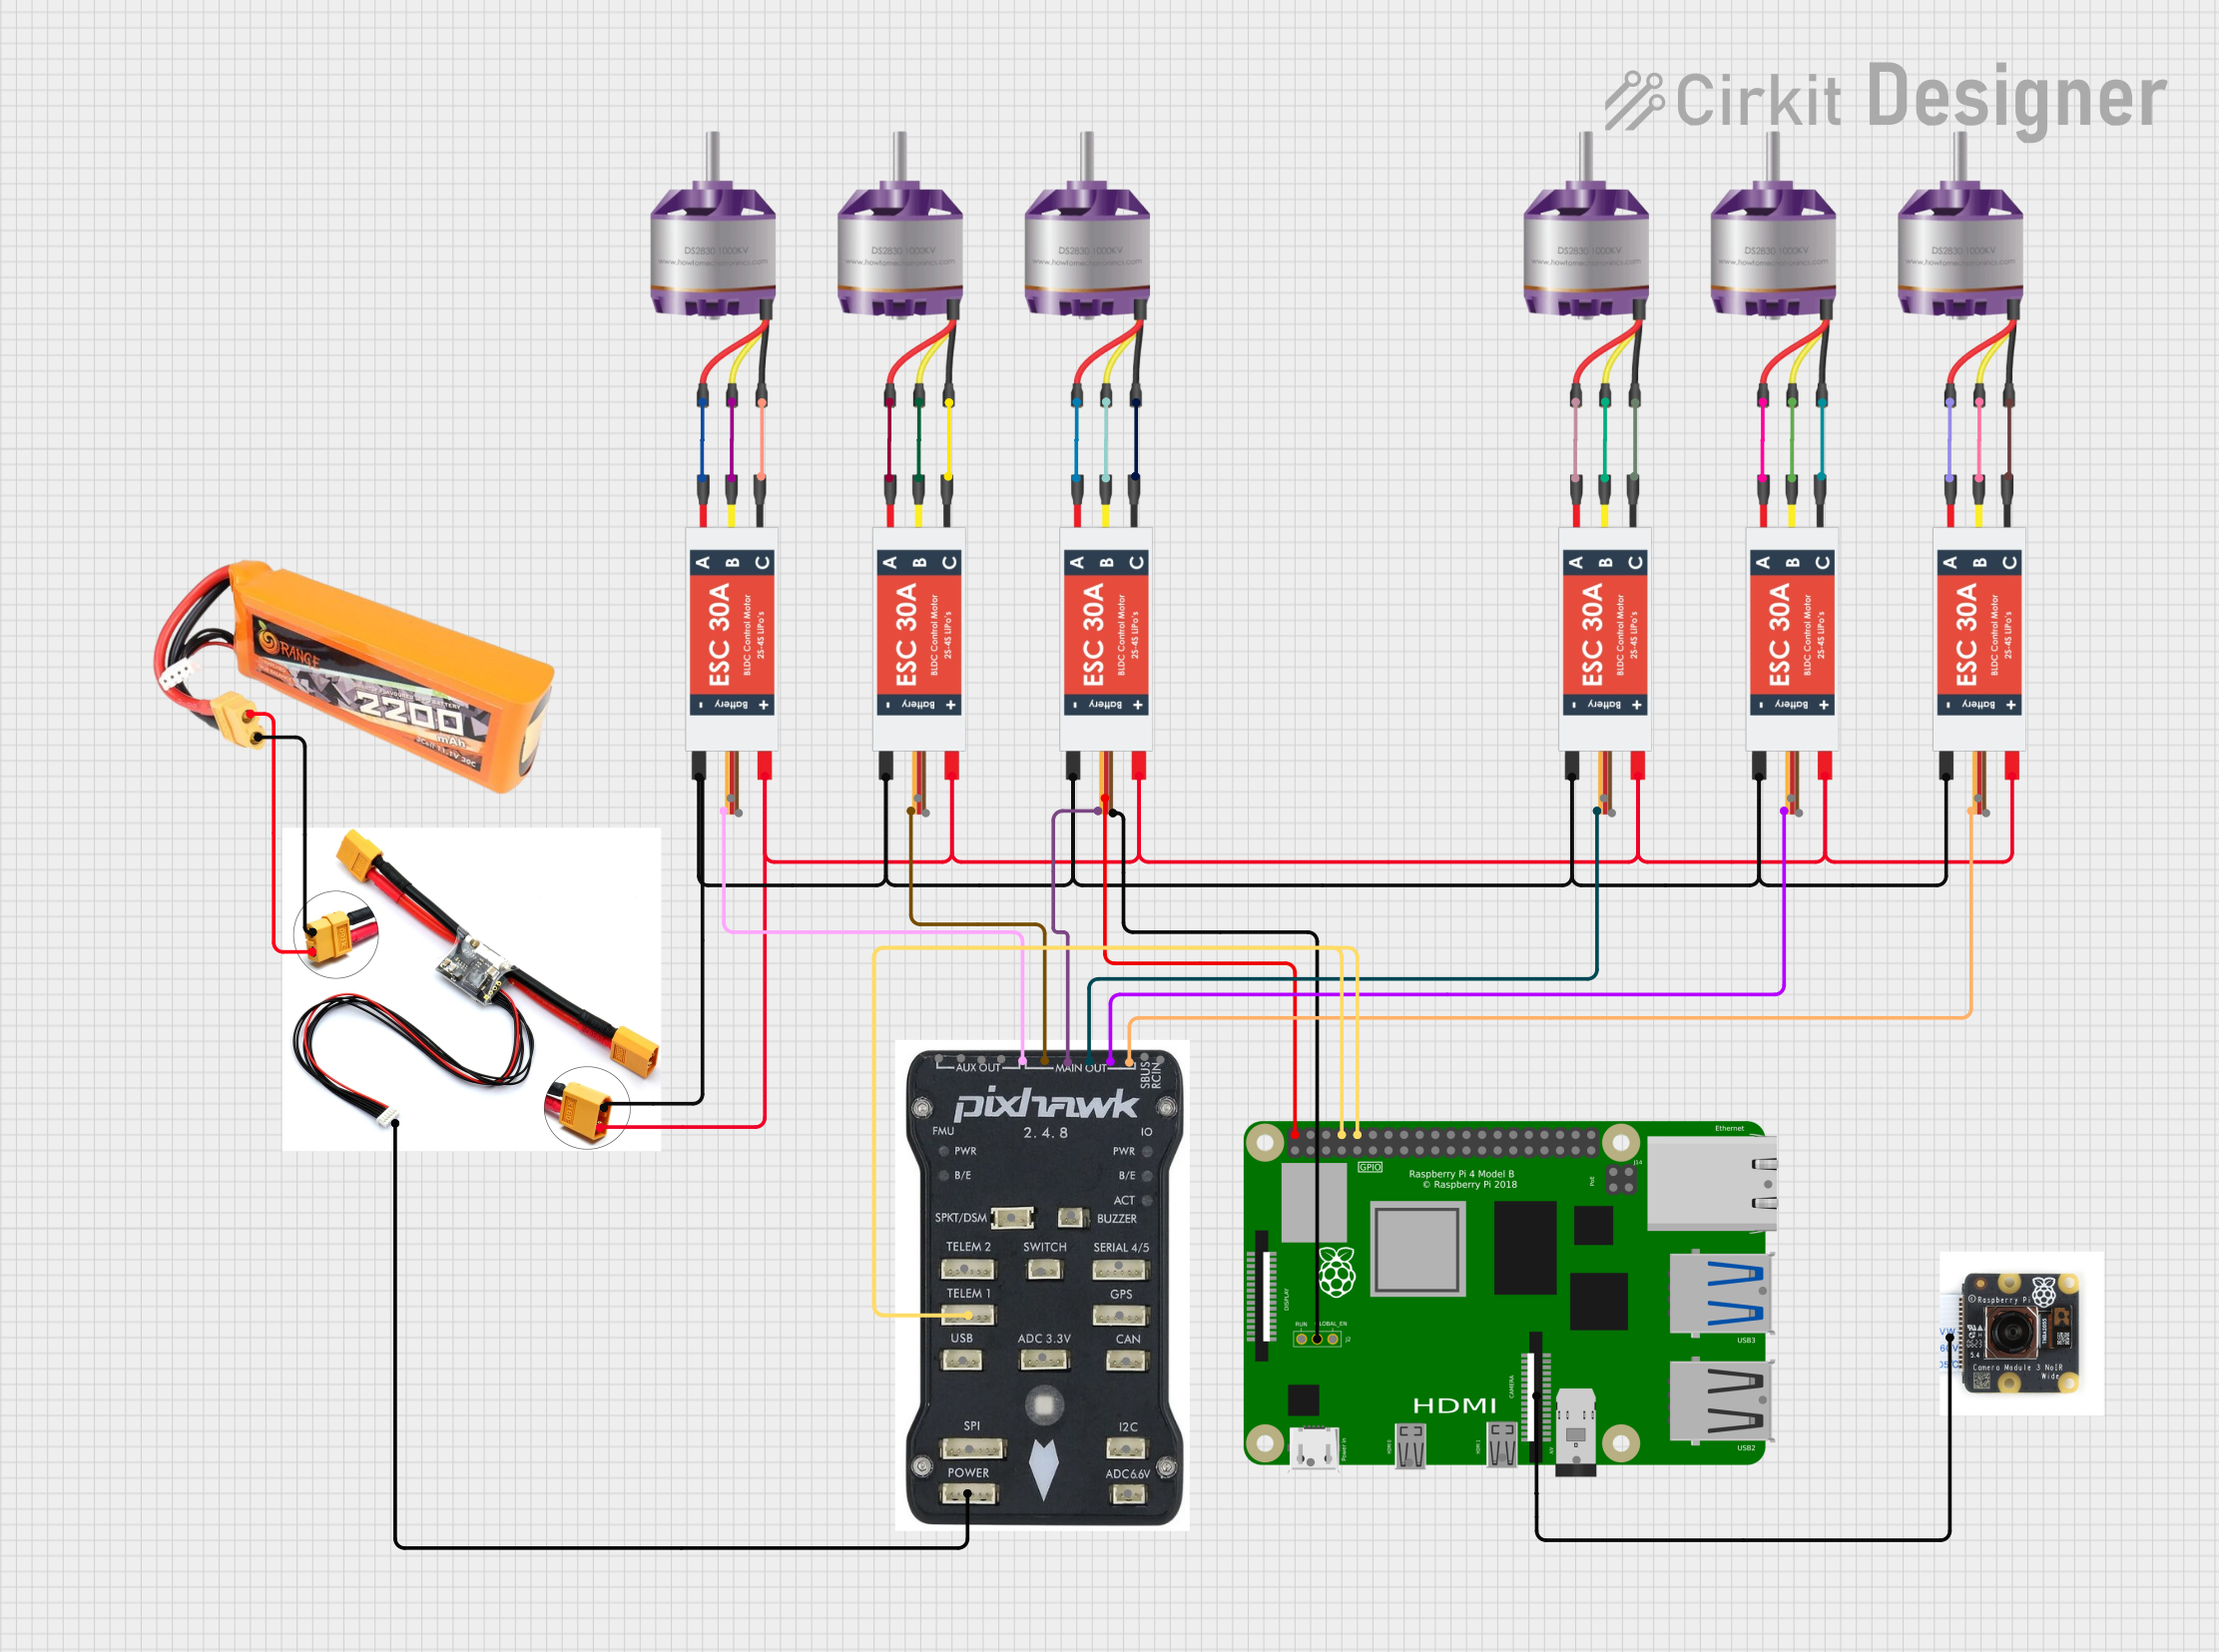
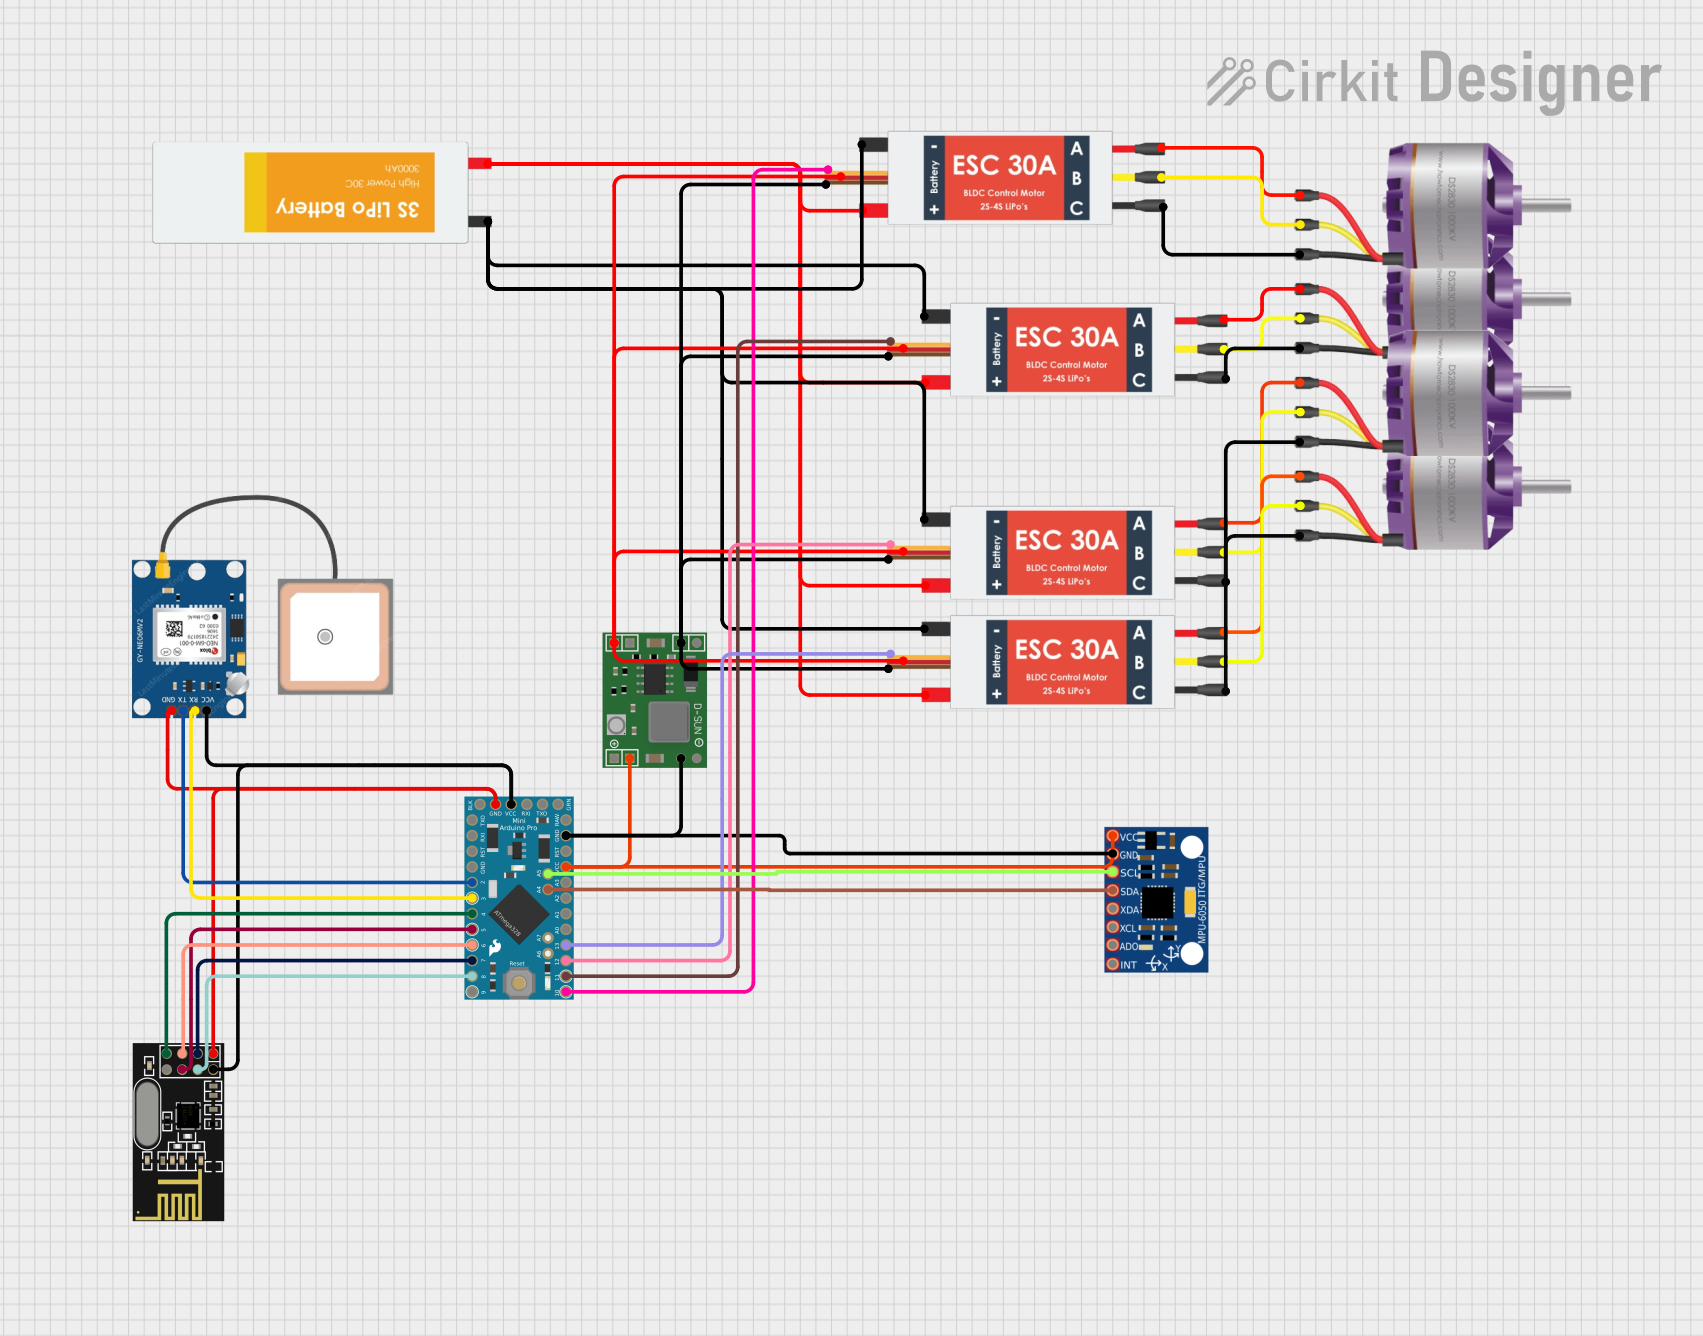
Connecting Peripherals:
- Attach motors to the PWM output pins (PWM1, PWM2, etc.).
- Connect sensors (e.g., GPS, barometer) to the appropriate ports (e.g., UART, I2C, CAN).
Programming and Configuration:
- Use the PX4 Autopilot firmware, which can be configured via the QGroundControl software.
- Connect the Pixhawk to your computer using the USB interface for firmware updates and parameter tuning.
Integration with Arduino UNO (Optional):
- The Pixhawk can communicate with an Arduino UNO via UART or I2C for additional control or data processing.
Example Code for Arduino UNO (UART Communication):
#include <SoftwareSerial.h>

// Define RX and TX pins for communication with Pixhawk
SoftwareSerial pixhawkSerial(10, 11); // RX = pin 10, TX = pin 11

void setup() {
  // Initialize serial communication
  Serial.begin(9600); // For debugging via Serial Monitor
  pixhawkSerial.begin(57600); // Baud rate for Pixhawk communication

  Serial.println("Arduino-Pixhawk communication initialized.");
}

void loop() {
  // Check if data is available from Pixhawk
  if (pixhawkSerial.available()) {
    String data = pixhawkSerial.readString(); // Read data from Pixhawk
    Serial.print("Received from Pixhawk: ");
    Serial.println(data); // Print data to Serial Monitor
  }

  // Example: Send a command to Pixhawk
  pixhawkSerial.println("Hello Pixhawk!");
  delay(1000); // Wait for 1 second
}
Important Considerations and Best Practices:
- Power Supply: Ensure the power supply is stable and within the specified voltage range to avoid damage.
- Firmware Updates: Always use the latest PX4 firmware for optimal performance and security.
- Sensor Calibration: Calibrate all sensors (e.g., accelerometer, gyroscope) before first use.
- EMI Shielding: Minimize electromagnetic interference by routing power and signal wires separately.
Troubleshooting and FAQs
Common Issues and Solutions:
Issue: Pixhawk does not power on.
- Solution: Check the power supply voltage and connections. Ensure the VCC pin receives 4.1V to 5.7V.
Issue: Motors do not respond to commands.
- Solution: Verify the PWM connections and ensure the motors are properly configured in the firmware.
Issue: GPS module not detected.
- Solution: Check the GPS connections (TX, RX) and ensure the module is powered.
Issue: Communication with Arduino fails.
- Solution: Ensure the baud rate matches between the Pixhawk and Arduino. Check the wiring of the UART pins.
FAQs:
Q: Can the Pixhawk Px4 Front be used with fixed-wing drones?
- A: Yes, it supports fixed-wing, multirotor, and VTOL configurations.
Q: What software is compatible with the Pixhawk?
- A: The Pixhawk is compatible with QGroundControl, Mission Planner, and MAVLink-based tools.
Q: How do I reset the Pixhawk to factory settings?
- A: Use the QGroundControl software to reset parameters to default values.
Q: Can I use the Pixhawk with Raspberry Pi?
- A: Yes, the Pixhawk can communicate with Raspberry Pi via UART or USB for advanced applications.
This concludes the documentation for the Pixhawk Px4 Front. For further assistance, refer to the official 3D Robotics support resources.