
How to Use QuadStepper: Examples, Pinouts, and Specs
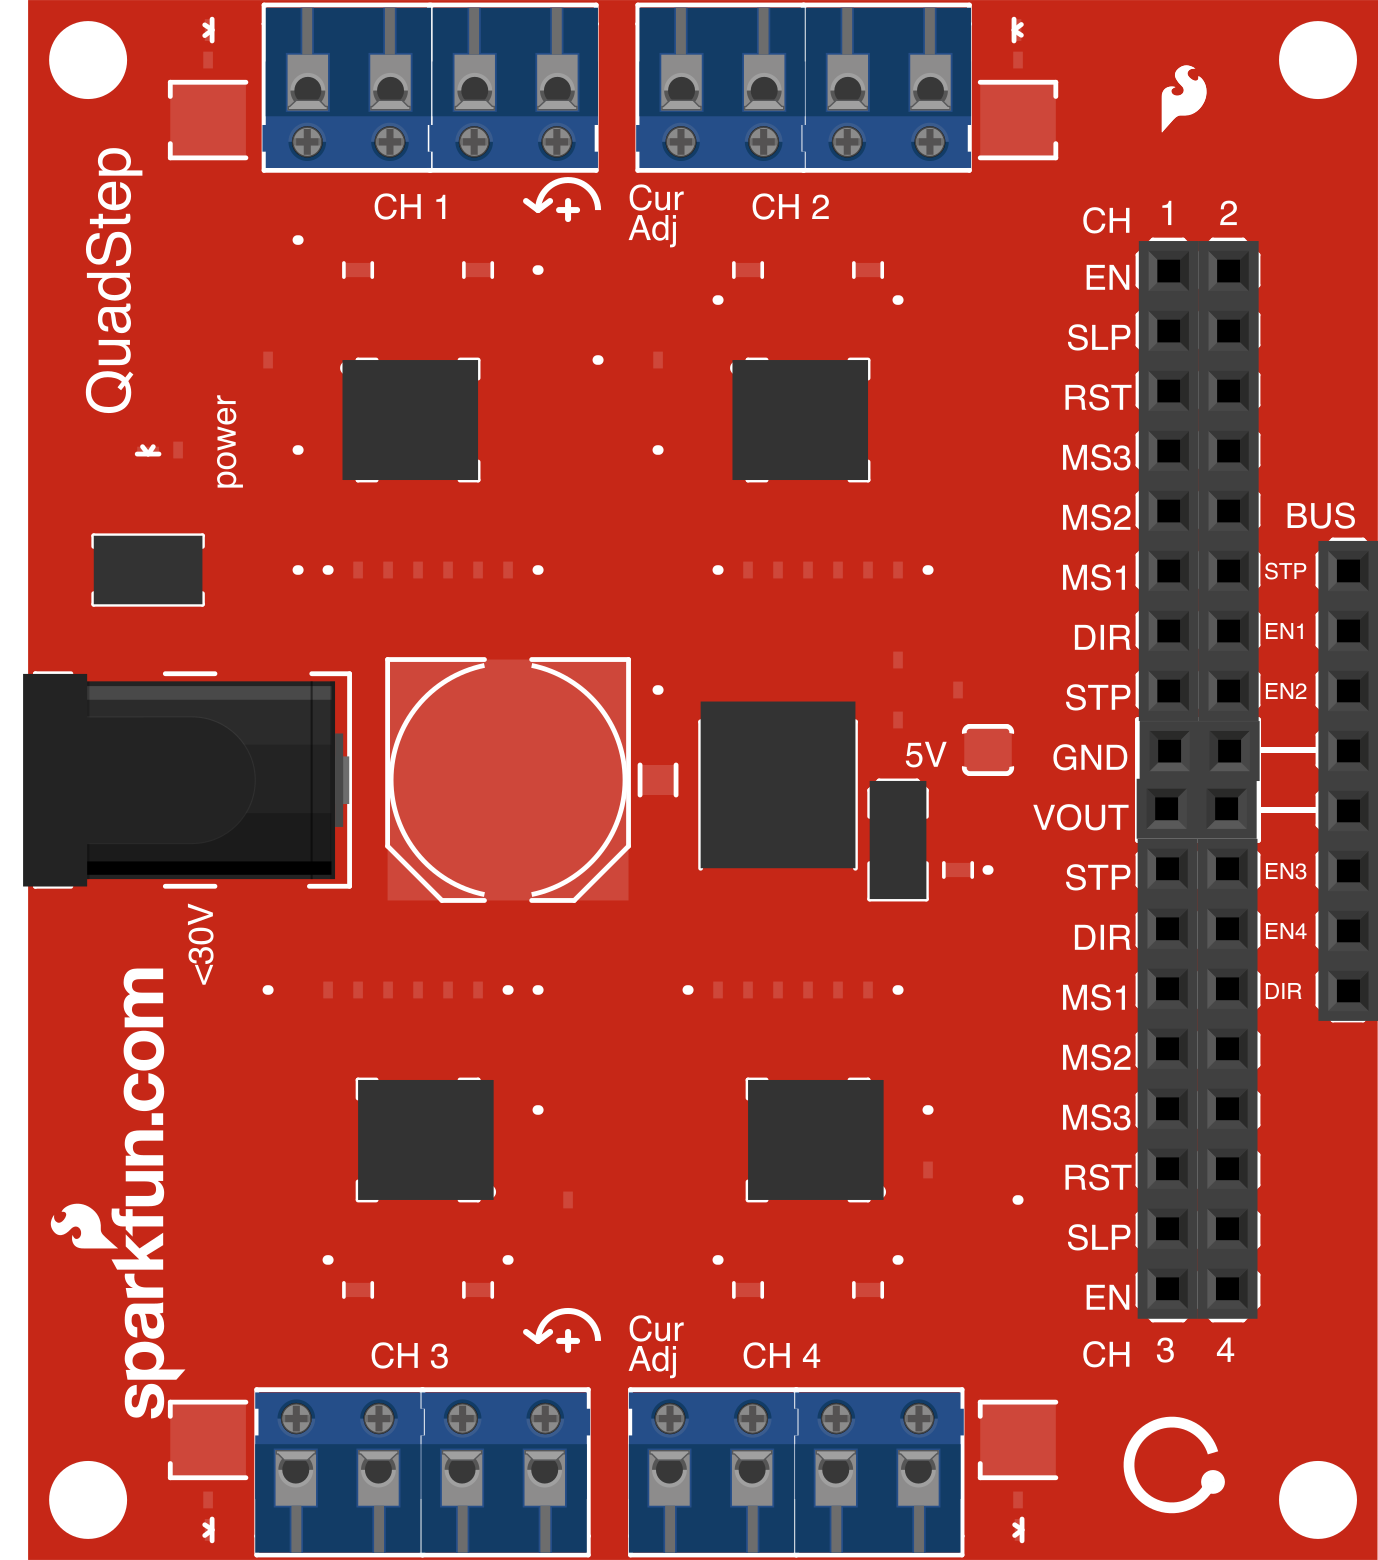
 Design with QuadStepper in Cirkit Designer
Introduction
The QuadStepper (Manufacturer Part ID: ROB-10507) by SparkFun Electronics is a versatile stepper motor driver designed to control up to four stepper motors simultaneously. It is ideal for applications requiring precise movement and positioning, such as robotics, CNC machines, 3D printers, and other automation systems. The QuadStepper simplifies the process of managing multiple motors, making it a valuable tool for both hobbyists and professionals.
Explore Projects Built with QuadStepper
 Open Project in Cirkit Designer
 Open Project in Cirkit Designer
 Open Project in Cirkit Designer
 Open Project in Cirkit Designer
Explore Projects Built with QuadStepper
Open Project in Cirkit DesignerOpen Project in Cirkit DesignerOpen Project in Cirkit DesignerOpen Project in Cirkit DesignerCommon Applications
- Robotics: Controlling multiple robotic arms or wheels.
- CNC Machines: Driving multiple axes for precise cutting or engraving.
- 3D Printing: Managing the movement of extruders and build platforms.
- Automation Systems: Coordinating conveyor belts or other mechanical systems.
Technical Specifications
The QuadStepper is designed to handle a wide range of stepper motor control tasks. Below are its key technical details:
General Specifications
| Parameter | Value |
|---|---|
| Manufacturer | SparkFun Electronics |
| Part ID | ROB-10507 |
| Number of Motors | 4 |
| Motor Type Supported | Bipolar Stepper Motors |
| Input Voltage Range | 8V to 30V |
| Maximum Current Output | 2.5A per motor (adjustable) |
| Microstepping Support | Full, Half, 1/4, 1/8, 1/16 |
| Communication Interface | Serial (UART) |
| Dimensions | 2.7" x 2.1" (68.6mm x 53.3mm) |
Pin Configuration
The QuadStepper features a set of headers and connectors for power, communication, and motor connections. Below is the pin configuration:
Power and Communication Pins
| Pin Name | Description |
|---|---|
| VIN | Input voltage (8V to 30V) |
| GND | Ground |
| TX | UART Transmit (to host microcontroller) |
| RX | UART Receive (from host microcontroller) |
Motor Output Pins (for each motor)
| Pin Name | Description |
|---|---|
| A+ | Positive terminal for coil A |
| A- | Negative terminal for coil A |
| B+ | Positive terminal for coil B |
| B- | Negative terminal for coil B |
Usage Instructions
The QuadStepper is straightforward to use, but proper setup and configuration are essential for optimal performance.
Step 1: Wiring the QuadStepper
- Power Supply: Connect a DC power supply (8V to 30V) to the
VINandGNDpins. Ensure the power supply can provide sufficient current for all connected motors. - Motor Connections: Connect the stepper motors to the corresponding
A+,A-,B+, andB-terminals for each motor. - Microcontroller Connection: Use the
TXandRXpins to connect the QuadStepper to a microcontroller (e.g., Arduino UNO). Ensure proper UART communication settings.
Step 2: Configuring the QuadStepper
- Set the desired microstepping mode using the onboard DIP switches.
- Adjust the current limit for each motor using the potentiometers on the board. Refer to the motor's datasheet for recommended current settings.
Step 3: Programming the Microcontroller
Below is an example Arduino UNO code to control the QuadStepper:
// Example code to control the QuadStepper with an Arduino UNO
// Ensure the QuadStepper is connected to the Arduino's TX and RX pins

#include <SoftwareSerial.h>

// Define the RX and TX pins for communication with the QuadStepper
#define QUADSTEPPER_RX 10  // Arduino pin connected to QuadStepper TX
#define QUADSTEPPER_TX 11  // Arduino pin connected to QuadStepper RX

SoftwareSerial quadStepperSerial(QUADSTEPPER_RX, QUADSTEPPER_TX);

void setup() {
  // Initialize serial communication with the QuadStepper
  quadStepperSerial.begin(9600); // Default baud rate for QuadStepper
  Serial.begin(9600); // For debugging

  // Example: Send a command to move Motor 1
  quadStepperSerial.print("M1:STEP 100\n"); // Move Motor 1 by 100 steps
  Serial.println("Command sent to QuadStepper: Move Motor 1 by 100 steps");
}

void loop() {
  // Add additional commands or logic as needed
}
Best Practices
- Use a heat sink or cooling fan if driving motors at high currents for extended periods.
- Double-check all connections to avoid damage to the board or motors.
- Use shielded cables for motor connections to minimize electrical noise.
Troubleshooting and FAQs
Common Issues and Solutions
Motors Not Moving
- Cause: Incorrect wiring or insufficient power supply.
- Solution: Verify motor connections and ensure the power supply meets the voltage and current requirements.
Overheating
- Cause: Current limit set too high or inadequate cooling.
- Solution: Adjust the current limit using the potentiometers and add a heat sink or fan.
Erratic Motor Movement
- Cause: Electrical noise or incorrect microstepping configuration.
- Solution: Use shielded cables and verify the DIP switch settings.
No Communication with Microcontroller
- Cause: Incorrect UART settings or wiring.
- Solution: Check the TX/RX connections and ensure the baud rate matches the QuadStepper's default (9600 bps).
FAQs
Q: Can the QuadStepper drive unipolar stepper motors?
A: No, the QuadStepper is designed for bipolar stepper motors only.
Q: What is the maximum step rate supported?
A: The QuadStepper can handle step rates up to 20,000 steps per second, depending on the motor and power supply.
Q: Can I use the QuadStepper with a Raspberry Pi?
A: Yes, the QuadStepper can be controlled via UART from a Raspberry Pi. Ensure proper voltage level shifting if needed.
Q: How do I reset the QuadStepper?
A: Power cycle the board by disconnecting and reconnecting the power supply.
By following this documentation, you can effectively integrate the QuadStepper into your projects and achieve precise multi-motor control.