Cirkit Designer Logo
Cirkit Designer
Your all-in-one circuit design IDE
Home / 
Component Documentation

How to Use TM1637: Examples, Pinouts, and Specs

Image of TM1637
Cirkit Designer LogoDesign with TM1637 in Cirkit Designer

Introduction

The TM1637 is a compact, serial input/output common-cathode display driver that interfaces microcontrollers to LED displays through a simple 2-wire interface, often referred to as I2C-like protocol. It is widely used in applications such as digital clocks, electronic meters, and other devices that require numeric display output.

Explore Projects Built with TM1637

Use Cirkit Designer to design, explore, and prototype these projects online. Some projects support real-time simulation. Click "Open Project" to start designing instantly!
Arduino Nano 33 BLE Battery-Powered Display Interface
Image of senior design 1: A project utilizing TM1637 in a practical application
This circuit features a Nano 33 BLE microcontroller interfaced with a TM1637 4-digit 7-segment display for information output, powered by a 3.7V battery managed by a TP4056 charging module. The microcontroller communicates with the display to present data, while the TP4056 ensures the battery is charged safely and provides power to the system.
Cirkit Designer LogoOpen Project in Cirkit Designer
Raspberry Pi 3B Controlled TM1637 Digital Display Interface
Image of clock: A project utilizing TM1637 in a practical application
This circuit connects a TM1637 display module to a Raspberry Pi 3B. The Raspberry Pi controls the display via GPIO pins 20 and 21 for data and clock signals, respectively. The TM1637 is powered by the Raspberry Pi's 5V supply, and both devices share a common ground.
Cirkit Designer LogoOpen Project in Cirkit Designer
Arduino Nano and TM1637 Real-Time Clock Display
Image of test: A project utilizing TM1637 in a practical application
This circuit uses an Arduino Nano to control a TM1637 4-digit 7-segment display module, displaying the current time. The Arduino reads the time from an RTC (Real-Time Clock) module and updates the display every second.
Cirkit Designer LogoOpen Project in Cirkit Designer
Arduino UNO Controlled TM1637 Display and SG90 Servo Motor Interface
Image of RC Pulse measurement: A project utilizing TM1637 in a practical application
This circuit features an Arduino UNO microcontroller connected to a TM1637 display module and an SG90 servo motor. The Arduino provides power to both the display and the servo motor, and it controls the display via digital pins D4 (DIO) and D3 (CLK), and the servo motor via pin D2 (PWM). The primary function of this circuit is likely to display information on the TM1637 module and to control the position or motion of the servo motor based on some programmed logic within the Arduino.
Cirkit Designer LogoOpen Project in Cirkit Designer

Explore Projects Built with TM1637

Use Cirkit Designer to design, explore, and prototype these projects online. Some projects support real-time simulation. Click "Open Project" to start designing instantly!
Image of senior design 1: A project utilizing TM1637 in a practical application
Arduino Nano 33 BLE Battery-Powered Display Interface
This circuit features a Nano 33 BLE microcontroller interfaced with a TM1637 4-digit 7-segment display for information output, powered by a 3.7V battery managed by a TP4056 charging module. The microcontroller communicates with the display to present data, while the TP4056 ensures the battery is charged safely and provides power to the system.
Cirkit Designer LogoOpen Project in Cirkit Designer
Image of clock: A project utilizing TM1637 in a practical application
Raspberry Pi 3B Controlled TM1637 Digital Display Interface
This circuit connects a TM1637 display module to a Raspberry Pi 3B. The Raspberry Pi controls the display via GPIO pins 20 and 21 for data and clock signals, respectively. The TM1637 is powered by the Raspberry Pi's 5V supply, and both devices share a common ground.
Cirkit Designer LogoOpen Project in Cirkit Designer
Image of test: A project utilizing TM1637 in a practical application
Arduino Nano and TM1637 Real-Time Clock Display
This circuit uses an Arduino Nano to control a TM1637 4-digit 7-segment display module, displaying the current time. The Arduino reads the time from an RTC (Real-Time Clock) module and updates the display every second.
Cirkit Designer LogoOpen Project in Cirkit Designer
Image of RC Pulse measurement: A project utilizing TM1637 in a practical application
Arduino UNO Controlled TM1637 Display and SG90 Servo Motor Interface
This circuit features an Arduino UNO microcontroller connected to a TM1637 display module and an SG90 servo motor. The Arduino provides power to both the display and the servo motor, and it controls the display via digital pins D4 (DIO) and D3 (CLK), and the servo motor via pin D2 (PWM). The primary function of this circuit is likely to display information on the TM1637 module and to control the position or motion of the servo motor based on some programmed logic within the Arduino.
Cirkit Designer LogoOpen Project in Cirkit Designer

Common Applications and Use Cases

  • Digital clocks and timers
  • Electronic meters (e.g., voltmeters, ammeters)
  • Scoreboards and counters
  • Home appliances with numeric displays

Technical Specifications

Key Technical Details

  • Operating Voltage: 3.3V to 5.5V
  • Max Output Current: 80mA (per segment)
  • Display Mode: 7-segment & 8-grid
  • Interface: 2-wire serial interface
  • Built-in scan register and decode driver
  • Automatic brightness control with PWM

Pin Configuration and Descriptions

Pin Number Pin Name Description
1 VDD Power supply (3.3V to 5.5V)
2 GND Ground
3 DIO Data input/output for 2-wire serial data
4 CLK Clock input for 2-wire serial interface

Usage Instructions

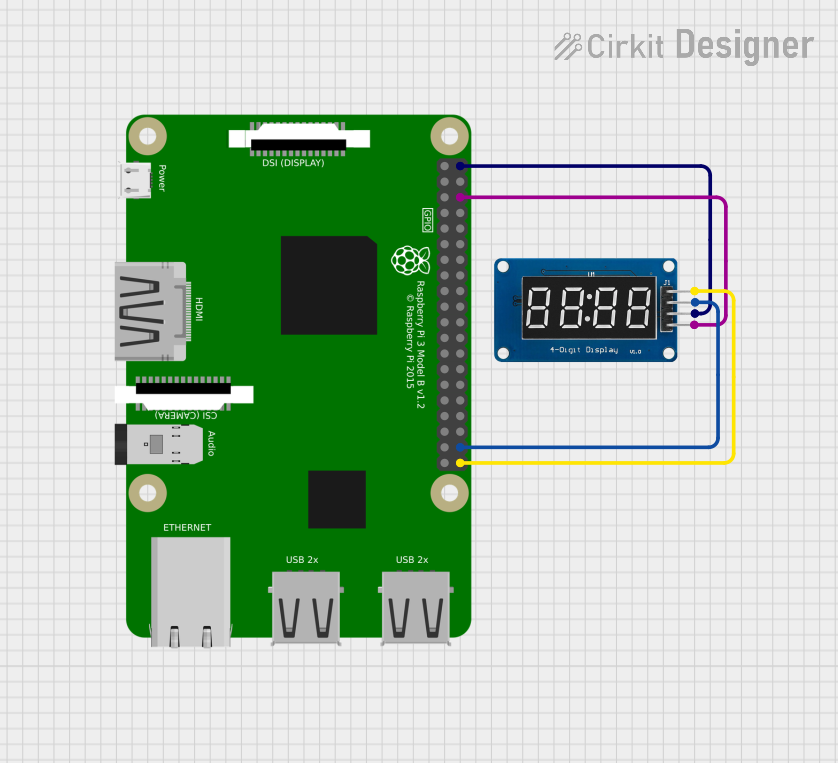
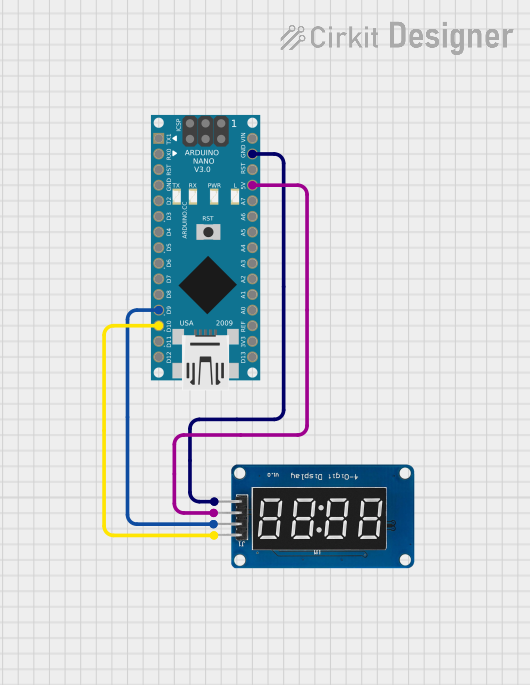
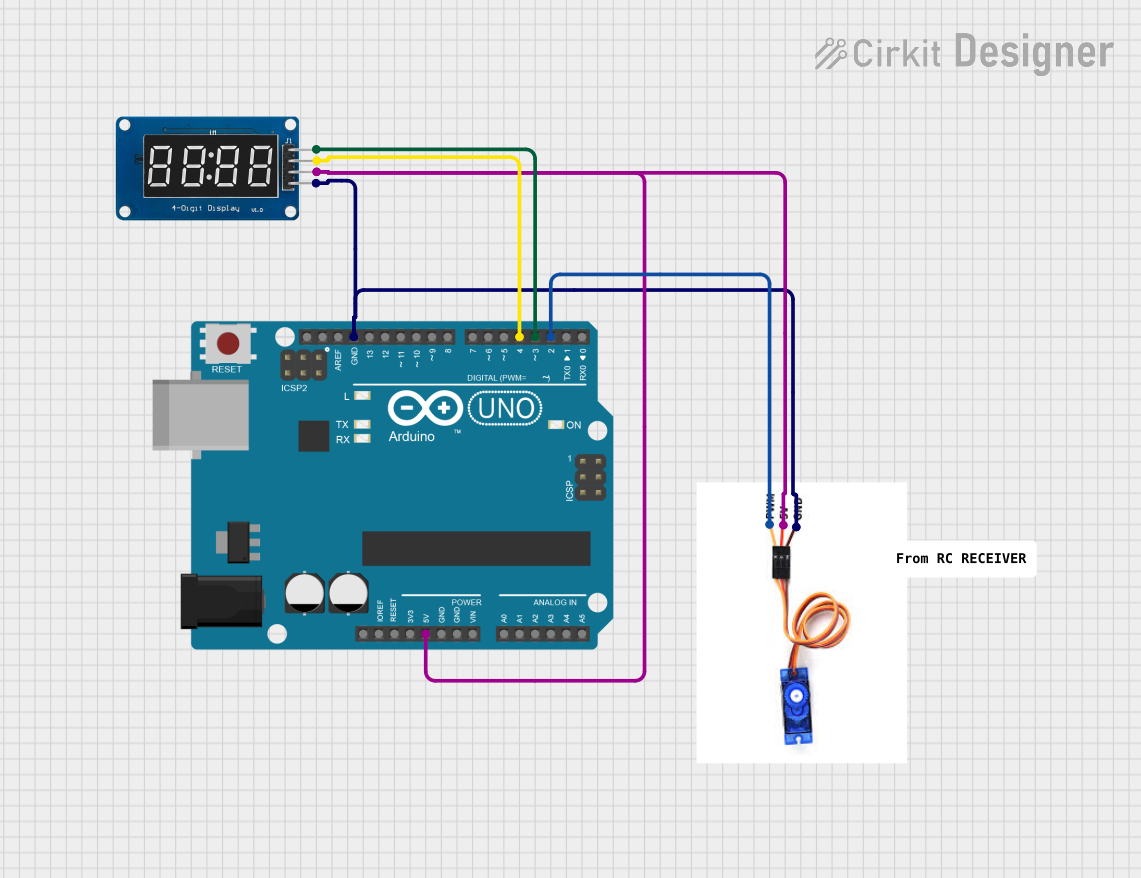
How to Use the TM1637 in a Circuit

  1. Power Connections: Connect VDD to the positive supply voltage (3.3V to 5.5V) and GND to the ground of the power supply.
  2. Microcontroller Interface: Connect the DIO pin to a digital I/O pin on the microcontroller and the CLK pin to another digital I/O pin.
  3. Initialization: Initialize the TM1637 from the microcontroller by setting up the serial communication protocol.
  4. Data Transmission: Send display data serially using the defined protocol to control individual segments of the display.

Important Considerations and Best Practices

  • Ensure that the power supply voltage is within the specified range to prevent damage.
  • Use current-limiting resistors if necessary to protect the LED segments.
  • Avoid long wires between the microcontroller and the TM1637 to minimize signal degradation.
  • Implement proper decoupling with a capacitor close to the VDD and GND pins of the TM1637.

Example Code for Arduino UNO

#include <TM1637Display.h>

// Define the connections pins
#define CLK 2
#define DIO 3

// Create a TM1637Display object
TM1637Display display(CLK, DIO);

void setup() {
  display.setBrightness(0x0f); // Set brightness level (0x00 to 0x0f)
  display.clear(); // Clear the display
}

void loop() {
  int value = 1234; // Value to be displayed
  display.showNumberDec(value); // Display the value on the screen
  delay(2000); // Wait for 2 seconds
}

Troubleshooting and FAQs

Common Issues Users Might Face

  • Display Not Lighting Up: Check the power supply connections and ensure that the voltage is within the specified range.
  • Garbled Display Output: Verify that the CLK and DIO connections are secure and that there are no loose connections.
  • Dim Display: Adjust the brightness level in the code or check for insufficient power supply voltage.

Solutions and Tips for Troubleshooting

  • Double-check wiring against the pin configuration table.
  • Ensure that the library used in the code is correctly installed and included.
  • Use the display.setBrightness() function to adjust the display brightness.
  • If using long wires, consider using shielded cables or twisted pairs to reduce interference.

FAQs

Q: Can the TM1637 drive other types of displays? A: The TM1637 is designed primarily for 7-segment LED displays, and it may not be suitable for other display types without additional components or modifications.

Q: How many digits can the TM1637 control? A: The TM1637 can control up to 4 digits of 7-segment displays.

Q: Is it possible to display letters as well as numbers? A: Yes, the TM1637 can display a limited set of letters and characters that can be formed using 7-segment displays.

Q: Can I control the TM1637 without an Arduino library? A: Yes, you can control the TM1637 by manually implementing the communication protocol, but using a library simplifies the process significantly.

This documentation provides an overview of the TM1637 LED driver, including its technical specifications, usage instructions, example code for Arduino UNO, and troubleshooting tips. For more detailed information, refer to the datasheet provided by TITAN MICRO ELECTRONICS.