
How to Use Grove Temperature Sensor: Examples, Pinouts, and Specs
 Design with Grove Temperature Sensor in Cirkit Designer
Introduction
The Grove Temperature Sensor, manufactured by Seeed Studio, is a versatile and easy-to-use module designed to measure ambient temperature. It provides an analog output proportional to the temperature, making it suitable for a wide range of applications. This sensor is commonly used in environmental monitoring, home automation, weather stations, and educational projects. Its plug-and-play design, compatible with the Grove ecosystem, ensures seamless integration with microcontrollers like Arduino and Raspberry Pi.
Explore Projects Built with Grove Temperature Sensor
 Open Project in Cirkit Designer
 Open Project in Cirkit Designer
 Open Project in Cirkit Designer
 Open Project in Cirkit Designer
Explore Projects Built with Grove Temperature Sensor
Open Project in Cirkit DesignerOpen Project in Cirkit DesignerOpen Project in Cirkit DesignerOpen Project in Cirkit DesignerTechnical Specifications
- Manufacturer: Seeed Studio
- Model: Grove Temperature Sensor
- Output Type: Analog voltage
- Operating Voltage: 3.3V to 5V DC
- Temperature Range: -40°C to 125°C
- Accuracy: ±1.5°C (typical)
- Response Time: <1 second
- Connector: Grove 4-pin interface
- Dimensions: 20mm x 20mm
Pin Configuration and Descriptions
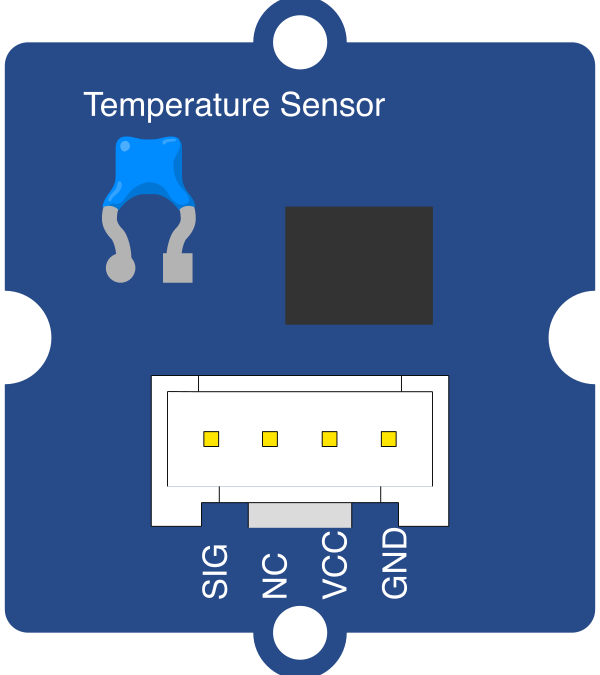
The Grove Temperature Sensor uses a 4-pin Grove connector. The pinout is as follows:
| Pin Number | Pin Name | Description |
|---|---|---|
| 1 | VCC | Power supply (3.3V to 5V DC) |
| 2 | GND | Ground |
| 3 | SIG | Analog signal output (temperature) |
| 4 | NC | Not connected |
Usage Instructions
Connecting the Sensor
Hardware Setup:
- Connect the Grove Temperature Sensor to an analog input port on a Grove Base Shield or directly to an Arduino UNO.
- Ensure the VCC and GND pins are properly connected to the 3.3V/5V and GND pins of the microcontroller, respectively.
- The SIG pin should be connected to an analog input pin (e.g., A0) on the microcontroller.
Software Setup:
- Install the necessary libraries for Grove sensors if using a Grove Base Shield.
- Use the following Arduino code to read and convert the analog signal into a temperature value.
Sample Arduino Code
// Grove Temperature Sensor Example Code
// This code reads the analog signal from the sensor and calculates the temperature.
// Ensure the sensor is connected to the A0 pin of the Arduino.

const int sensorPin = A0; // Analog pin connected to the sensor's SIG pin
float voltage;            // Variable to store the sensor's output voltage
float temperature;        // Variable to store the calculated temperature

void setup() {
  Serial.begin(9600); // Initialize serial communication at 9600 baud
  pinMode(sensorPin, INPUT); // Set the sensor pin as input
}

void loop() {
  int sensorValue = analogRead(sensorPin); // Read the analog value from the sensor
  voltage = sensorValue * (5.0 / 1023.0);  // Convert the analog value to voltage
  temperature = (voltage - 0.5) * 100.0;   // Convert voltage to temperature in °C
  // The formula assumes a 10mV/°C scale factor and 0.5V offset at 0°C

  Serial.print("Temperature: ");
  Serial.print(temperature);
  Serial.println(" °C"); // Print the temperature to the Serial Monitor

  delay(1000); // Wait for 1 second before the next reading
}
Important Considerations
- Power Supply: Ensure the sensor is powered within its operating voltage range (3.3V to 5V DC).
- Calibration: For precise measurements, consider calibrating the sensor in your specific environment.
- Placement: Avoid placing the sensor near heat sources or in direct sunlight, as this may affect accuracy.
- Signal Noise: Use proper grounding and shielding to minimize noise in the analog signal.
Troubleshooting and FAQs
Common Issues
No Output or Incorrect Readings:
- Cause: Improper wiring or loose connections.
- Solution: Double-check the connections, ensuring VCC, GND, and SIG are correctly connected.
Temperature Readings Are Inaccurate:
- Cause: Environmental factors or incorrect formula in the code.
- Solution: Ensure the sensor is placed in a stable environment and verify the calculation formula.
Serial Monitor Shows "0°C" Constantly:
- Cause: Sensor not receiving power or analog pin not configured correctly.
- Solution: Verify the power supply and ensure the correct analog pin is used in the code.
FAQs
Q1: Can this sensor measure negative temperatures?
Yes, the Grove Temperature Sensor can measure temperatures as low as -40°C. Ensure the formula in your code accounts for negative values.
Q2: Is this sensor compatible with Raspberry Pi?
Yes, the sensor can be used with Raspberry Pi via an ADC (Analog-to-Digital Converter) module, as Raspberry Pi lacks native analog input pins.
Q3: How do I extend the sensor's cable length?
You can use Grove extension cables, but ensure the total length does not introduce significant signal noise or voltage drop.
Q4: Can I use this sensor outdoors?
The sensor itself is not weatherproof. If used outdoors, it must be enclosed in a protective, ventilated housing to prevent damage from moisture or extreme conditions.