Cirkit Designer Logo
Cirkit Designer
Your all-in-one circuit design IDE
Home / 
Component Documentation

How to Use SDmodule: Examples, Pinouts, and Specs

Image of SDmodule
Cirkit Designer LogoDesign with SDmodule in Cirkit Designer

Introduction

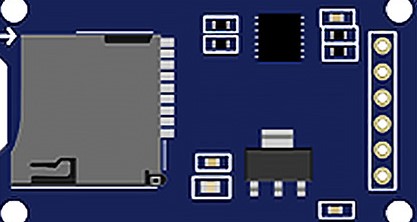
An SD module is an electronic component that enables microcontrollers and other computing devices to communicate with Secure Digital (SD) cards. SD cards are widely used for storage in portable devices due to their compact size and high storage capacity. The SD module acts as an interface between the SD card and the host device, allowing for the reading and writing of data. Common applications include data logging, media storage, and firmware updates in embedded systems.

Explore Projects Built with SDmodule

Use Cirkit Designer to design, explore, and prototype these projects online. Some projects support real-time simulation. Click "Open Project" to start designing instantly!
ESP32-S3 GPS and Wind Speed Logger with Dual OLED Displays and CAN Bus
Image of esp32-s3-ellipse: A project utilizing SDmodule in a practical application
This circuit features an ESP32-S3 microcontroller interfaced with an SD card module, two OLED displays, a GPS module, and a CAN bus module. The ESP32-S3 records GPS data to the SD card, displays speed on one OLED, and shows wind speed from the CAN bus on the other OLED, providing a comprehensive data logging and display system.
Cirkit Designer LogoOpen Project in Cirkit Designer
Arduino UNO SD Card Data Logger
Image of sd card: A project utilizing SDmodule in a practical application
This circuit consists of an Arduino UNO connected to an SD card module. The Arduino provides power and ground to the SD module and interfaces with it using SPI communication through digital pins D10 (CS), D11 (MOSI), D12 (MISO), and D13 (SCK). The setup is intended for reading from or writing to an SD card using the Arduino.
Cirkit Designer LogoOpen Project in Cirkit Designer
ESP32-S3 GPS Logger and Wind Speed Display with Dual OLED and CAN Bus
Image of Copy of esp32-s3-ellipse: A project utilizing SDmodule in a practical application
This circuit features an ESP32-S3 microcontroller interfaced with an SD card, two OLED displays, a GPS module, and a CAN bus module. It records GPS data to the SD card every second, displays speed in knots on one OLED display, and shows wind speed from the CAN bus in NMEA 2000 format on the other OLED display.
Cirkit Designer LogoOpen Project in Cirkit Designer
ESP32-Based SD Card Data Logger
Image of Data Logging: A project utilizing SDmodule in a practical application
This circuit connects an ESP32 Wroom Dev Kit microcontroller to a Micro SD Card Module for data storage purposes. The ESP32 is configured to communicate with the SD card using the SPI protocol, as indicated by the connections of MOSI, MISO, SCK, and CS pins. A separate Vcc component provides power to the SD card module.
Cirkit Designer LogoOpen Project in Cirkit Designer

Explore Projects Built with SDmodule

Use Cirkit Designer to design, explore, and prototype these projects online. Some projects support real-time simulation. Click "Open Project" to start designing instantly!
Image of esp32-s3-ellipse: A project utilizing SDmodule in a practical application
ESP32-S3 GPS and Wind Speed Logger with Dual OLED Displays and CAN Bus
This circuit features an ESP32-S3 microcontroller interfaced with an SD card module, two OLED displays, a GPS module, and a CAN bus module. The ESP32-S3 records GPS data to the SD card, displays speed on one OLED, and shows wind speed from the CAN bus on the other OLED, providing a comprehensive data logging and display system.
Cirkit Designer LogoOpen Project in Cirkit Designer
Image of sd card: A project utilizing SDmodule in a practical application
Arduino UNO SD Card Data Logger
This circuit consists of an Arduino UNO connected to an SD card module. The Arduino provides power and ground to the SD module and interfaces with it using SPI communication through digital pins D10 (CS), D11 (MOSI), D12 (MISO), and D13 (SCK). The setup is intended for reading from or writing to an SD card using the Arduino.
Cirkit Designer LogoOpen Project in Cirkit Designer
Image of Copy of esp32-s3-ellipse: A project utilizing SDmodule in a practical application
ESP32-S3 GPS Logger and Wind Speed Display with Dual OLED and CAN Bus
This circuit features an ESP32-S3 microcontroller interfaced with an SD card, two OLED displays, a GPS module, and a CAN bus module. It records GPS data to the SD card every second, displays speed in knots on one OLED display, and shows wind speed from the CAN bus in NMEA 2000 format on the other OLED display.
Cirkit Designer LogoOpen Project in Cirkit Designer
Image of Data Logging: A project utilizing SDmodule in a practical application
ESP32-Based SD Card Data Logger
This circuit connects an ESP32 Wroom Dev Kit microcontroller to a Micro SD Card Module for data storage purposes. The ESP32 is configured to communicate with the SD card using the SPI protocol, as indicated by the connections of MOSI, MISO, SCK, and CS pins. A separate Vcc component provides power to the SD card module.
Cirkit Designer LogoOpen Project in Cirkit Designer

Technical Specifications

Key Technical Details

  • Supply Voltage (VCC): 3.3V to 5V
  • Logic Level: 3.3V (5V tolerant with level shifter)
  • Communication Interface: SPI (Serial Peripheral Interface)
  • Supported SD Card Types: SD, SDHC (up to 32GB)
  • Data Transfer Rate: Up to 25 Mbps (depending on the SD card class)

Pin Configuration and Descriptions

Pin Name Description
CS Chip Select - Active low
MOSI Master Out Slave In - Data to SD card
MISO Master In Slave Out - Data from SD card
SCK Serial Clock - Clock signal for SPI
VCC Supply Voltage - 3.3V to 5V
GND Ground - Common ground for power and logic

Usage Instructions

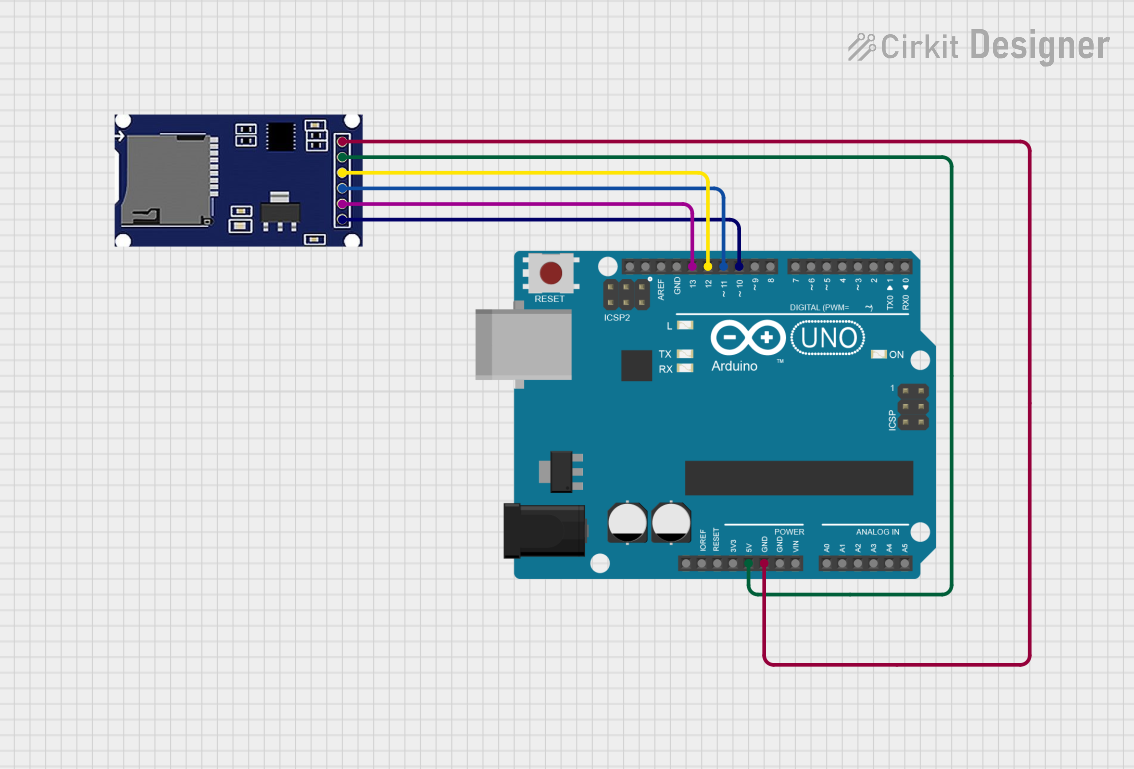
Connecting the SD Module to a Circuit

  1. Power Connections:

    • Connect the VCC pin to a 3.3V or 5V power supply.
    • Connect the GND pin to the ground of the power supply.
  2. SPI Connections:

    • Connect the CS pin to a digital pin on the microcontroller for chip select.
    • Connect the MOSI pin to the MOSI pin of the microcontroller's SPI interface.
    • Connect the MISO pin to the MISO pin of the microcontroller's SPI interface.
    • Connect the SCK pin to the SCK pin of the microcontroller's SPI interface.

Important Considerations and Best Practices

  • Ensure that the power supply is stable and within the specified voltage range.
  • Use a level shifter if the microcontroller operates at 5V to avoid damaging the SD card.
  • Format the SD card to FAT16 or FAT32 file system before use.
  • Use pull-up resistors on the SPI lines to ensure signal integrity.
  • Keep the SPI cable length as short as possible to reduce signal degradation.

Example Code for Arduino UNO

#include <SPI.h>
#include <SD.h>

// Pin configuration
const int chipSelect = 10; // Chip select pin for the SD card module

void setup() {
  Serial.begin(9600);
  while (!Serial) {
    ; // Wait for serial port to connect.
  }

  Serial.print("Initializing SD card...");

  // Ensure the chip select pin is set as an output
  pinMode(chipSelect, OUTPUT);

  // Check for the presence of the SD card
  if (!SD.begin(chipSelect)) {
    Serial.println("Card failed, or not present");
    // Don't continue if the initialization fails
    while (1);
  }
  Serial.println("Card initialized.");
}

void loop() {
  // Main code to read and write data to the SD card
}

Troubleshooting and FAQs

Common Issues

  • SD Card Not Detected: Ensure the SD card is properly inserted and the chip select pin is correctly configured.
  • Read/Write Errors: Check the file system format of the SD card and ensure it is FAT16 or FAT32.
  • Corrupted Data: Use proper power supply and grounding to avoid data corruption.

Solutions and Tips for Troubleshooting

  • If the SD card is not recognized, try reformatting the card on a computer.
  • Ensure that the connections are secure and the correct pins are used for SPI communication.
  • Check the serial output for error messages that can provide insight into the issue.
  • Use the SD.h library's functions like SD.exists() and SD.remove() to manage files and diagnose issues.

FAQs

Q: Can I use a microSD card with this module? A: Yes, with an appropriate microSD to SD card adapter.

Q: What is the maximum size of SD card supported by the module? A: The module supports SD cards up to 32GB.

Q: How do I format the SD card for use with the module? A: Use a computer to format the SD card to FAT16 or FAT32 file system.

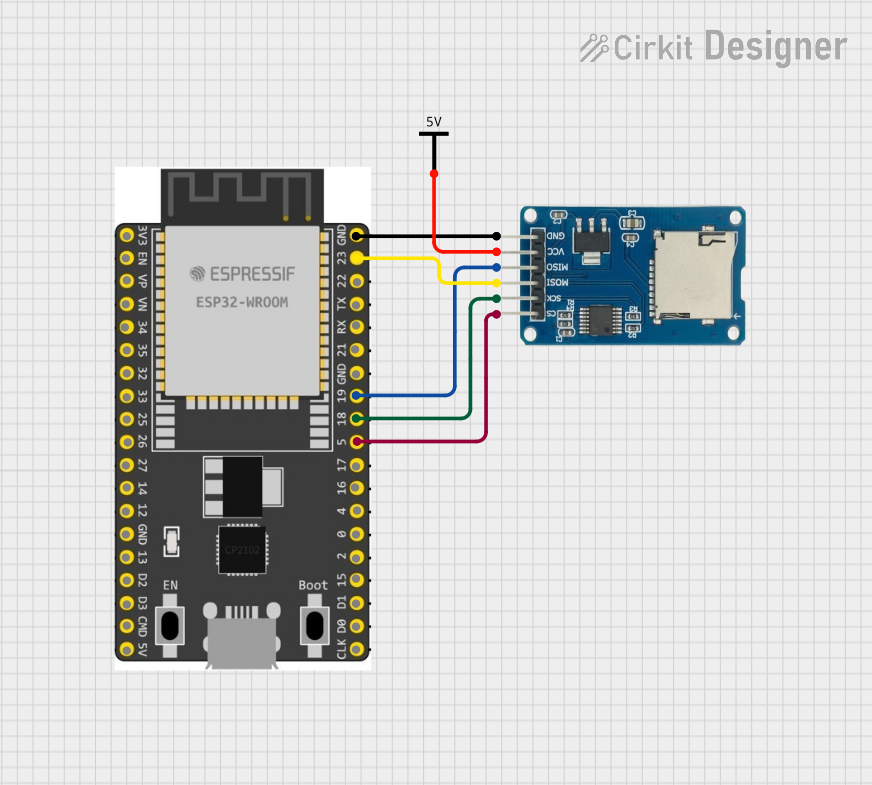
Q: Can I use this module with other microcontrollers besides Arduino? A: Yes, as long as the microcontroller supports SPI communication and operates at the correct voltage level.