How to Use Sparkfun COM-18356: Examples, Pinouts, and Specs
Introduction
The Sparkfun COM-18356 is a versatile and compact USB to serial converter module designed to facilitate seamless communication between a computer and microcontroller or other serial devices. This module is based on the CH340C USB-to-serial chip, which ensures reliable data transfer and compatibility with a wide range of operating systems, including Windows, macOS, and Linux. Its small form factor and ease of use make it an essential tool for prototyping, debugging, and programming microcontroller-based projects.
Explore Projects Built with Sparkfun COM-18356


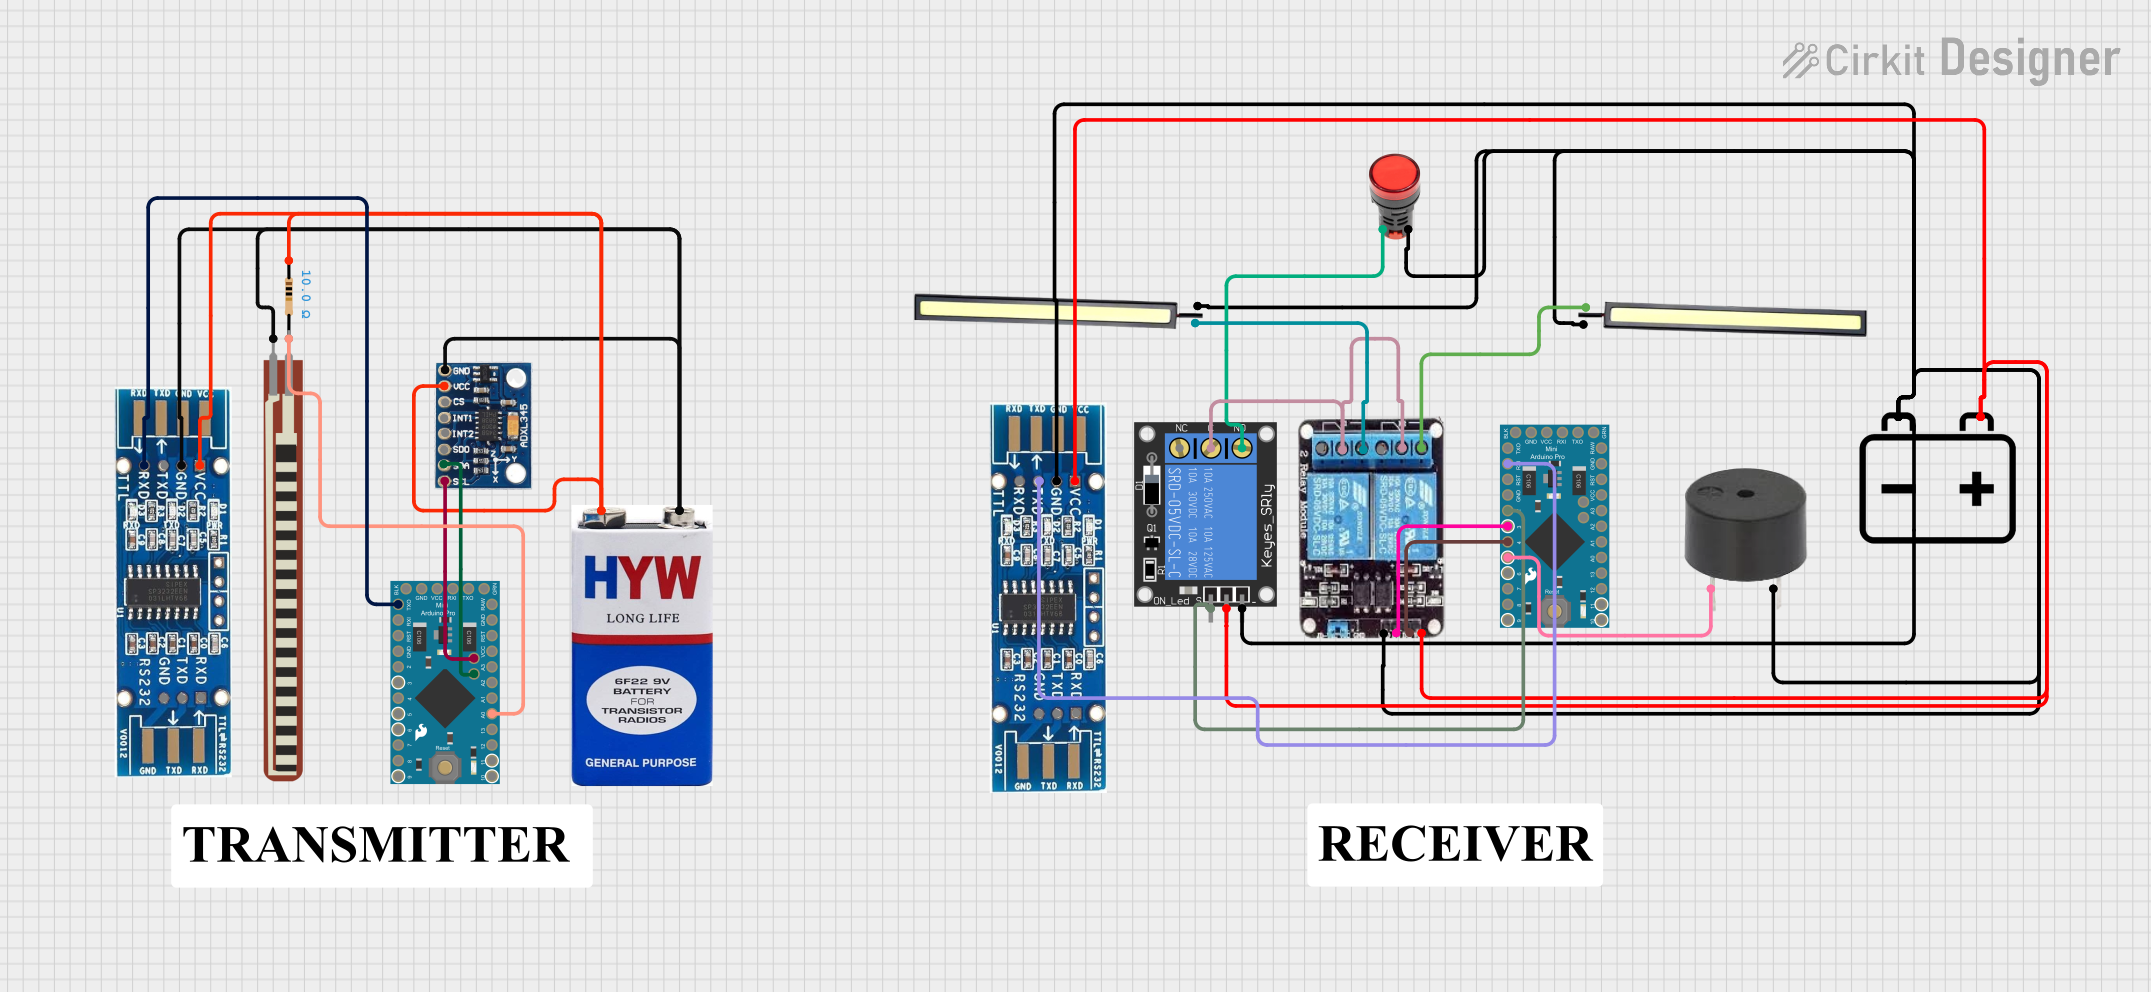
Explore Projects Built with Sparkfun COM-18356
Common Applications and Use Cases
- Programming and debugging microcontrollers such as Arduino, ESP8266, and ESP32.
- Establishing serial communication between a computer and embedded systems.
- Interfacing with serial devices like GPS modules, sensors, and displays.
- Prototyping and testing serial communication protocols.
Technical Specifications
The following table outlines the key technical details of the Sparkfun COM-18356 module:
| Specification | Details |
|---|---|
| Manufacturer | Sparkfun |
| Manufacturer Part ID | COM-18356 |
| USB Interface | USB 2.0 Type-C |
| Serial Chip | CH340C |
| Supported Baud Rates | 50 bps to 2 Mbps |
| Operating Voltage | 3.3V or 5V (selectable via jumper) |
| Logic Level | 3.3V or 5V (selectable via jumper) |
| Operating Temperature | -40°C to +85°C |
| Dimensions | 25.4mm x 12.7mm (1.0" x 0.5") |
| OS Compatibility | Windows, macOS, Linux |
Pin Configuration and Descriptions
The Sparkfun COM-18356 module features the following pins for interfacing:
| Pin Name | Description |
|---|---|
| GND | Ground connection. |
| VCC | Power input/output. Provides 3.3V or 5V depending on jumper configuration. |
| TXD | Transmit data pin. Sends serial data from the module to the connected device. |
| RXD | Receive data pin. Receives serial data from the connected device. |
| DTR | Data Terminal Ready. Used for resetting microcontrollers during programming. |
| CTS | Clear to Send. Optional flow control pin. |
Usage Instructions
How to Use the Sparkfun COM-18356 in a Circuit
Connect the Module to Your Computer: Use a USB Type-C cable to connect the COM-18356 module to your computer. Ensure that the necessary drivers for the CH340C chip are installed. These drivers are typically available on the Sparkfun website or can be downloaded from the manufacturer's site.
Configure the Voltage Level: Set the voltage level (3.3V or 5V) using the onboard jumper. Ensure the selected voltage matches the logic level of the device you are interfacing with.
Connect to Your Device:
- Connect the
TXDpin of the COM-18356 to theRXpin of your device. - Connect the
RXDpin of the COM-18356 to theTXpin of your device. - Connect the
GNDpin of the COM-18356 to the ground of your device. - Optionally, connect the
DTRpin to the reset pin of your microcontroller for programming purposes.
- Connect the
Open a Serial Terminal: Use a serial terminal program (e.g., Arduino IDE Serial Monitor, PuTTY, or CoolTerm) to communicate with your device. Select the appropriate COM port and baud rate.
Important Considerations and Best Practices
- Driver Installation: Ensure that the CH340C driver is correctly installed on your computer. Without the driver, the module may not be recognized.
- Voltage Compatibility: Always verify the voltage level of your target device before connecting the module. Incorrect voltage settings can damage your device.
- Cable Quality: Use a high-quality USB Type-C cable to ensure reliable data transfer and power delivery.
- Avoid Crossed Connections: Double-check the
TXDandRXDconnections to avoid communication errors.
Example: Using COM-18356 with Arduino UNO
Below is an example of how to use the Sparkfun COM-18356 to communicate with an Arduino UNO:
Circuit Connections
- Connect
TXDof COM-18356 toRXof Arduino UNO. - Connect
RXDof COM-18356 toTXof Arduino UNO. - Connect
GNDof COM-18356 toGNDof Arduino UNO.
Arduino Code
// Example code to send and receive data via Sparkfun COM-18356
void setup() {
  Serial.begin(9600); // Initialize serial communication at 9600 baud
  Serial.println("Sparkfun COM-18356 Test"); // Send a test message
}

void loop() {
  if (Serial.available() > 0) {
    // Read incoming data from the serial port
    char receivedChar = Serial.read();
    // Echo the received data back to the sender
    Serial.print("Received: ");
    Serial.println(receivedChar);
  }
}
Troubleshooting and FAQs
Common Issues and Solutions
Module Not Recognized by Computer:
- Ensure the CH340C driver is installed. Download the driver from the Sparkfun website or the manufacturer's site.
- Try using a different USB Type-C cable or port.
No Data Transmission:
- Verify the
TXDandRXDconnections. Ensure they are not swapped. - Check the baud rate settings in your serial terminal program. The baud rate must match the device's configuration.
- Verify the
Device Not Powering On:
- Confirm that the voltage jumper is set correctly (3.3V or 5V).
- Ensure the USB cable is providing power.
Intermittent Communication Errors:
- Use a shorter or higher-quality USB cable.
- Check for loose connections or damaged wires.
FAQs
Q: Can I use the COM-18356 with a Raspberry Pi?
A: Yes, the COM-18356 can be used with a Raspberry Pi. Connect the TXD, RXD, and GND pins to the corresponding GPIO pins on the Raspberry Pi. Ensure the voltage levels are compatible.
Q: What is the maximum baud rate supported by the COM-18356?
A: The COM-18356 supports baud rates up to 2 Mbps.
Q: Is the COM-18356 compatible with macOS Ventura?
A: Yes, the COM-18356 is compatible with macOS Ventura, provided the CH340C driver is installed.
Q: Can I power my microcontroller using the COM-18356?
A: Yes, the VCC pin can provide 3.3V or 5V power to your microcontroller, depending on the jumper configuration. Ensure the current requirements of your microcontroller do not exceed the module's capabilities.