Cirkit Designer LogoCirkit DesignerYour all-in-one circuit design IDE Launch Cirkit Designer App

How to Use ESP32 S3 Super Mini: Examples, Pinouts, and Specs

Image of ESP32 S3 Super MiniDesign with ESP32 S3 Super Mini in Cirkit Designer

Introduction

The ESP32 S3 Super Mini is a compact and powerful microcontroller developed by ESP32. It is designed for Internet of Things (IoT) applications, offering integrated Wi-Fi and Bluetooth connectivity. With its dual-core processing capabilities, the ESP32 S3 Super Mini is ideal for projects requiring high performance, low power consumption, and versatile connectivity options. Its small form factor makes it suitable for space-constrained designs.

Explore Projects Built with ESP32 S3 Super Mini

Use Cirkit Designer to design, explore, and prototype these projects online. Some projects support real-time simulation. Click "Open Project" to start designing instantly!
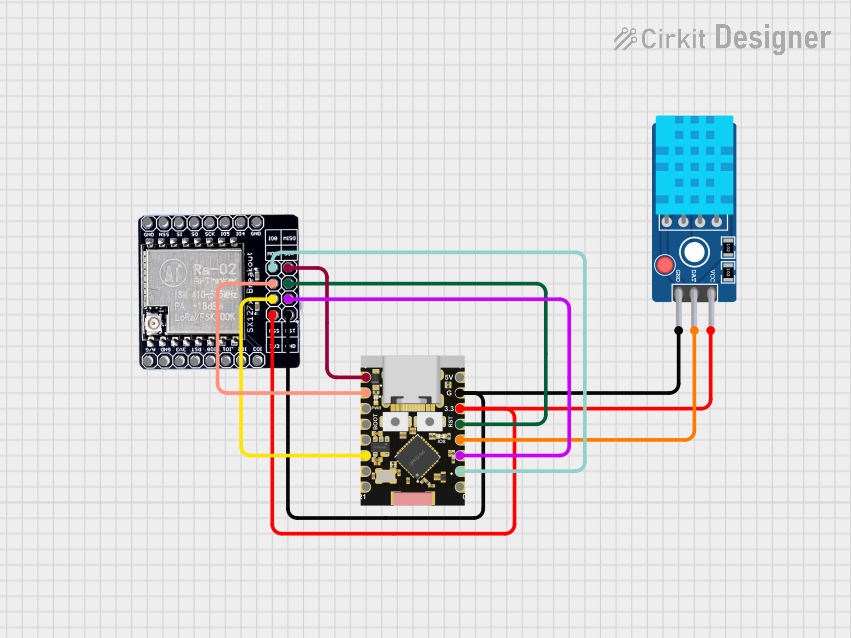
Image of ESP32C3 and LoRa-Enabled Environmental Sensing Node: A project utilizing ESP32 S3 Super Mini in a practical application
ESP32C3 and LoRa-Enabled Environmental Sensing Node

This circuit features an ESP32C3 Supermini microcontroller connected to a LORA_RA02 module and a DHT11 temperature and humidity sensor. The ESP32C3 handles communication with the LORA module via SPI (using GPIO05, GPIO06, GPIO10, and GPIO04 for MISO, MOSI, NSS, and SCK respectively) and GPIO01 and GPIO02 for additional control signals. The DHT11 sensor is interfaced through GPIO03 for data reading, and all components share a common power supply through the 3.3V and GND pins.

Open Project in Cirkit Designer

Common Applications and Use Cases

Technical Specifications

The following table outlines the key technical specifications of the ESP32 S3 Super Mini:

Specification Details
Manufacturer ESP32
Part ID S3 Super Mini
Processor Dual-core Xtensa® LX7
Clock Speed Up to 240 MHz
Flash Memory 4 MB (varies by model)
RAM 512 KB SRAM
Wireless Connectivity Wi-Fi 802.11 b/g/n (2.4 GHz), Bluetooth 5.0 LE
GPIO Pins 27 GPIOs (configurable for digital, analog, I2C, SPI, UART, PWM, etc.)
Operating Voltage 3.3V
Input Voltage Range 3.0V to 3.6V
Power Consumption Ultra-low power consumption in deep sleep mode
Dimensions 20 mm x 15 mm
Operating Temperature -40°C to +85°C

Pin Configuration and Descriptions

The ESP32 S3 Super Mini features a variety of pins for versatile connectivity. Below is the pinout description:

Pin Name Type Description
GND Power Ground
3V3 Power 3.3V power output
EN Input Enable pin (active high)
GPIO0 I/O General-purpose I/O, boot mode selection
GPIO1-27 I/O Configurable for digital, analog, I2C, SPI, UART, PWM, etc.
TXD0 Output UART0 transmit
RXD0 Input UART0 receive
ADC1_CH0-9 Input Analog-to-digital converter channels
DAC1, DAC2 Output Digital-to-analog converter outputs
SPI_CLK I/O SPI clock
SPI_MOSI Output SPI master-out, slave-in
SPI_MISO Input SPI master-in, slave-out
I2C_SCL I/O I2C clock line
I2C_SDA I/O I2C data line

Usage Instructions

How to Use the ESP32 S3 Super Mini in a Circuit

  1. Powering the Module: Provide a stable 3.3V power supply to the 3V3 pin and connect GND to ground.
  2. Programming: Use a USB-to-serial adapter to connect the module to your computer. Connect:
    • TXD0 to the adapter's RX pin
    • RXD0 to the adapter's TX pin
    • GND to the adapter's ground
  3. Boot Mode: To enter bootloader mode for programming, hold the GPIO0 pin low while resetting the module.
  4. GPIO Configuration: Configure the GPIO pins as needed for your application (e.g., digital I/O, PWM, ADC, etc.).
  5. Wireless Connectivity: Use the built-in Wi-Fi and Bluetooth capabilities to connect to networks or other devices.

Important Considerations and Best Practices

Example: Connecting to an Arduino UNO

The ESP32 S3 Super Mini can be used with an Arduino UNO for extended functionality. Below is an example of connecting the ESP32 S3 Super Mini to Wi-Fi using the Arduino IDE:

#include <WiFi.h> // Include the Wi-Fi library for ESP32

// Replace with your network credentials
const char* ssid = "Your_SSID";
const char* password = "Your_PASSWORD";

void setup() {
  Serial.begin(115200); // Initialize serial communication
  delay(1000);

  Serial.println("Connecting to Wi-Fi...");
  WiFi.begin(ssid, password); // Start Wi-Fi connection

  // Wait for connection
  while (WiFi.status() != WL_CONNECTED) {
    delay(500);
    Serial.print(".");
  }

  Serial.println("\nConnected to Wi-Fi!");
  Serial.print("IP Address: ");
  Serial.println(WiFi.localIP()); // Print the device's IP address
}

void loop() {
  // Add your main code here
}

Troubleshooting and FAQs

Common Issues and Solutions

  1. Module Not Responding

    • Cause: Incorrect wiring or power supply issues.
    • Solution: Double-check all connections and ensure a stable 3.3V power supply.
  2. Wi-Fi Connection Fails

    • Cause: Incorrect SSID or password, or weak signal strength.
    • Solution: Verify the network credentials and ensure the module is within range of the Wi-Fi router.
  3. Bootloader Mode Not Entering

    • Cause: Improper boot mode selection.
    • Solution: Ensure the GPIO0 pin is held low while resetting the module.
  4. Overheating

    • Cause: Excessive current draw or poor ventilation.
    • Solution: Check the circuit for short circuits and ensure proper heat dissipation.

FAQs

This documentation provides a comprehensive guide to using the ESP32 S3 Super Mini effectively in your projects.