
How to Use SparkFun LilyPad Temperature Sensor (MCP9700): Examples, Pinouts, and Specs
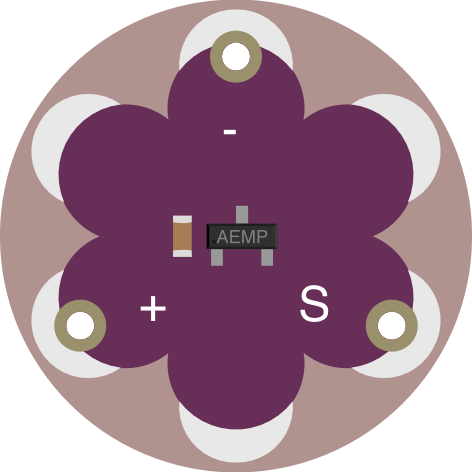
 Design with SparkFun LilyPad Temperature Sensor (MCP9700) in Cirkit Designer
Introduction
The SparkFun LilyPad Temperature Sensor (MCP9700) is a low-cost, analog temperature sensor designed for wearable electronics and fabric-based projects. It outputs an analog voltage proportional to the ambient temperature, making it easy to measure temperature changes in real-time. The sensor is part of the LilyPad series, which is specifically designed for e-textiles and wearable applications, featuring a sewable design with large conductive pads.
Explore Projects Built with SparkFun LilyPad Temperature Sensor (MCP9700)
 Open Project in Cirkit Designer
 Open Project in Cirkit Designer
 Open Project in Cirkit Designer
 Open Project in Cirkit Designer
Explore Projects Built with SparkFun LilyPad Temperature Sensor (MCP9700)
Open Project in Cirkit DesignerOpen Project in Cirkit DesignerOpen Project in Cirkit DesignerOpen Project in Cirkit DesignerCommon Applications and Use Cases
- Wearable temperature monitoring systems
- Environmental sensing in e-textile projects
- DIY smart clothing
- Educational projects for learning about temperature sensing
- Integration into Arduino-based systems for temperature measurement
Technical Specifications
The following table outlines the key technical details of the SparkFun LilyPad Temperature Sensor (MCP9700):
| Parameter | Value |
|---|---|
| Manufacturer | SparkFun Electronics |
| Manufacturer Part ID | DEV-08777 |
| Sensor Type | Analog temperature sensor |
| Output Voltage Range | 0.1V to 1.75V (typical) |
| Temperature Range | -40°C to +125°C |
| Accuracy | ±2°C (typical) |
| Sensitivity | 10 mV/°C |
| Supply Voltage (Vcc) | 2.3V to 5.5V |
| Supply Current | 6 µA (typical) |
| Dimensions | Diameter: 20mm |
| Mounting Style | Sewable (LilyPad design) |
Pin Configuration and Descriptions
The LilyPad Temperature Sensor has three sewable connection pads. The pin configuration is as follows:
| Pin Name | Description |
|---|---|
| VCC | Power supply input (2.3V to 5.5V) |
| GND | Ground connection |
| OUT | Analog voltage output proportional to temperature |
Usage Instructions
How to Use the Component in a Circuit
- Power the Sensor: Connect the
VCCpad to a power source (2.3V to 5.5V) and theGNDpad to ground. - Read the Output: Connect the
OUTpad to an analog input pin of a microcontroller (e.g., Arduino UNO). The voltage on theOUTpin corresponds to the ambient temperature. - Calculate Temperature: Use the sensor's sensitivity (10 mV/°C) and offset (500 mV at 0°C) to calculate the temperature: [ \text{Temperature (°C)} = \frac{\text{V}_{\text{OUT}} - 500 , \text{mV}}{10 , \text{mV/°C}} ]
Important Considerations and Best Practices
- Power Supply: Ensure the supply voltage is within the specified range (2.3V to 5.5V) for accurate readings.
- Analog-to-Digital Conversion: When using a microcontroller, ensure the ADC resolution is sufficient to detect small voltage changes (e.g., 10-bit ADC for Arduino).
- Placement: For wearable applications, place the sensor in an area where it can accurately measure ambient or body temperature without interference from heat sources.
- Sewing Tips: Use conductive thread to sew the sensor into fabric. Ensure secure connections to avoid signal loss or noise.
Example Code for Arduino UNO
The following example demonstrates how to read temperature data from the LilyPad Temperature Sensor using an Arduino UNO:
// Define the analog pin connected to the sensor's OUT pin
const int sensorPin = A0;

// Define constants for the sensor's characteristics
const float voltageOffset = 0.5; // 500 mV offset at 0°C
const float sensitivity = 0.01;  // 10 mV/°C sensitivity

void setup() {
  Serial.begin(9600); // Initialize serial communication
}

void loop() {
  // Read the analog value from the sensor
  int sensorValue = analogRead(sensorPin);

  // Convert the analog value to voltage (assuming 5V reference)
  float voltage = sensorValue * (5.0 / 1023.0);

  // Calculate the temperature in Celsius
  float temperatureC = (voltage - voltageOffset) / sensitivity;

  // Print the temperature to the Serial Monitor
  Serial.print("Temperature: ");
  Serial.print(temperatureC);
  Serial.println(" °C");

  delay(1000); // Wait 1 second before the next reading
}
Troubleshooting and FAQs
Common Issues and Solutions
No Output or Incorrect Readings:
- Cause: Poor connections or insufficient power supply.
- Solution: Check all connections, ensure the power supply is within the specified range, and verify the sensor is properly sewn or soldered.
Fluctuating Readings:
- Cause: Electrical noise or unstable power supply.
- Solution: Add a decoupling capacitor (e.g., 0.1 µF) between
VCCandGNDto stabilize the power supply.
Output Voltage Does Not Match Expected Values:
- Cause: Incorrect ADC reference voltage or calculation errors.
- Solution: Verify the ADC reference voltage matches the microcontroller's supply voltage and double-check the temperature calculation formula.
FAQs
Q: Can this sensor measure body temperature accurately?
A: The sensor is designed for ambient temperature measurement. While it can measure body temperature, the accuracy may vary depending on placement and environmental factors.
Q: Is the sensor washable?
A: The LilyPad Temperature Sensor is not waterproof or washable. Remove it from fabric before washing.
Q: Can I use this sensor with a 3.3V microcontroller?
A: Yes, the sensor operates within a supply voltage range of 2.3V to 5.5V, making it compatible with 3.3V systems.
Q: How do I extend the sensor's lifespan in wearable projects?
A: Protect the sensor from moisture, excessive heat, and mechanical stress. Use insulating materials to shield the sensor if necessary.