
How to Use Adafruit FeatherWing Tripler: Examples, Pinouts, and Specs
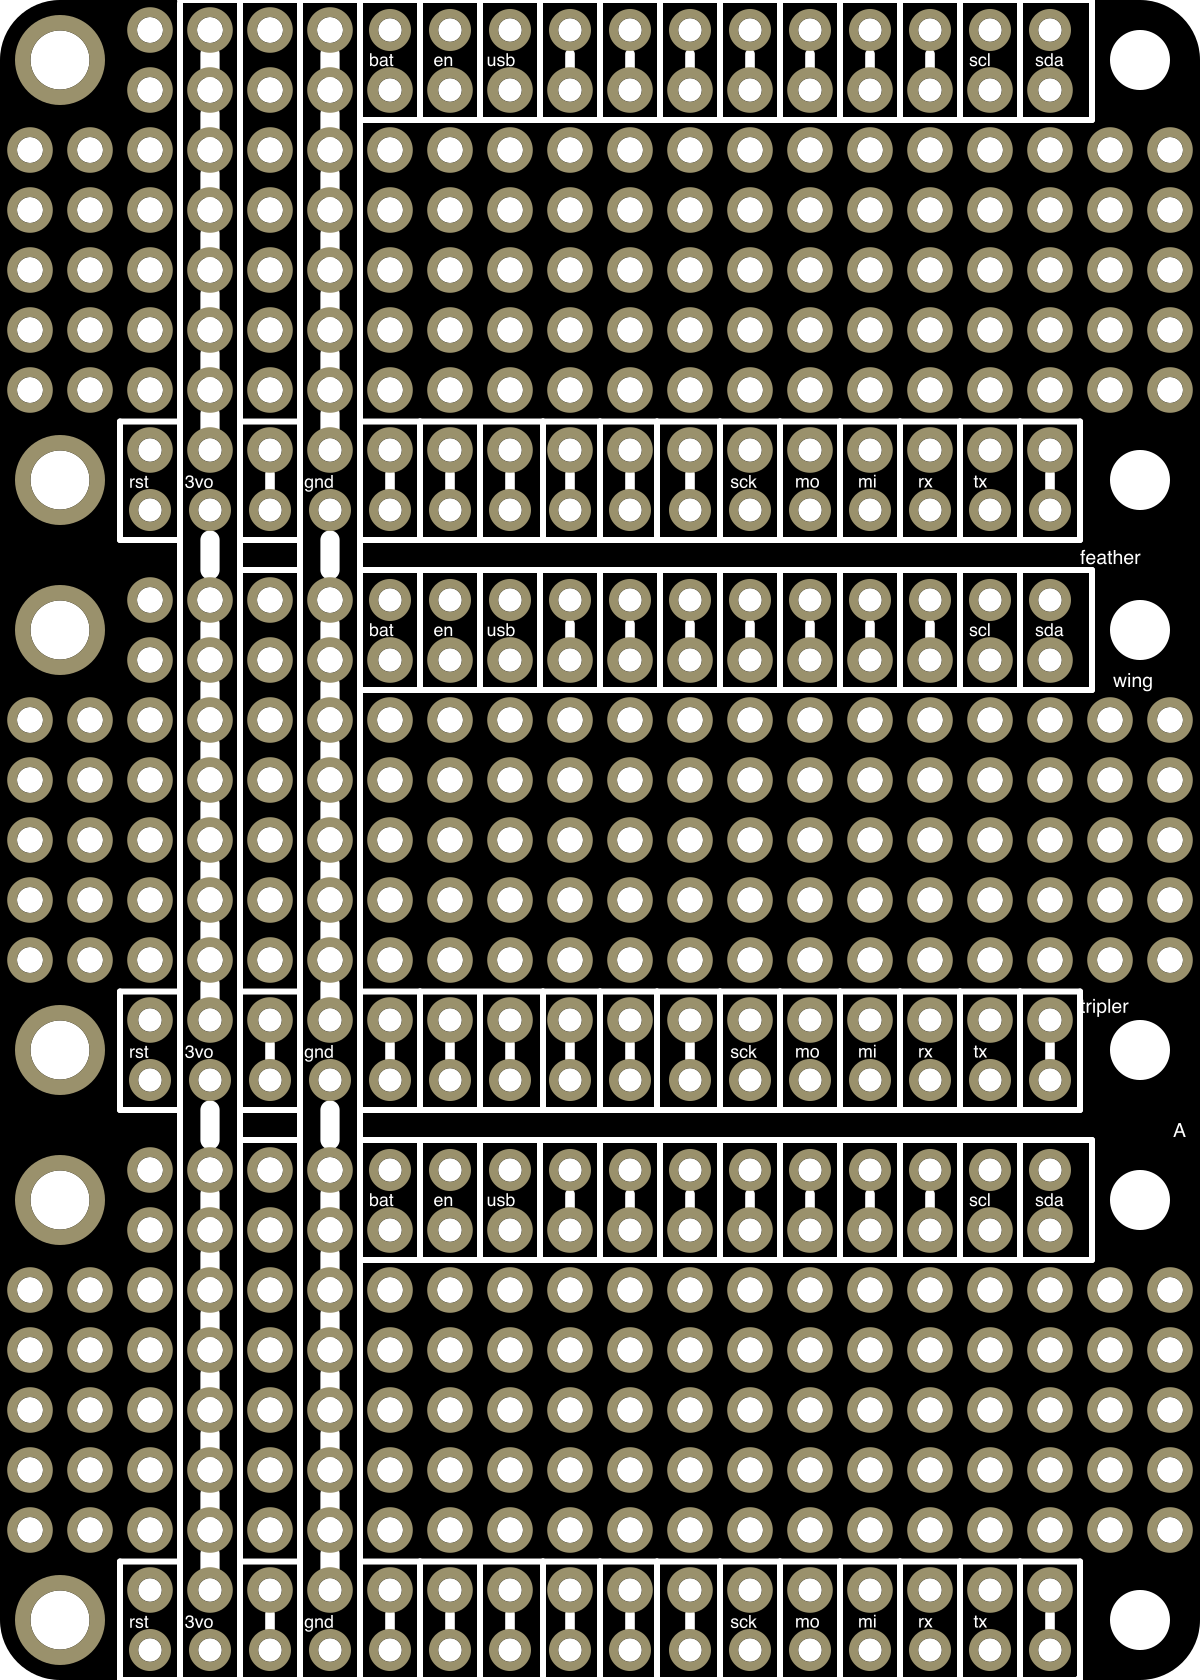
 Design with Adafruit FeatherWing Tripler in Cirkit Designer
Introduction
The Adafruit FeatherWing Tripler (Manufacturer Part ID: 3417) is a versatile add-on board designed for use with Adafruit Feather microcontrollers. It provides three additional Feather-compatible connectors, enabling users to connect multiple Feather boards or accessories simultaneously. This makes it an excellent choice for prototyping, expanding functionality, or integrating multiple Feather modules into a single project.
Explore Projects Built with Adafruit FeatherWing Tripler
 Open Project in Cirkit Designer
 Open Project in Cirkit Designer
 Open Project in Cirkit Designer
 Open Project in Cirkit Designer
Explore Projects Built with Adafruit FeatherWing Tripler
Open Project in Cirkit DesignerOpen Project in Cirkit DesignerOpen Project in Cirkit DesignerOpen Project in Cirkit DesignerCommon Applications and Use Cases
- Prototyping with multiple Feather boards or accessories
- Creating modular and expandable electronic systems
- Combining Feather microcontrollers with FeatherWings (e.g., sensors, displays, or motor drivers)
- Simplifying wiring and connections in complex projects
Technical Specifications
The Adafruit FeatherWing Tripler is designed to be simple yet powerful, offering seamless integration with the Feather ecosystem. Below are its key technical details:
Key Features
- Connector Type: Three Feather-compatible sockets
- Dimensions: 51mm x 51mm x 1.6mm (2" x 2" x 0.06")
- Weight: 8.5g
- PCB Thickness: 1.6mm
- Mounting Holes: Four mounting holes for secure attachment
- Power Distribution: Shared power and ground rails across all three sockets
- Compatibility: Works with all Adafruit Feather boards and FeatherWings
Pin Configuration and Descriptions
The FeatherWing Tripler provides three sets of Feather-compatible connectors. Each connector has the following pinout:
| Pin Name | Description |
|---|---|
| 3V | 3.3V power rail shared across all sockets |
| GND | Ground rail shared across all sockets |
| BAT | Battery voltage input/output |
| USB | USB voltage input/output |
| EN | Enable pin for controlling power to the Feather board |
| RST | Reset pin for resetting the Feather board |
| SCL | I2C clock line (shared across all sockets) |
| SDA | I2C data line (shared across all sockets) |
| TX | UART transmit pin |
| RX | UART receive pin |
| Analog Pins | Analog input pins (A0, A1, etc., depending on the Feather board) |
| Digital Pins | Digital I/O pins (D0, D1, etc., depending on the Feather board) |
Usage Instructions
The Adafruit FeatherWing Tripler is straightforward to use and requires no additional configuration. Follow the steps below to integrate it into your project:
Step 1: Mount Feather Boards
- Insert your Feather microcontroller and FeatherWings into the three sockets on the Tripler.
- Ensure the pins are aligned correctly with the sockets to avoid damage.
Step 2: Connect Power
- The FeatherWing Tripler shares power and ground rails across all sockets. You can power the system via:
- USB (connected to the Feather microcontroller)
- A LiPo battery connected to the Feather board
- External power supplied to the Feather board's VIN pin
Step 3: Wiring and Connections
- Use jumper wires or solder connections to route signals between the Feather boards or accessories.
- The shared I2C (SCL/SDA) and power rails simplify communication and power distribution.
Step 4: Programming and Testing
- Program your Feather microcontroller as usual using the Arduino IDE or CircuitPython.
- If using multiple Feather boards, ensure they have unique I2C addresses or use separate communication protocols.
Example: Connecting a FeatherWing OLED and a FeatherWing Relay
Here’s an example of how to use the FeatherWing Tripler with an Adafruit Feather microcontroller, an OLED FeatherWing, and a Relay FeatherWing.
Arduino Code Example
#include <Adafruit_GFX.h>       // Graphics library for OLED
#include <Adafruit_SSD1306.h>  // OLED driver library

#define SCREEN_WIDTH 128       // OLED display width, in pixels
#define SCREEN_HEIGHT 32       // OLED display height, in pixels
#define OLED_RESET -1          // Reset pin (not used with FeatherWing OLED)
Adafruit_SSD1306 display(SCREEN_WIDTH, SCREEN_HEIGHT, &Wire, OLED_RESET);

#define RELAY_PIN 5            // Pin connected to the relay FeatherWing

void setup() {
  // Initialize serial communication for debugging
  Serial.begin(115200);
  while (!Serial);

  // Initialize OLED display
  if (!display.begin(SSD1306_I2C_ADDRESS, 0x3C)) {
    Serial.println(F("SSD1306 allocation failed"));
    for (;;);
  }
  display.clearDisplay();
  display.setTextSize(1);
  display.setTextColor(SSD1306_WHITE);
  display.setCursor(0, 0);
  display.println(F("FeatherWing Tripler"));
  display.display();

  // Initialize relay pin
  pinMode(RELAY_PIN, OUTPUT);
  digitalWrite(RELAY_PIN, LOW);  // Start with relay off
}

void loop() {
  // Toggle relay every 2 seconds
  digitalWrite(RELAY_PIN, HIGH);  // Turn relay on
  display.clearDisplay();
  display.setCursor(0, 0);
  display.println(F("Relay: ON"));
  display.display();
  delay(2000);

  digitalWrite(RELAY_PIN, LOW);   // Turn relay off
  display.clearDisplay();
  display.setCursor(0, 0);
  display.println(F("Relay: OFF"));
  display.display();
  delay(2000);
}
Best Practices
- Use standoffs or screws to secure the Tripler to your project enclosure.
- Avoid exceeding the current limits of the Feather microcontroller or accessories.
- Ensure proper alignment of pins when inserting Feather boards into the sockets.
Troubleshooting and FAQs
Common Issues
Feather board not powering on
- Check that the Feather board is properly seated in the socket.
- Verify that power is supplied via USB, battery, or VIN.
I2C devices not communicating
- Ensure all I2C devices have unique addresses.
- Check the connections to the SCL and SDA pins.
Interference between Feather boards
- Verify that no two Feather boards are using the same pins for conflicting purposes.
- Use jumper wires to reroute signals if necessary.
Loose connections
- Ensure all Feather boards and accessories are securely inserted into the sockets.
- Solder connections if needed for a more permanent setup.
FAQs
Q: Can I use more than three Feather boards with the Tripler?
A: No, the Tripler is designed for three Feather-compatible sockets. For more connections, consider using additional Triplers or other FeatherWing expansion boards.
Q: Is the Tripler compatible with non-Adafruit boards?
A: The Tripler is specifically designed for Adafruit Feather boards and FeatherWings. Non-Adafruit boards may not fit or function correctly.
Q: Can I stack multiple Triplers?
A: While it is physically possible, stacking Triplers is not recommended due to potential signal interference and power distribution issues.
Q: How do I secure the Tripler in my project?
A: Use the four mounting holes to attach the Tripler to your project enclosure with screws or standoffs.
By following this documentation, you can effectively use the Adafruit FeatherWing Tripler to expand and enhance your Feather-based projects.