Cirkit Designer Logo
Cirkit Designer
Your all-in-one circuit design IDE
Home / 
Component Documentation

How to Use Geiger Counter: Examples, Pinouts, and Specs

Image of Geiger Counter
Cirkit Designer LogoDesign with Geiger Counter in Cirkit Designer

Introduction

A Geiger Counter is a device used for detecting and measuring ionizing radiation. It typically employs a Geiger-Müller tube to produce an electrical signal when radiation is present. This component is essential in various fields, including nuclear research, environmental monitoring, and health physics, to measure radiation levels and ensure safety.

Explore Projects Built with Geiger Counter

Use Cirkit Designer to design, explore, and prototype these projects online. Some projects support real-time simulation. Click "Open Project" to start designing instantly!
ESP32-CAM and Arduino Nano Radiation Detection System with GPS and Wi-Fi Connectivity
Image of esp32camGps: A project utilizing Geiger Counter in a practical application
This circuit is a radiation detection and monitoring system that uses an ESP32-CAM for capturing images and streaming video, an Arduino Nano for processing data from a GPS module and a Geiger counter, and a bi-directional logic level converter for interfacing between different voltage levels. The ESP32-CAM also serves as a web server to display the radiation levels and GPS coordinates in real-time.
Cirkit Designer LogoOpen Project in Cirkit Designer
Arduino UNO-Based Lung Cancer Detector with Multiple Gas Sensors and LCD Display
Image of THE NEW LUN C: A project utilizing Geiger Counter in a practical application
This circuit is a lung cancer detector that uses six gas sensors connected to an Arduino UNO to monitor air quality. The sensor readings are displayed on a 20x4 LCD, and if any sensor value exceeds a predefined threshold, a buzzer and an LED are activated to alert the user.
Cirkit Designer LogoOpen Project in Cirkit Designer
Arduino UNO-Based Object Counter with Dual 7-Segment Display and IR Sensor
Image of two digit counter using arduino uno and 7 segment display: A project utilizing Geiger Counter in a practical application
This circuit is a counter system that uses an IR sensor to detect objects and increments a count displayed on two 7-segment displays. An Arduino UNO microcontroller processes the IR sensor input and controls the displays, while a pushbutton allows the user to reset the count.
Cirkit Designer LogoOpen Project in Cirkit Designer
Arduino-Based Gas Detection System with LCD Display and SD Card Logging
Image of Gas detector booooot: A project utilizing Geiger Counter in a practical application
This circuit is a gas detection system that uses multiple gas sensors (MQ-7, MQ-135, MQ-4, and MH-Z19B) to measure concentrations of various gases. The Arduino UNO processes the sensor data, displays the readings on a 16x2 I2C LCD screen, and logs the data to a micro SD card. Additionally, a DS3231 RTC module provides timestamping for the logged data.
Cirkit Designer LogoOpen Project in Cirkit Designer

Explore Projects Built with Geiger Counter

Use Cirkit Designer to design, explore, and prototype these projects online. Some projects support real-time simulation. Click "Open Project" to start designing instantly!
Image of esp32camGps: A project utilizing Geiger Counter in a practical application
ESP32-CAM and Arduino Nano Radiation Detection System with GPS and Wi-Fi Connectivity
This circuit is a radiation detection and monitoring system that uses an ESP32-CAM for capturing images and streaming video, an Arduino Nano for processing data from a GPS module and a Geiger counter, and a bi-directional logic level converter for interfacing between different voltage levels. The ESP32-CAM also serves as a web server to display the radiation levels and GPS coordinates in real-time.
Cirkit Designer LogoOpen Project in Cirkit Designer
Image of THE NEW LUN C: A project utilizing Geiger Counter in a practical application
Arduino UNO-Based Lung Cancer Detector with Multiple Gas Sensors and LCD Display
This circuit is a lung cancer detector that uses six gas sensors connected to an Arduino UNO to monitor air quality. The sensor readings are displayed on a 20x4 LCD, and if any sensor value exceeds a predefined threshold, a buzzer and an LED are activated to alert the user.
Cirkit Designer LogoOpen Project in Cirkit Designer
Image of two digit counter using arduino uno and 7 segment display: A project utilizing Geiger Counter in a practical application
Arduino UNO-Based Object Counter with Dual 7-Segment Display and IR Sensor
This circuit is a counter system that uses an IR sensor to detect objects and increments a count displayed on two 7-segment displays. An Arduino UNO microcontroller processes the IR sensor input and controls the displays, while a pushbutton allows the user to reset the count.
Cirkit Designer LogoOpen Project in Cirkit Designer
Image of Gas detector booooot: A project utilizing Geiger Counter in a practical application
Arduino-Based Gas Detection System with LCD Display and SD Card Logging
This circuit is a gas detection system that uses multiple gas sensors (MQ-7, MQ-135, MQ-4, and MH-Z19B) to measure concentrations of various gases. The Arduino UNO processes the sensor data, displays the readings on a 16x2 I2C LCD screen, and logs the data to a micro SD card. Additionally, a DS3231 RTC module provides timestamping for the logged data.
Cirkit Designer LogoOpen Project in Cirkit Designer

Technical Specifications

Key Technical Details

Parameter Value
Operating Voltage 3.3V - 5V
Operating Current 10mA - 20mA
Detection Range Alpha, Beta, Gamma radiation
Sensitivity 0.1 µSv/h to 1 Sv/h
Output Signal Digital pulse
Response Time < 1 second
Operating Temperature -20°C to 50°C

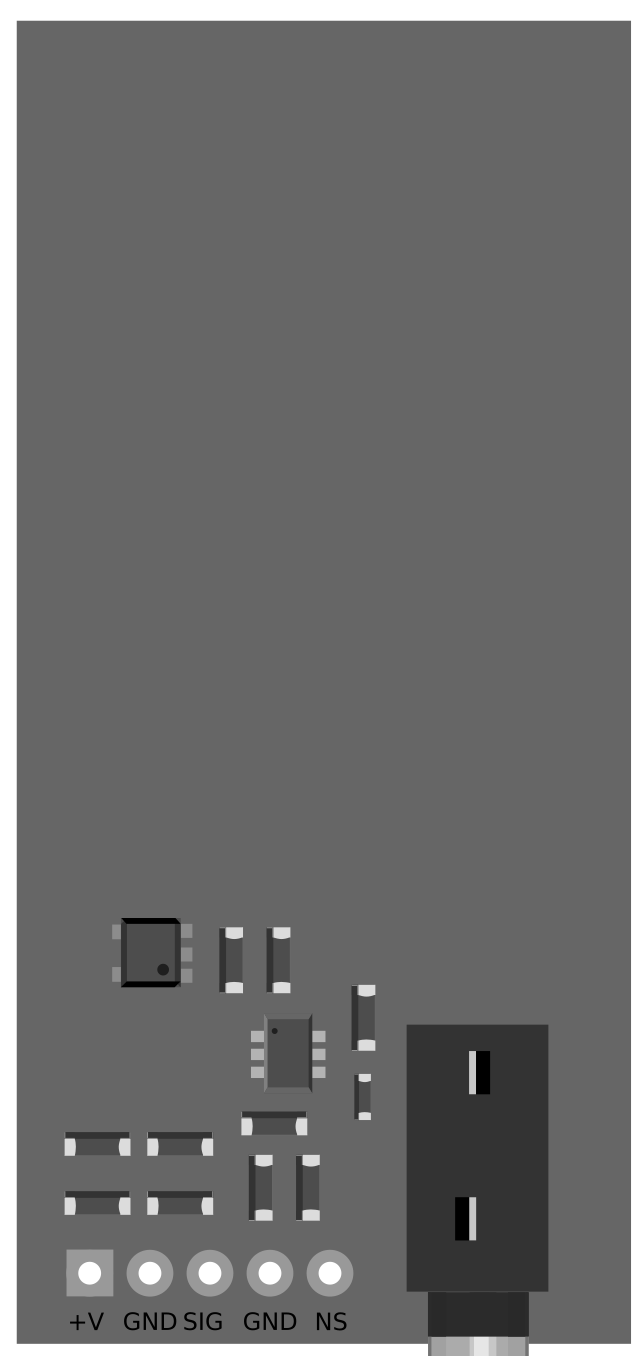
Pin Configuration and Descriptions

Pin Number Pin Name Description
1 VCC Power supply (3.3V - 5V)
2 GND Ground
3 OUT Digital output signal (pulses when radiation is detected)
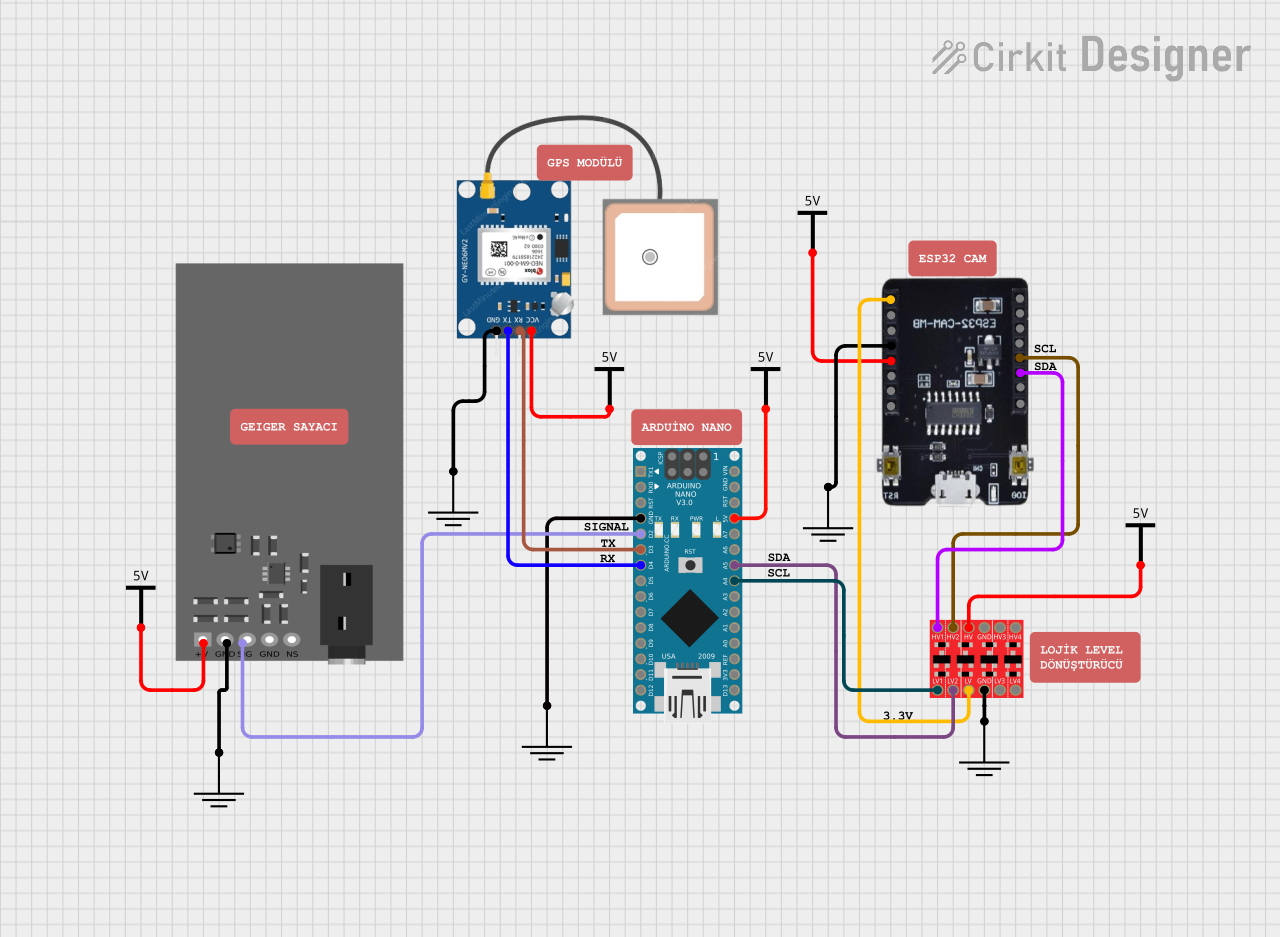
Usage Instructions

How to Use the Component in a Circuit

  1. Power Supply: Connect the VCC pin to a 3.3V or 5V power supply.
  2. Ground: Connect the GND pin to the ground of your circuit.
  3. Output Signal: Connect the OUT pin to a digital input pin on your microcontroller (e.g., Arduino UNO).

Example Circuit Diagram

+5V  ----->  VCC (Pin 1)
GND  ----->  GND (Pin 2)
D2   ----->  OUT (Pin 3)

Important Considerations and Best Practices

  • Shielding: Ensure the Geiger-Müller tube is properly shielded to avoid false readings from external electromagnetic interference.
  • Calibration: Regularly calibrate the Geiger Counter to maintain accuracy.
  • Safety: Handle the Geiger Counter with care, especially when dealing with high radiation levels.

Sample Arduino Code

// Geiger Counter connected to digital pin 2
const int geigerPin = 2;
volatile int count = 0;

void setup() {
  Serial.begin(9600); // Initialize serial communication
  pinMode(geigerPin, INPUT); // Set geigerPin as input
  attachInterrupt(digitalPinToInterrupt(geigerPin), countPulse, RISING);
  // Attach interrupt to geigerPin, call countPulse on rising edge
}

void loop() {
  delay(1000); // Wait for 1 second
  Serial.print("Radiation Count: ");
  Serial.println(count); // Print the count of pulses
  count = 0; // Reset count for the next interval
}

void countPulse() {
  count++; // Increment count on each pulse
}

Troubleshooting and FAQs

Common Issues Users Might Face

  1. No Output Signal: Ensure the power supply is connected correctly and the Geiger-Müller tube is functional.
  2. False Readings: Check for electromagnetic interference and ensure proper shielding.
  3. Inconsistent Readings: Regularly calibrate the Geiger Counter and check for any damage to the tube.

Solutions and Tips for Troubleshooting

  • Check Connections: Verify all connections are secure and correct.
  • Test Power Supply: Ensure the power supply voltage is within the specified range.
  • Inspect the Tube: Look for any physical damage to the Geiger-Müller tube.
  • Use a Known Radiation Source: Test the Geiger Counter with a known radiation source to verify its functionality.

FAQs

Q: Can the Geiger Counter detect all types of radiation? A: The Geiger Counter can detect alpha, beta, and gamma radiation, but its sensitivity may vary for each type.

Q: How often should I calibrate the Geiger Counter? A: Calibration frequency depends on usage, but a general recommendation is to calibrate every 6-12 months.

Q: Is it safe to use a Geiger Counter? A: Yes, it is safe to use a Geiger Counter. However, always handle it with care, especially when measuring high radiation levels.


This documentation provides a comprehensive guide to understanding, using, and troubleshooting a Geiger Counter. Whether you are a beginner or an experienced user, these instructions and tips will help you effectively measure ionizing radiation.