
How to Use DHT22: Examples, Pinouts, and Specs
 Design with DHT22 in Cirkit Designer
Introduction
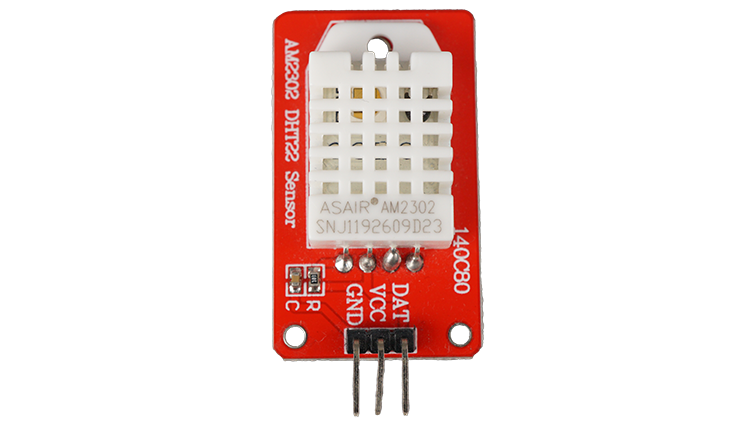
The DHT22 is a digital temperature and humidity sensor that provides accurate readings of temperature in Celsius and humidity in percentage. It is widely used in applications requiring environmental monitoring, such as weather stations, HVAC systems, greenhouses, and IoT projects. The DHT22 is known for its high precision and reliability, making it a popular choice for both hobbyists and professionals.
Explore Projects Built with DHT22
 Open Project in Cirkit Designer
 Open Project in Cirkit Designer
 Open Project in Cirkit Designer
 Open Project in Cirkit Designer
Explore Projects Built with DHT22
Open Project in Cirkit DesignerOpen Project in Cirkit DesignerOpen Project in Cirkit DesignerOpen Project in Cirkit DesignerTechnical Specifications
- Temperature Range: -40°C to +80°C
- Temperature Accuracy: ±0.5°C
- Humidity Range: 0% to 100% RH
- Humidity Accuracy: ±2% RH
- Operating Voltage: 3.3V to 6V
- Max Current Consumption: 2.5mA during data transmission
- Communication Protocol: Single-wire digital signal
- Sampling Period: Minimum 2 seconds between readings
- Dimensions: 15.1mm x 25mm x 7.7mm
Pin Configuration and Descriptions
The DHT22 has four pins, but typically only three are used in most applications. Below is the pinout:
| Pin Number | Name | Description |
|---|---|---|
| 1 | VCC | Power supply pin (3.3V to 6V). Connect to the positive rail of the power source. |
| 2 | DATA | Digital data pin. Used for communication with the microcontroller. |
| 3 | NC (Not Connected) | Not used. Leave this pin unconnected. |
| 4 | GND | Ground pin. Connect to the ground rail of the power source. |
Usage Instructions
How to Use the DHT22 in a Circuit
- Power the Sensor: Connect the VCC pin to a 3.3V or 5V power source and the GND pin to ground.
- Data Communication: Connect the DATA pin to a digital input pin on your microcontroller. Use a 10kΩ pull-up resistor between the DATA pin and the VCC pin to ensure proper signal transmission.
- Timing Considerations: The DHT22 requires a minimum of 2 seconds between consecutive readings to ensure accurate data.
- Library Support: For ease of use, many microcontroller platforms (e.g., Arduino) have libraries available to handle the communication protocol.
Example: Connecting the DHT22 to an Arduino UNO
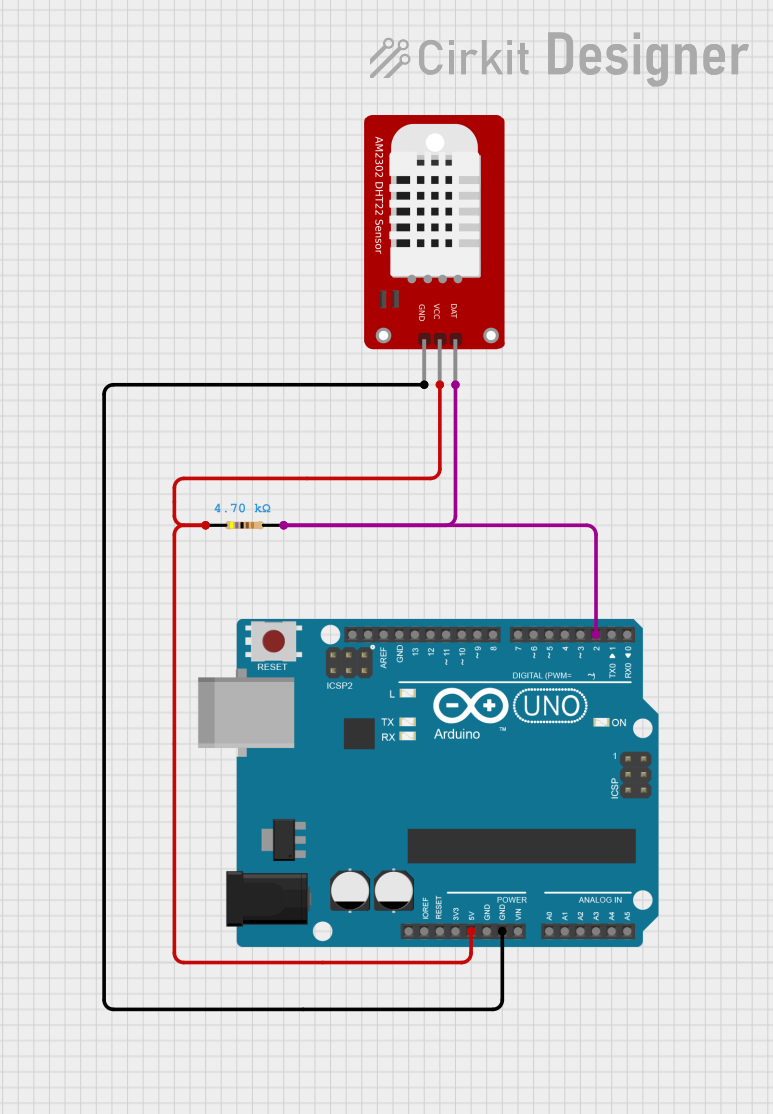
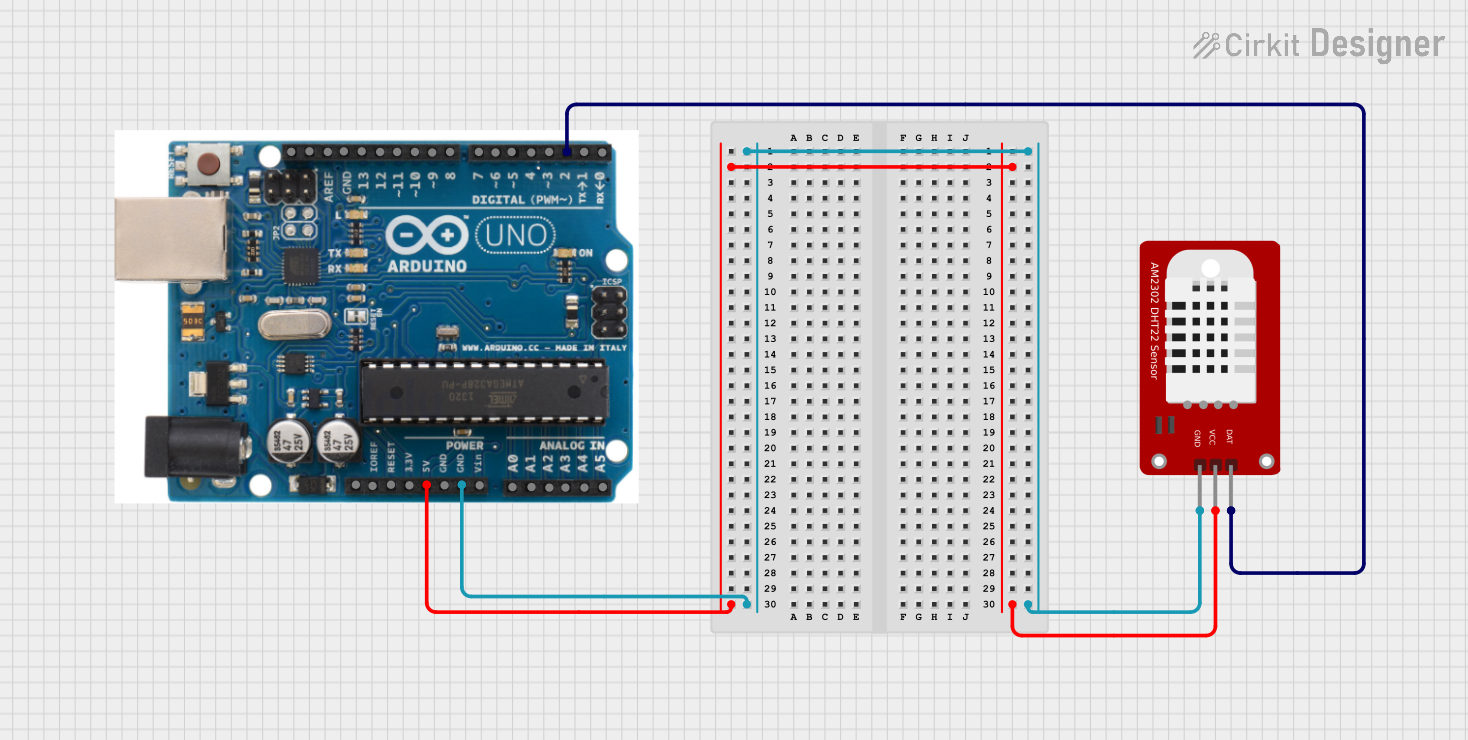
Below is an example of how to connect and use the DHT22 with an Arduino UNO:
Circuit Diagram
- VCC: Connect to the 5V pin on the Arduino.
- DATA: Connect to digital pin 2 on the Arduino, with a 10kΩ pull-up resistor to 5V.
- GND: Connect to the GND pin on the Arduino.
Arduino Code Example
// Include the DHT library for communication with the sensor
#include <DHT.h>

// Define the pin where the DATA pin of the DHT22 is connected
#define DHTPIN 2

// Define the type of DHT sensor being used (DHT22)
#define DHTTYPE DHT22

// Initialize the DHT sensor
DHT dht(DHTPIN, DHTTYPE);

void setup() {
  // Start the serial communication for debugging
  Serial.begin(9600);
  Serial.println("DHT22 Sensor Initialization");

  // Begin the DHT sensor
  dht.begin();
}

void loop() {
  // Wait 2 seconds between readings as required by the DHT22
  delay(2000);

  // Read temperature in Celsius
  float temperature = dht.readTemperature();
  // Read humidity in percentage
  float humidity = dht.readHumidity();

  // Check if the readings are valid
  if (isnan(temperature) || isnan(humidity)) {
    Serial.println("Failed to read from DHT sensor!");
    return;
  }

  // Print the readings to the Serial Monitor
  Serial.print("Temperature: ");
  Serial.print(temperature);
  Serial.println("°C");

  Serial.print("Humidity: ");
  Serial.print(humidity);
  Serial.println("%");
}
Important Considerations and Best Practices
- Pull-Up Resistor: Always use a 10kΩ pull-up resistor on the DATA pin to ensure reliable communication.
- Sampling Period: Do not attempt to read data more frequently than every 2 seconds, as the sensor requires this time to stabilize.
- Environmental Factors: Avoid placing the sensor in areas with condensation or direct water exposure, as this may damage the sensor.
- Cable Length: Keep the cable length between the sensor and the microcontroller as short as possible to avoid signal degradation.
Troubleshooting and FAQs
Common Issues
No Data or Incorrect Readings:
- Ensure the pull-up resistor is correctly connected between the DATA pin and VCC.
- Verify that the sensor is powered with the correct voltage (3.3V to 6V).
- Check the wiring for loose connections or incorrect pin assignments.
"Failed to read from DHT sensor!" Error in Arduino:
- Ensure the DHT library is correctly installed in the Arduino IDE.
- Verify that the DATA pin is connected to the correct digital pin on the Arduino.
Slow or No Response:
- Ensure there is at least a 2-second delay between consecutive readings.
- Check for electromagnetic interference if the sensor is placed near high-power devices.
FAQs
Q: Can the DHT22 measure negative temperatures?
A: Yes, the DHT22 can measure temperatures as low as -40°C.
Q: What is the difference between the DHT11 and DHT22?
A: The DHT22 offers higher accuracy and a wider range for both temperature and humidity compared to the DHT11. However, it is slightly more expensive.
Q: Can I use the DHT22 with a 3.3V microcontroller?
A: Yes, the DHT22 operates within a voltage range of 3.3V to 6V, making it compatible with 3.3V microcontrollers like the ESP8266 or ESP32.
Q: How long is the lifespan of the DHT22?
A: The DHT22 has a typical lifespan of 5 years under normal operating conditions.
By following this documentation, you should be able to successfully integrate and use the DHT22 sensor in your projects!