
How to Use PixHawk 2.4.8: Examples, Pinouts, and Specs
 Design with PixHawk 2.4.8 in Cirkit Designer
Introduction
The PixHawk 2.4.8 is an advanced flight control hardware designed for drones and UAVs. It features a powerful processor, multiple sensor inputs, and compatibility with various autopilot software such as PX4 and ArduPilot. This flight controller enables precise navigation, stabilization, and control for unmanned aerial vehicles, making it a popular choice for hobbyists, researchers, and professionals in the drone industry.
Explore Projects Built with PixHawk 2.4.8
 Open Project in Cirkit Designer
 Open Project in Cirkit Designer
 Open Project in Cirkit Designer
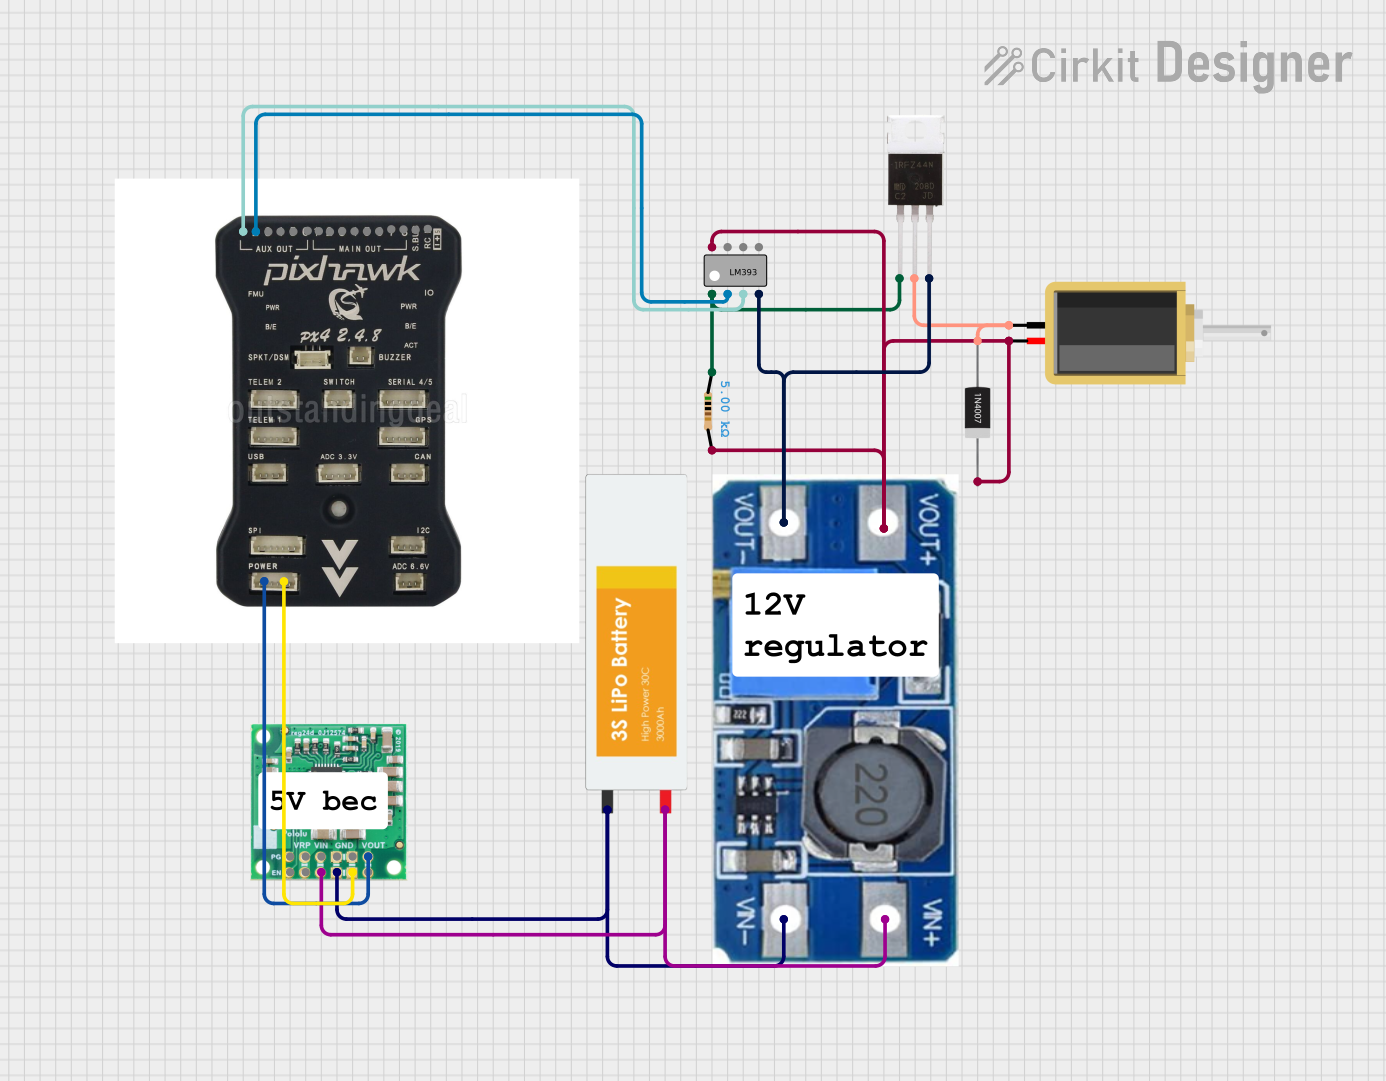 Open Project in Cirkit Designer
Explore Projects Built with PixHawk 2.4.8
Open Project in Cirkit DesignerOpen Project in Cirkit DesignerOpen Project in Cirkit DesignerOpen Project in Cirkit DesignerCommon Applications and Use Cases
- Autonomous drone navigation and control
- Aerial photography and videography
- Research and development of UAV systems
- Agricultural monitoring and surveying
- Search and rescue operations
- Industrial inspections and mapping
Technical Specifications
The PixHawk 2.4.8 is equipped with robust hardware and versatile connectivity options. Below are its key technical details:
Key Technical Details
- Processor: 32-bit STM32F427 Cortex-M4, 168 MHz
- IMU Sensors:
- MPU6000 (3-axis accelerometer and gyroscope)
- LSM303D (3-axis magnetometer)
- MS5611 (barometer)
- Input Voltage: 4.8V to 5.4V (via power module)
- Power Consumption: ~280mA @ 5V
- Flash Memory: 2 MB
- RAM: 256 KB
- Connectivity:
- 8 PWM/servo outputs
- 5 UART ports
- I2C, SPI, CAN, and ADC interfaces
- Dimensions: 50mm x 81.5mm x 15.5mm
- Weight: ~38g
Pin Configuration and Descriptions
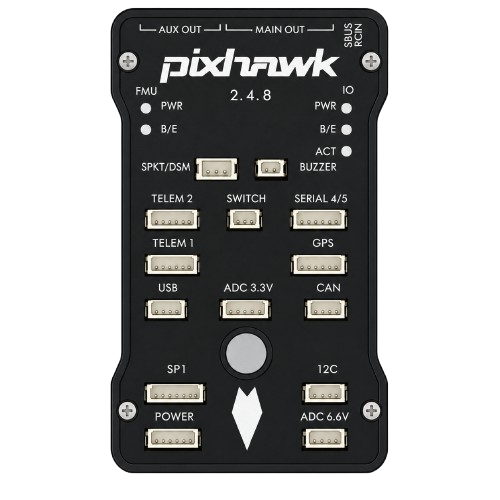
The PixHawk 2.4.8 features multiple ports for connecting peripherals. Below is a table summarizing the key pin configurations:
| Port Name | Pin Description |
|---|---|
| Power | Connects to the power module for supplying power to the flight controller. |
| PWM Outputs | 8 channels for connecting ESCs, servos, or other actuators. |
| I2C | Interface for connecting external sensors like GPS, magnetometers, or airspeed. |
| UART | Serial communication ports for telemetry modules, GPS, or companion computers. |
| CAN | CAN bus interface for advanced peripherals like UAVCAN devices. |
| ADC | Analog-to-digital converter for voltage and current sensing. |
| USB | Micro-USB port for firmware updates, configuration, and data logging. |
| SD Card Slot | For inserting an SD card to store flight logs and data. |
Usage Instructions
How to Use the PixHawk 2.4.8 in a Drone
- Power Supply: Connect the power module to the PixHawk's power port. Ensure the input voltage is within the specified range (4.8V to 5.4V).
- Connect Peripherals:
- Attach ESCs or servos to the PWM output ports.
- Connect external sensors (e.g., GPS, magnetometer) to the I2C or UART ports.
- Attach a telemetry module to a UART port for remote communication.
- Install Firmware:
- Use the Mission Planner or QGroundControl software to flash the desired autopilot firmware (e.g., PX4 or ArduPilot).
- Connect the PixHawk to your computer via the USB port and follow the software instructions.
- Calibrate Sensors:
- Perform accelerometer, gyroscope, and compass calibration using the ground control software.
- Set up the radio transmitter and receiver for manual control.
- Configure Flight Modes:
- Define flight modes (e.g., Stabilize, Loiter, Auto) in the ground control software.
- Assign flight modes to transmitter switches for easy access during flight.
- Pre-Flight Checks:
- Verify all connections and ensure the battery is fully charged.
- Check for any errors or warnings in the ground control software.
- Perform a motor test to confirm proper operation.
Important Considerations and Best Practices
- Always use a high-quality power module to ensure stable voltage supply.
- Secure all connections to prevent disconnections during flight.
- Use vibration-dampening mounts to reduce noise affecting the IMU sensors.
- Regularly update the firmware to access new features and bug fixes.
- Perform a thorough pre-flight check before every flight to ensure safety.
Example Code for Arduino UNO Integration
While the PixHawk 2.4.8 is not directly controlled by an Arduino, it can communicate with an Arduino via MAVLink protocol. Below is an example of how to send a heartbeat message to the PixHawk using an Arduino UNO:
#include <mavlink.h> // Include MAVLink library

// Define serial port for communication with PixHawk
#define SERIAL_PORT Serial

void setup() {
  SERIAL_PORT.begin(57600); // Initialize serial communication at 57600 baud
}

void loop() {
  // Create a MAVLink heartbeat message
  mavlink_message_t msg;
  uint8_t buf[MAVLINK_MAX_PACKET_LEN];

  // Pack the heartbeat message
  mavlink_msg_heartbeat_pack(
    1, // System ID (e.g., Arduino)
    200, // Component ID
    &msg,
    MAV_TYPE_GENERIC, // Type of MAV (generic)
    MAV_AUTOPILOT_GENERIC, // Autopilot type
    MAV_MODE_MANUAL_ARMED, // Mode
    0, // Custom mode
    MAV_STATE_ACTIVE // System state
  );

  // Serialize the message to the buffer
  uint16_t len = mavlink_msg_to_send_buffer(buf, &msg);

  // Send the message over the serial port
  SERIAL_PORT.write(buf, len);

  delay(1000); // Send heartbeat every second
}
Troubleshooting and FAQs
Common Issues and Solutions
PixHawk Not Powering On:
- Cause: Insufficient or incorrect power supply.
- Solution: Verify the power module connection and ensure the input voltage is within the specified range.
No Communication with Ground Control Software:
- Cause: Incorrect USB driver or faulty cable.
- Solution: Install the correct USB driver for PixHawk and try a different cable.
Unstable Flight or Drifting:
- Cause: Improper sensor calibration or vibration interference.
- Solution: Recalibrate the accelerometer, gyroscope, and compass. Use vibration-dampening mounts.
Telemetry Module Not Connecting:
- Cause: Incorrect UART port configuration.
- Solution: Verify the baud rate and port settings in the ground control software.
FAQs
Q: Can I use the PixHawk 2.4.8 with a Raspberry Pi?
- A: Yes, the PixHawk can communicate with a Raspberry Pi via UART using the MAVLink protocol.
Q: What is the maximum number of PWM outputs supported?
- A: The PixHawk 2.4.8 supports up to 8 PWM outputs.
Q: How do I update the firmware?
- A: Connect the PixHawk to your computer via USB and use Mission Planner or QGroundControl to update the firmware.
Q: Can I use the PixHawk for fixed-wing aircraft?
- A: Yes, the PixHawk supports fixed-wing, multirotor, and other UAV configurations.