Cirkit Designer Logo
Cirkit Designer
Your all-in-one circuit design IDE
Home / 
Component Documentation

How to Use SunFounder Fusion HAT+: Examples, Pinouts, and Specs

Image of SunFounder Fusion HAT+
Cirkit Designer LogoDesign with SunFounder Fusion HAT+ in Cirkit Designer

Introduction

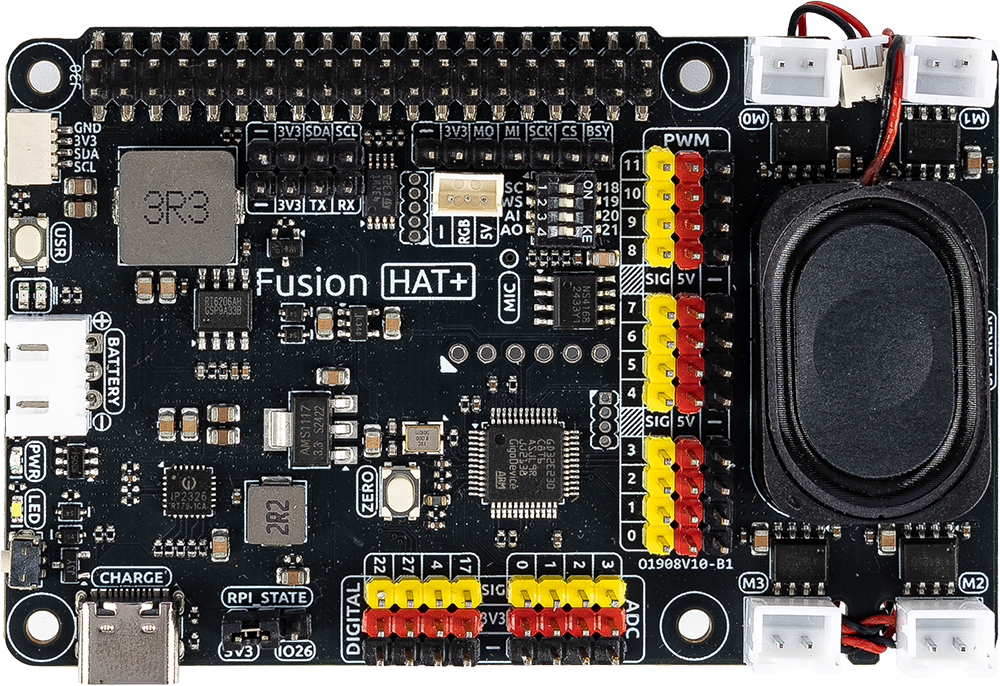
The SunFounder Fusion HAT+ is a versatile add-on board designed for Raspberry Pi, offering a wide range of interfaces and sensors to simplify hardware integration. It features GPIO, I2C, and PWM capabilities, making it an ideal choice for prototyping, robotics, IoT applications, and educational projects. With its plug-and-play design, the Fusion HAT+ allows users to quickly connect and control external devices, sensors, and actuators.

Explore Projects Built with SunFounder Fusion HAT+

Use Cirkit Designer to design, explore, and prototype these projects online. Some projects support real-time simulation. Click "Open Project" to start designing instantly!
Raspberry Pi 4B-Based Multi-Sensor Interface Hub with GPS and GSM
Image of Rocket: A project utilizing SunFounder Fusion HAT+ in a practical application
This circuit features a Raspberry Pi 4B interfaced with an IMX296 color global shutter camera, a Neo 6M GPS module, an Adafruit BMP388 barometric pressure sensor, an MPU-6050 accelerometer/gyroscope, and a Sim800l GSM module for cellular connectivity. Power management is handled by an MT3608 boost converter, which steps up the voltage from a Lipo battery, with a resettable fuse PTC and a 1N4007 diode for protection. The Adafruit Perma-Proto HAT is used for organizing connections and interfacing the sensors and modules with the Raspberry Pi via I2C and GPIO pins.
Cirkit Designer LogoOpen Project in Cirkit Designer
Raspberry Pi 4B-Based GPS and GSM Tracking System with Audio Feedback
Image of unlimited range: A project utilizing SunFounder Fusion HAT+ in a practical application
This circuit features a Raspberry Pi 4B as the central processing unit, interfaced with a GPS NEO-6M V2 module for location tracking and an Adafruit FONA 808 Shield for cellular communication. It includes a PAM8406 5V Digital Audio Amplifier connected to an Adafruit STEMMA Speaker for audio output, and a Condenser Microphone connected to the FONA 808 for audio input. Power management is handled by a 12V battery connected to a voltage regulator that steps down the voltage to 5V and 3V required by the various components.
Cirkit Designer LogoOpen Project in Cirkit Designer
Raspberry Pi 5 Controlled Robotic Vehicle with LIDAR and IMU
Image of Rover: A project utilizing SunFounder Fusion HAT+ in a practical application
This circuit features a Raspberry Pi 5 as the central controller, interfaced with a TF LUNA LIDAR sensor for distance measurement and an MPU-6050 for motion tracking via I2C communication. It also includes two L298 motor drivers powered by a 12V battery to control four DC motors, with the Raspberry Pi's GPIO pins used to manage the direction and speed of the motors.
Cirkit Designer LogoOpen Project in Cirkit Designer
Voice-Activated Home Automation System with Arduino and ESP8266
Image of IOT based online/offline controlled home automation: A project utilizing SunFounder Fusion HAT+ in a practical application
This is a voice-activated control system powered by solar energy with battery backup. It uses an Arduino UNO to interpret voice commands via a DF Robot Gravity voice recognition module and control a 4-channel relay that switches a fan, buzzer, solenoid lock, and AC bulb. A NodeMCU ESP8266 is included for potential IoT connectivity.
Cirkit Designer LogoOpen Project in Cirkit Designer

Explore Projects Built with SunFounder Fusion HAT+

Use Cirkit Designer to design, explore, and prototype these projects online. Some projects support real-time simulation. Click "Open Project" to start designing instantly!
Image of Rocket: A project utilizing SunFounder Fusion HAT+ in a practical application
Raspberry Pi 4B-Based Multi-Sensor Interface Hub with GPS and GSM
This circuit features a Raspberry Pi 4B interfaced with an IMX296 color global shutter camera, a Neo 6M GPS module, an Adafruit BMP388 barometric pressure sensor, an MPU-6050 accelerometer/gyroscope, and a Sim800l GSM module for cellular connectivity. Power management is handled by an MT3608 boost converter, which steps up the voltage from a Lipo battery, with a resettable fuse PTC and a 1N4007 diode for protection. The Adafruit Perma-Proto HAT is used for organizing connections and interfacing the sensors and modules with the Raspberry Pi via I2C and GPIO pins.
Cirkit Designer LogoOpen Project in Cirkit Designer
Image of unlimited range: A project utilizing SunFounder Fusion HAT+ in a practical application
Raspberry Pi 4B-Based GPS and GSM Tracking System with Audio Feedback
This circuit features a Raspberry Pi 4B as the central processing unit, interfaced with a GPS NEO-6M V2 module for location tracking and an Adafruit FONA 808 Shield for cellular communication. It includes a PAM8406 5V Digital Audio Amplifier connected to an Adafruit STEMMA Speaker for audio output, and a Condenser Microphone connected to the FONA 808 for audio input. Power management is handled by a 12V battery connected to a voltage regulator that steps down the voltage to 5V and 3V required by the various components.
Cirkit Designer LogoOpen Project in Cirkit Designer
Image of Rover: A project utilizing SunFounder Fusion HAT+ in a practical application
Raspberry Pi 5 Controlled Robotic Vehicle with LIDAR and IMU
This circuit features a Raspberry Pi 5 as the central controller, interfaced with a TF LUNA LIDAR sensor for distance measurement and an MPU-6050 for motion tracking via I2C communication. It also includes two L298 motor drivers powered by a 12V battery to control four DC motors, with the Raspberry Pi's GPIO pins used to manage the direction and speed of the motors.
Cirkit Designer LogoOpen Project in Cirkit Designer
Image of IOT based online/offline controlled home automation: A project utilizing SunFounder Fusion HAT+ in a practical application
Voice-Activated Home Automation System with Arduino and ESP8266
This is a voice-activated control system powered by solar energy with battery backup. It uses an Arduino UNO to interpret voice commands via a DF Robot Gravity voice recognition module and control a 4-channel relay that switches a fan, buzzer, solenoid lock, and AC bulb. A NodeMCU ESP8266 is included for potential IoT connectivity.
Cirkit Designer LogoOpen Project in Cirkit Designer

Common Applications and Use Cases

  • Robotics and motor control
  • IoT (Internet of Things) projects
  • Sensor integration and data acquisition
  • Educational and prototyping purposes
  • LED control and PWM-based applications

Technical Specifications

Key Technical Details

Parameter Specification
Compatible Boards Raspberry Pi 4, 3B+, 3, Zero, Zero W
Input Voltage 5V (via Raspberry Pi GPIO header)
Communication Protocols GPIO, I2C, PWM
GPIO Pins 40-pin Raspberry Pi GPIO header
Onboard Sensors Temperature, Light, and Sound sensors
PWM Channels 4
Dimensions 65mm x 56mm x 15mm

Pin Configuration and Descriptions

The SunFounder Fusion HAT+ connects directly to the Raspberry Pi's 40-pin GPIO header. Below is a description of the key pins and their functions:

Pin Number Pin Name Description
1 3.3V Power supply for low-power devices
2 5V Power supply for high-power devices
3 SDA (I2C) I2C data line for communication
5 SCL (I2C) I2C clock line for communication
7 GPIO4 General-purpose input/output pin
12 PWM0 PWM output channel 0
13 PWM1 PWM output channel 1
15 GPIO22 General-purpose input/output pin
37 GPIO26 General-purpose input/output pin
39 GND Ground connection

Usage Instructions

How to Use the Component in a Circuit

  1. Attach the Fusion HAT+ to the Raspberry Pi: Align the 40-pin GPIO header on the HAT+ with the Raspberry Pi's GPIO pins and press gently to secure the connection.
  2. Power the Raspberry Pi: Connect the Raspberry Pi to a 5V power supply. The HAT+ will draw power directly from the Raspberry Pi.
  3. Connect External Devices: Use the GPIO, I2C, or PWM pins to connect sensors, actuators, or other peripherals as needed.
  4. Install Required Libraries: Install the SunFounder-provided Python libraries or other necessary software to control the HAT+.

Important Considerations and Best Practices

  • Voltage Levels: Ensure that connected devices operate at 3.3V or 5V to avoid damaging the HAT+ or Raspberry Pi.
  • Library Installation: Use the official SunFounder libraries for seamless integration. Install them using the following command:
    pip install sunfounder-fusion
    
  • Avoid Overloading: Do not exceed the current limits of the GPIO pins or the Raspberry Pi's power supply.
  • Secure Connections: Ensure all connections are secure to prevent accidental disconnections during operation.

Example Code for Raspberry Pi

Below is an example Python script to read data from the onboard temperature sensor and control an LED using PWM:

import time
from sunfounder_fusion import FusionHAT

Initialize the Fusion HAT+ library

fusion = FusionHAT()

Function to read temperature from the onboard sensor

def read_temperature(): temp = fusion.get_temperature() # Get temperature in Celsius print(f"Temperature: {temp:.2f} °C") return temp

Function to control an LED using PWM

def control_led(brightness): # Brightness should be a value between 0 (off) and 100 (full brightness) fusion.set_pwm(0, brightness) # Set PWM channel 0 to the specified brightness

try: while True: # Read and display temperature read_temperature()

    # Gradually increase LED brightness
    for brightness in range(0, 101, 10):
        control_led(brightness)
        time.sleep(0.1)
    
    # Gradually decrease LED brightness
    for brightness in range(100, -1, -10):
        control_led(brightness)
        time.sleep(0.1)

except KeyboardInterrupt: print("Exiting program...") fusion.set_pwm(0, 0) # Turn off the LED


Troubleshooting and FAQs

Common Issues and Solutions

  1. HAT+ Not Detected by Raspberry Pi

    • Solution: Ensure the HAT+ is securely connected to the GPIO header. Verify that the Raspberry Pi is powered on and the required libraries are installed.
  2. I2C Devices Not Responding

    • Solution: Enable I2C on the Raspberry Pi by running sudo raspi-config and navigating to "Interfacing Options > I2C". Reboot the Raspberry Pi after enabling I2C.
  3. PWM Output Not Working

    • Solution: Check the connected device's wiring and ensure the correct PWM channel is being used. Verify that the brightness value is within the valid range (0–100).
  4. Temperature Sensor Reading Incorrect Values

    • Solution: Ensure the HAT+ is not exposed to extreme environmental conditions. Verify that the library is correctly installed and updated.

FAQs

  • Q: Can I use the Fusion HAT+ with other microcontrollers?
    A: The Fusion HAT+ is specifically designed for Raspberry Pi. However, you may adapt it for other microcontrollers with compatible GPIO and I2C interfaces, though this requires advanced knowledge.

  • Q: How many devices can I connect via I2C?
    A: The I2C bus supports multiple devices, but ensure each device has a unique address to avoid conflicts.

  • Q: Is the Fusion HAT+ compatible with Raspberry Pi Pico?
    A: No, the Fusion HAT+ is designed for Raspberry Pi models with a 40-pin GPIO header.

  • Q: Can I power the HAT+ separately?
    A: No, the HAT+ draws power directly from the Raspberry Pi's GPIO header. Ensure the Raspberry Pi is adequately powered.