Cirkit Designer Logo
Cirkit Designer
Your all-in-one circuit design IDE
Home / 
Component Documentation

How to Use Haptic Motor Driver: Examples, Pinouts, and Specs

Image of Haptic Motor Driver
Cirkit Designer LogoDesign with Haptic Motor Driver in Cirkit Designer

Introduction

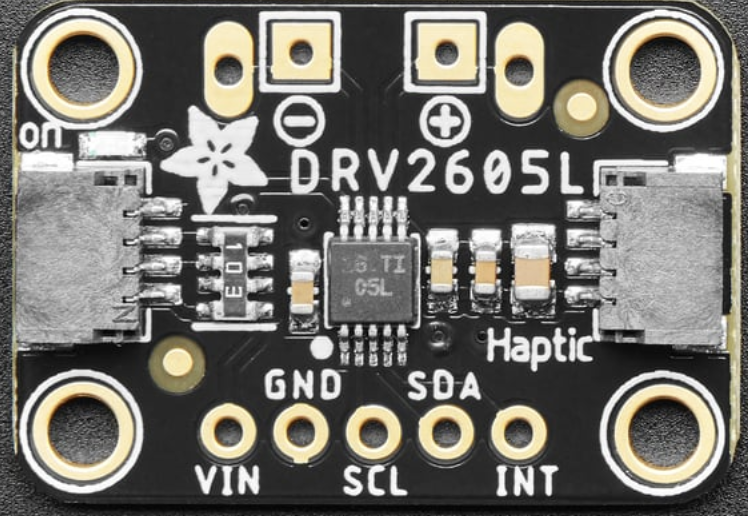
The Adafruit DRV2605L Haptic Motor Driver is a versatile and efficient component designed to control haptic motors, enabling tactile feedback in electronic devices. It is based on the Texas Instruments DRV2605L chip and is capable of driving both Linear Resonant Actuators (LRAs) and Eccentric Rotating Mass (ERM) motors. This driver is ideal for applications requiring precise vibration control, such as wearable devices, gaming controllers, smartphones, and other interactive systems.

The DRV2605L features an integrated library of haptic effects, making it easy to implement a wide range of tactile sensations without requiring complex programming. Additionally, it supports I²C communication, allowing seamless integration with microcontrollers like the Arduino UNO.

Explore Projects Built with Haptic Motor Driver

Use Cirkit Designer to design, explore, and prototype these projects online. Some projects support real-time simulation. Click "Open Project" to start designing instantly!
Battery-Powered Vibration Motor Control with ESP32 and DRV2605L
Image of Guante Háptico 2: A project utilizing Haptic Motor Driver in a practical application
This circuit is a haptic feedback system powered by a 2000mAh battery, controlled by an Adafruit HUZZAH32 ESP32 Feather microcontroller, and utilizing an Adafruit DRV2605L haptic driver to drive two vibration motors. The system includes a flex resistor for input sensing, and the microcontroller communicates with the haptic driver via I2C.
Cirkit Designer LogoOpen Project in Cirkit Designer
STM32F407-Controlled Robotic System with Touch Interface and Motor Actuation
Image of 0000: A project utilizing Haptic Motor Driver in a practical application
This circuit is designed to control multiple DC motors using L298N motor drivers, which are interfaced with an STM32F407 Discovery Kit microcontroller. The microcontroller receives input from a rotary encoder, multiple touch sensors, a joystick module, and an IR sensor to determine the motors' behavior. A 12V power supply provides power to the motor drivers, which is regulated for other components by MT3608 step-up converters, and the entire system is powered by an AC supply connected to the 12V power supply unit.
Cirkit Designer LogoOpen Project in Cirkit Designer
Arduino-Controlled Robotics Platform with Proximity and Ultrasonic Sensing
Image of ertyuio: A project utilizing Haptic Motor Driver in a practical application
This circuit is a multi-motor control system with sensory input, featuring an Arduino Mega 2560 that manages four servos and four DC motors through an L298N motor driver. It includes an HC-SR04 ultrasonic sensor and an LJC18A3-B-Z/BY capacitive proximity sensor for environmental interaction, powered by a 4 x AAA battery mount.
Cirkit Designer LogoOpen Project in Cirkit Designer
Bluetooth-Controlled Multi-Function Arduino Nano Gadget
Image of Copy of Smarttt: A project utilizing Haptic Motor Driver in a practical application
This is a portable, microcontroller-driven interactive device featuring Bluetooth connectivity, visual (RGB LED), auditory (loudspeaker), and haptic (vibration motor) feedback, user input (pushbutton), and a rechargeable power system (TP4056 with Li-ion battery).
Cirkit Designer LogoOpen Project in Cirkit Designer

Explore Projects Built with Haptic Motor Driver

Use Cirkit Designer to design, explore, and prototype these projects online. Some projects support real-time simulation. Click "Open Project" to start designing instantly!
Image of Guante Háptico 2: A project utilizing Haptic Motor Driver in a practical application
Battery-Powered Vibration Motor Control with ESP32 and DRV2605L
This circuit is a haptic feedback system powered by a 2000mAh battery, controlled by an Adafruit HUZZAH32 ESP32 Feather microcontroller, and utilizing an Adafruit DRV2605L haptic driver to drive two vibration motors. The system includes a flex resistor for input sensing, and the microcontroller communicates with the haptic driver via I2C.
Cirkit Designer LogoOpen Project in Cirkit Designer
Image of 0000: A project utilizing Haptic Motor Driver in a practical application
STM32F407-Controlled Robotic System with Touch Interface and Motor Actuation
This circuit is designed to control multiple DC motors using L298N motor drivers, which are interfaced with an STM32F407 Discovery Kit microcontroller. The microcontroller receives input from a rotary encoder, multiple touch sensors, a joystick module, and an IR sensor to determine the motors' behavior. A 12V power supply provides power to the motor drivers, which is regulated for other components by MT3608 step-up converters, and the entire system is powered by an AC supply connected to the 12V power supply unit.
Cirkit Designer LogoOpen Project in Cirkit Designer
Image of ertyuio: A project utilizing Haptic Motor Driver in a practical application
Arduino-Controlled Robotics Platform with Proximity and Ultrasonic Sensing
This circuit is a multi-motor control system with sensory input, featuring an Arduino Mega 2560 that manages four servos and four DC motors through an L298N motor driver. It includes an HC-SR04 ultrasonic sensor and an LJC18A3-B-Z/BY capacitive proximity sensor for environmental interaction, powered by a 4 x AAA battery mount.
Cirkit Designer LogoOpen Project in Cirkit Designer
Image of Copy of Smarttt: A project utilizing Haptic Motor Driver in a practical application
Bluetooth-Controlled Multi-Function Arduino Nano Gadget
This is a portable, microcontroller-driven interactive device featuring Bluetooth connectivity, visual (RGB LED), auditory (loudspeaker), and haptic (vibration motor) feedback, user input (pushbutton), and a rechargeable power system (TP4056 with Li-ion battery).
Cirkit Designer LogoOpen Project in Cirkit Designer

Technical Specifications

  • Manufacturer: Adafruit
  • Part Number: DRV2605L
  • Operating Voltage: 2.0V to 5.2V
  • Interface: I²C (7-bit address: 0x5A by default)
  • Output Type: PWM or analog drive for haptic motors
  • Supported Motors: ERM and LRA
  • Integrated Features:
    • Preloaded haptic effect library
    • Real-time playback mode
    • Auto-resonance detection for LRAs
  • Dimensions: 20mm x 20mm (breakout board)

Pin Configuration and Descriptions

The DRV2605L breakout board has the following pin layout:

Pin Name Description
VIN Power input (2.0V to 5.2V). Connect to the power supply.
GND Ground. Connect to the ground of the circuit.
SDA I²C data line. Connect to the SDA pin of the microcontroller.
SCL I²C clock line. Connect to the SCL pin of the microcontroller.
IN Optional analog or PWM input for motor control.
EN Enable pin. Pull high to enable the driver, or low to disable it.
OUT+ Positive output for the haptic motor. Connect to the motor's positive terminal.
OUT- Negative output for the haptic motor. Connect to the motor's negative terminal.

Usage Instructions

Connecting the DRV2605L to an Arduino UNO

To use the DRV2605L with an Arduino UNO, follow these steps:

  1. Connect the VIN pin to the Arduino's 5V pin.
  2. Connect the GND pin to the Arduino's GND pin.
  3. Connect the SDA pin to the Arduino's A4 pin (I²C data line).
  4. Connect the SCL pin to the Arduino's A5 pin (I²C clock line).
  5. Connect the OUT+ and OUT- pins to the terminals of the haptic motor.

Example Arduino Code

The following example demonstrates how to use the DRV2605L with an Arduino UNO to play a haptic effect from the built-in library:

#include <Wire.h>
#include <Adafruit_DRV2605.h>

// Create an instance of the DRV2605L driver
Adafruit_DRV2605 drv;

void setup() {
  Serial.begin(9600);
  Serial.println("Initializing DRV2605L...");

  // Initialize the DRV2605L
  if (!drv.begin()) {
    Serial.println("Failed to find DRV2605L chip. Check connections.");
    while (1);
  }
  Serial.println("DRV2605L initialized!");

  // Select the ERM motor mode (default)
  drv.selectLibrary(1);

  // Set the haptic effect to play (e.g., effect #1)
  drv.setMode(DRV2605_MODE_INTTRIG); // Internal trigger mode
  drv.setWaveform(0, 1);             // Play effect #1
  drv.setWaveform(1, 0);             // End of sequence
}

void loop() {
  Serial.println("Playing haptic effect...");
  drv.go(); // Trigger the effect
  delay(1000); // Wait for 1 second before repeating
}

Important Considerations

  • Ensure the power supply voltage is within the specified range (2.0V to 5.2V).
  • Use appropriate pull-up resistors (typically 4.7kΩ) on the SDA and SCL lines if not already present.
  • For LRA motors, the DRV2605L automatically detects the resonance frequency for optimal performance.
  • Avoid exceeding the current rating of the motor to prevent damage.

Troubleshooting and FAQs

Common Issues

  1. The motor does not vibrate.

    • Verify all connections, especially the motor terminals and I²C lines.
    • Check the power supply voltage and ensure it is within the specified range.
    • Ensure the correct I²C address (0x5A by default) is being used in the code.
  2. The Arduino cannot detect the DRV2605L.

    • Confirm that the SDA and SCL lines are connected to the correct pins on the Arduino.
    • Use an I²C scanner sketch to verify the DRV2605L's address.
  3. The motor vibrates weakly or inconsistently.

    • Ensure the motor is compatible with the DRV2605L (ERM or LRA).
    • For LRA motors, verify that the auto-resonance detection is functioning correctly.

Tips for Troubleshooting

  • Use a multimeter to check for continuity and proper voltage levels on all connections.
  • Test the motor independently to ensure it is functional.
  • Refer to the Adafruit DRV2605L datasheet for advanced configuration options.

By following this documentation, you can effectively integrate the Adafruit DRV2605L Haptic Motor Driver into your projects and create engaging tactile feedback experiences.