Cirkit Designer
Your all-in-one circuit design IDE
Home /
Component Documentation
How to Use Tuya TYWE3S: Examples, Pinouts, and Specs
Introduction
The Tuya TYWE3S is a Wi-Fi module based on the ESP8266 chip, designed for Internet of Things (IoT) applications. It supports 2.4 GHz Wi-Fi and provides a reliable and cost-effective solution for wireless communication in smart home devices. The module is widely used in various applications, including smart lighting, home automation, and wireless sensor networks.
Explore Projects Built with Tuya TYWE3S
ESP32C3-Based Thermal Imaging Camera with TFT Display

This circuit connects a 1.3 inch TFT Module 240×240 ST7789 display, a GY-MCU90640 thermal camera module, and a XIAO ESP32C3 microcontroller to create a thermal imaging system. The ESP32C3 microcontroller is programmed to read temperature data from the thermal camera, process it, and display a visual representation of the temperature distribution on the TFT screen. The circuit is designed for applications requiring thermal monitoring, such as detecting heat sources or monitoring temperature variations in an environment.
ESP32-Powered Wi-Fi Controlled Robotic Car with OLED Display and Ultrasonic Sensor

This circuit is a battery-powered system featuring an ESP32 microcontroller that controls an OLED display, a motor driver for two hobby motors, an ultrasonic sensor for distance measurement, and a DFPlayer Mini for audio output through a loudspeaker. The TP4056 module manages battery charging, and a step-up boost converter provides a stable 5V supply to the components.
Wi-Fi Enabled Gas Leak Detection and Alert System with ESP8266 and SIM800L
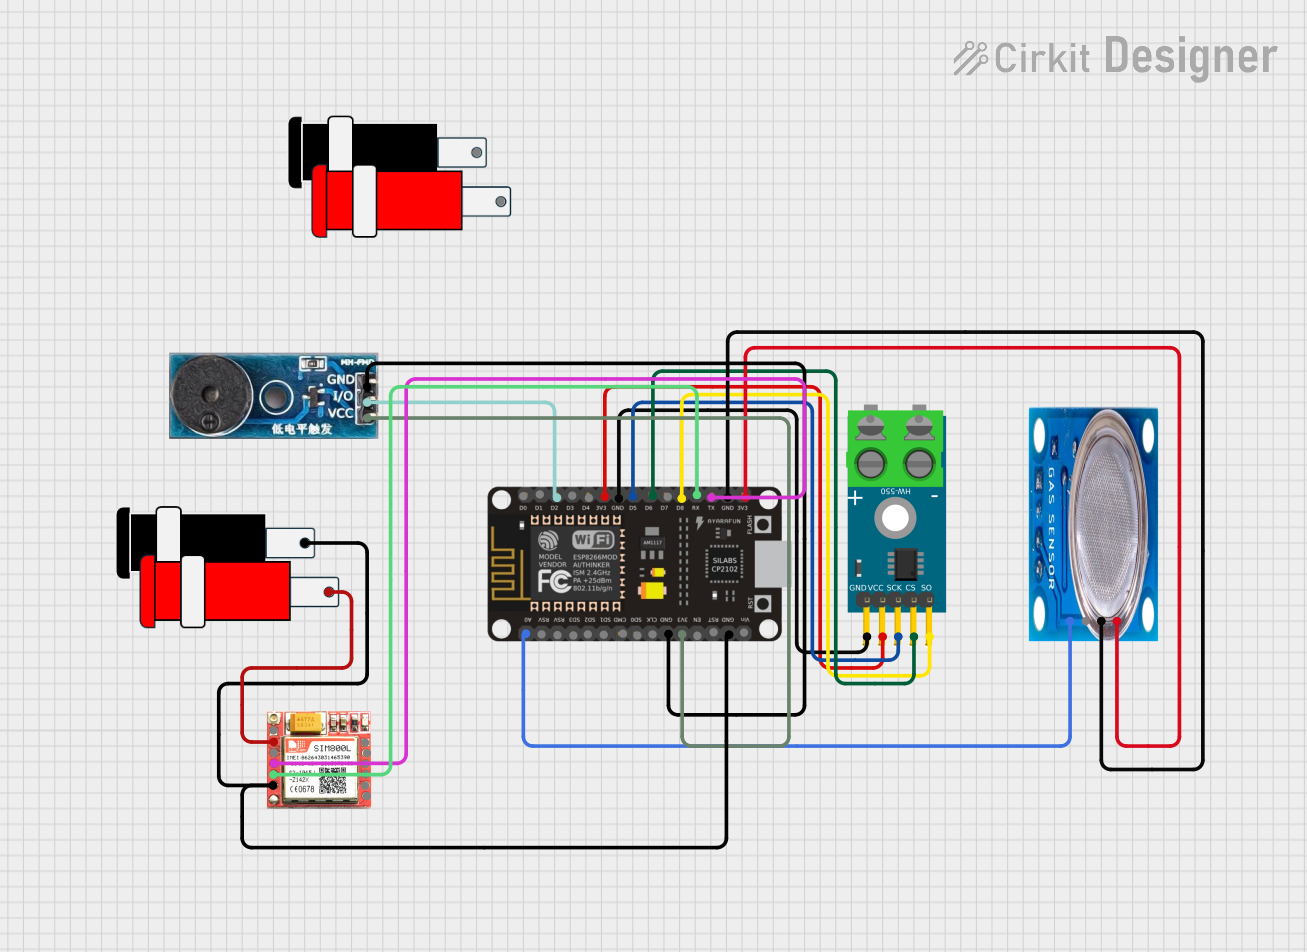
This circuit is a sensor and communication system using an ESP8266 NodeMCU microcontroller. It interfaces with a MAX6675 thermocouple module for temperature sensing, an MQ-5 gas sensor for gas detection, and a SIM800L module for GSM communication. Additionally, a buzzer module is included for audible alerts.
ESP32-Based Smart Environmental Monitoring System with Relay Control

This is a smart environmental monitoring and control system featuring an ESP32 microcontroller interfaced with a PZEM004T for power monitoring, relay modules for actuating bulbs and a fan, and an LCD for user interface. It includes flame, gas, and vibration sensors for safety monitoring purposes.
Explore Projects Built with Tuya TYWE3S
ESP32C3-Based Thermal Imaging Camera with TFT Display
This circuit connects a 1.3 inch TFT Module 240×240 ST7789 display, a GY-MCU90640 thermal camera module, and a XIAO ESP32C3 microcontroller to create a thermal imaging system. The ESP32C3 microcontroller is programmed to read temperature data from the thermal camera, process it, and display a visual representation of the temperature distribution on the TFT screen. The circuit is designed for applications requiring thermal monitoring, such as detecting heat sources or monitoring temperature variations in an environment.
ESP32-Powered Wi-Fi Controlled Robotic Car with OLED Display and Ultrasonic Sensor
This circuit is a battery-powered system featuring an ESP32 microcontroller that controls an OLED display, a motor driver for two hobby motors, an ultrasonic sensor for distance measurement, and a DFPlayer Mini for audio output through a loudspeaker. The TP4056 module manages battery charging, and a step-up boost converter provides a stable 5V supply to the components.
Wi-Fi Enabled Gas Leak Detection and Alert System with ESP8266 and SIM800L
This circuit is a sensor and communication system using an ESP8266 NodeMCU microcontroller. It interfaces with a MAX6675 thermocouple module for temperature sensing, an MQ-5 gas sensor for gas detection, and a SIM800L module for GSM communication. Additionally, a buzzer module is included for audible alerts.
ESP32-Based Smart Environmental Monitoring System with Relay Control
This is a smart environmental monitoring and control system featuring an ESP32 microcontroller interfaced with a PZEM004T for power monitoring, relay modules for actuating bulbs and a fan, and an LCD for user interface. It includes flame, gas, and vibration sensors for safety monitoring purposes.
Technical Specifications
Key Technical Details
| Parameter | Value |
|---|---|
| Wi-Fi Standard | IEEE 802.11 b/g/n |
| Frequency Range | 2.4 GHz |
| Operating Voltage | 3.0V - 3.6V |
| Operating Current | 80 mA (average) |
| Peak Current | 500 mA |
| Flash Memory | 1 MB |
| Operating Temperature | -40°C to 85°C |
| Dimensions | 24mm x 16mm x 3mm |
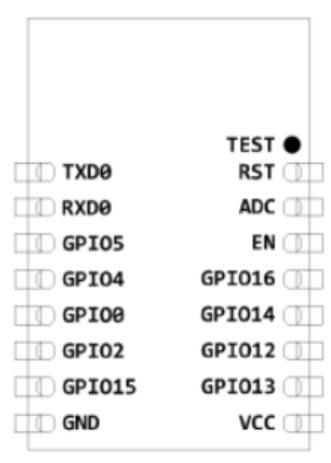
Pin Configuration and Descriptions
| Pin Number | Pin Name | Description |
|---|---|---|
| 1 | VCC | Power supply (3.3V) |
| 2 | TXD | UART Transmit Data |
| 3 | RXD | UART Receive Data |
| 4 | GND | Ground |
| 5 | GPIO0 | General Purpose I/O |
| 6 | GPIO2 | General Purpose I/O |
| 7 | GPIO4 | General Purpose I/O |
| 8 | GPIO5 | General Purpose I/O |
| 9 | GPIO12 | General Purpose I/O |
| 10 | GPIO13 | General Purpose I/O |
| 11 | GPIO14 | General Purpose I/O |
| 12 | GPIO15 | General Purpose I/O |
| 13 | GPIO16 | General Purpose I/O |
| 14 | ADC | Analog to Digital Converter |
| 15 | EN | Chip Enable (Active High) |
| 16 | RST | Reset (Active Low) |
Usage Instructions
How to Use the Component in a Circuit
- Power Supply: Connect the VCC pin to a 3.3V power supply and the GND pin to the ground.
- UART Communication: Connect the TXD pin to the RX pin of your microcontroller and the RXD pin to the TX pin of your microcontroller for serial communication.
- GPIO Pins: Use the GPIO pins for various input/output operations as needed in your application.
- Reset and Enable: Connect the RST pin to a push-button for manual reset and the EN pin to the 3.3V power supply to enable the module.
Important Considerations and Best Practices
- Power Supply: Ensure a stable 3.3V power supply to avoid damage to the module.
- Antenna Placement: Place the module in a location with minimal interference for optimal Wi-Fi performance.
- Firmware Updates: Regularly update the firmware to ensure security and performance improvements.
- Heat Dissipation: Ensure proper ventilation to avoid overheating, especially in enclosed spaces.
Example Code for Arduino UNO
#include <SoftwareSerial.h>

// Define the pins for SoftwareSerial
SoftwareSerial esp8266(2, 3); // RX, TX

void setup() {
  // Start the hardware serial communication
  Serial.begin(9600);
  // Start the software serial communication
  esp8266.begin(9600);

  // Send AT command to check communication
  esp8266.println("AT");
}

void loop() {
  // Check if data is available from the ESP8266
  if (esp8266.available()) {
    // Read the data and print it to the Serial Monitor
    while (esp8266.available()) {
      char c = esp8266.read();
      Serial.write(c);
    }
  }

  // Check if data is available from the Serial Monitor
  if (Serial.available()) {
    // Read the data and send it to the ESP8266
    while (Serial.available()) {
      char c = Serial.read();
      esp8266.write(c);
    }
  }
}
Troubleshooting and FAQs
Common Issues Users Might Face
- Module Not Responding: Ensure the power supply is stable and the connections are correct.
- Wi-Fi Connection Issues: Check the antenna placement and ensure the Wi-Fi credentials are correct.
- Overheating: Ensure proper ventilation and avoid placing the module in enclosed spaces.
Solutions and Tips for Troubleshooting
- Check Connections: Verify all connections, especially the power supply and UART connections.
- Use a Stable Power Supply: Use a regulated 3.3V power supply to avoid voltage fluctuations.
- Update Firmware: Regularly update the firmware to fix bugs and improve performance.
- Monitor Serial Output: Use the Serial Monitor to check for error messages and debug the communication.
By following this documentation, users can effectively integrate the Tuya TYWE3S Wi-Fi module into their IoT projects, ensuring reliable and efficient wireless communication.