
How to Use OPA350: Examples, Pinouts, and Specs
 Design with OPA350 in Cirkit Designer
Introduction
The OPA350, manufactured by Texas Instruments (Part ID: PA), is a precision, low-noise operational amplifier designed for high-performance applications. It features a wide bandwidth, low offset voltage, and low distortion, making it ideal for signal conditioning, filtering, and amplification in various electronic circuits. Its rail-to-rail input and output capabilities, combined with low power consumption, make it suitable for both battery-powered and high-speed systems.
Explore Projects Built with OPA350
 Open Project in Cirkit Designer
 Open Project in Cirkit Designer
 Open Project in Cirkit Designer
 Open Project in Cirkit Designer
Explore Projects Built with OPA350
Open Project in Cirkit DesignerOpen Project in Cirkit DesignerOpen Project in Cirkit DesignerOpen Project in Cirkit DesignerCommon Applications
- Signal conditioning in sensor interfaces
- Active filters for audio and communication systems
- Precision voltage amplification
- Analog-to-digital converter (ADC) buffering
- Portable and battery-powered devices
Technical Specifications
Key Specifications
| Parameter | Value |
|---|---|
| Supply Voltage Range | 2.5 V to 5.5 V |
| Input Offset Voltage | ±0.5 mV (typical) |
| Gain Bandwidth Product | 38 MHz |
| Slew Rate | 22 V/µs |
| Input Bias Current | ±0.2 pA (typical) |
| Output Voltage Swing | Rail-to-rail |
| Quiescent Current | 5.5 mA (typical) |
| Operating Temperature Range | -40°C to +85°C |
| Package Options | SOIC-8, SOT23-5 |
Pin Configuration and Descriptions
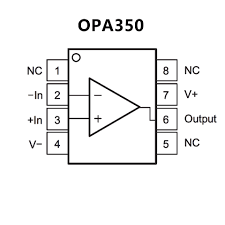
SOIC-8 Package
| Pin Number | Pin Name | Description |
|---|---|---|
| 1 | NC | No connection |
| 2 | IN- | Inverting input |
| 3 | IN+ | Non-inverting input |
| 4 | V- (GND) | Negative power supply or ground |
| 5 | NC | No connection |
| 6 | OUT | Output |
| 7 | V+ | Positive power supply |
| 8 | NC | No connection |
SOT23-5 Package
| Pin Number | Pin Name | Description |
|---|---|---|
| 1 | V+ | Positive power supply |
| 2 | IN- | Inverting input |
| 3 | IN+ | Non-inverting input |
| 4 | V- (GND) | Negative power supply or ground |
| 5 | OUT | Output |
Usage Instructions
Using the OPA350 in a Circuit
- Power Supply: Connect the OPA350 to a power supply within the range of 2.5 V to 5.5 V. Ensure proper decoupling capacitors (e.g., 0.1 µF ceramic capacitor) are placed close to the power pins to minimize noise.
- Input Configuration: Connect the input signals to the IN+ (non-inverting) and IN- (inverting) pins. For single-supply operation, bias the input signal to a mid-supply voltage if necessary.
- Output Load: The OPA350 can drive resistive and capacitive loads. For optimal performance, avoid excessive capacitive loading without compensation.
- Feedback Network: Use appropriate resistors and capacitors in the feedback loop to set the desired gain and bandwidth.
Important Considerations
- Stability: For capacitive loads greater than 100 pF, consider adding a small resistor (e.g., 10 Ω) in series with the output to maintain stability.
- Thermal Management: Ensure the device operates within the specified temperature range (-40°C to +85°C) to avoid performance degradation.
- PCB Layout: Minimize trace lengths and use a ground plane to reduce noise and interference.
Example: Connecting OPA350 to an Arduino UNO
The OPA350 can be used to amplify an analog signal before feeding it into the Arduino UNO's ADC. Below is an example circuit and Arduino code:
Circuit Description
- Connect the OPA350's V+ to the Arduino's 5V pin and V- to GND.
- Connect the signal source to the IN+ pin and a reference voltage (e.g., GND) to the IN- pin.
- The output of the OPA350 (OUT pin) is connected to an analog input pin (e.g., A0) on the Arduino.
Arduino Code
// Example code to read an amplified signal from the OPA350
// and display the ADC value on the serial monitor.

const int analogPin = A0; // Analog pin connected to OPA350 output
int adcValue = 0;         // Variable to store ADC reading

void setup() {
  Serial.begin(9600); // Initialize serial communication at 9600 baud
}

void loop() {
  adcValue = analogRead(analogPin); // Read the analog value from pin A0
  Serial.print("ADC Value: ");
  Serial.println(adcValue); // Print the ADC value to the serial monitor
  delay(500); // Wait for 500 ms before the next reading
}
Troubleshooting and FAQs
Common Issues
No Output Signal:
- Verify the power supply connections (V+ and V-).
- Check the input signal and ensure it is within the specified input voltage range.
- Ensure the feedback network is correctly configured.
Output Distortion:
- Check if the output is being driven beyond the rail-to-rail limits.
- Reduce capacitive loading or add a series resistor to stabilize the output.
High Noise Levels:
- Ensure proper decoupling capacitors are used near the power supply pins.
- Minimize noise sources and use a clean power supply.
Overheating:
- Verify that the device is operating within the specified voltage and temperature ranges.
- Check for excessive current draw due to incorrect circuit design.
FAQs
Q: Can the OPA350 operate with a single power supply?
A: Yes, the OPA350 is designed to operate with a single supply voltage as low as 2.5 V. Ensure the input signal is properly biased for single-supply operation.
Q: What is the maximum capacitive load the OPA350 can drive?
A: The OPA350 can drive capacitive loads up to 100 pF without additional compensation. For larger loads, use a series resistor to maintain stability.
Q: Is the OPA350 suitable for audio applications?
A: Yes, the OPA350's low noise, low distortion, and wide bandwidth make it an excellent choice for audio signal amplification and filtering.
Q: How do I protect the OPA350 from electrostatic discharge (ESD)?
A: Handle the device using proper ESD precautions, such as grounding yourself and using an anti-static wrist strap. Additionally, ensure the circuit includes ESD protection components if necessary.