Cirkit Designer Logo
Cirkit Designer
Your all-in-one circuit design IDE
Home / 
Component Documentation

How to Use moisture module hygrometer: Examples, Pinouts, and Specs

Image of moisture module hygrometer
Cirkit Designer LogoDesign with moisture module hygrometer in Cirkit Designer

Introduction

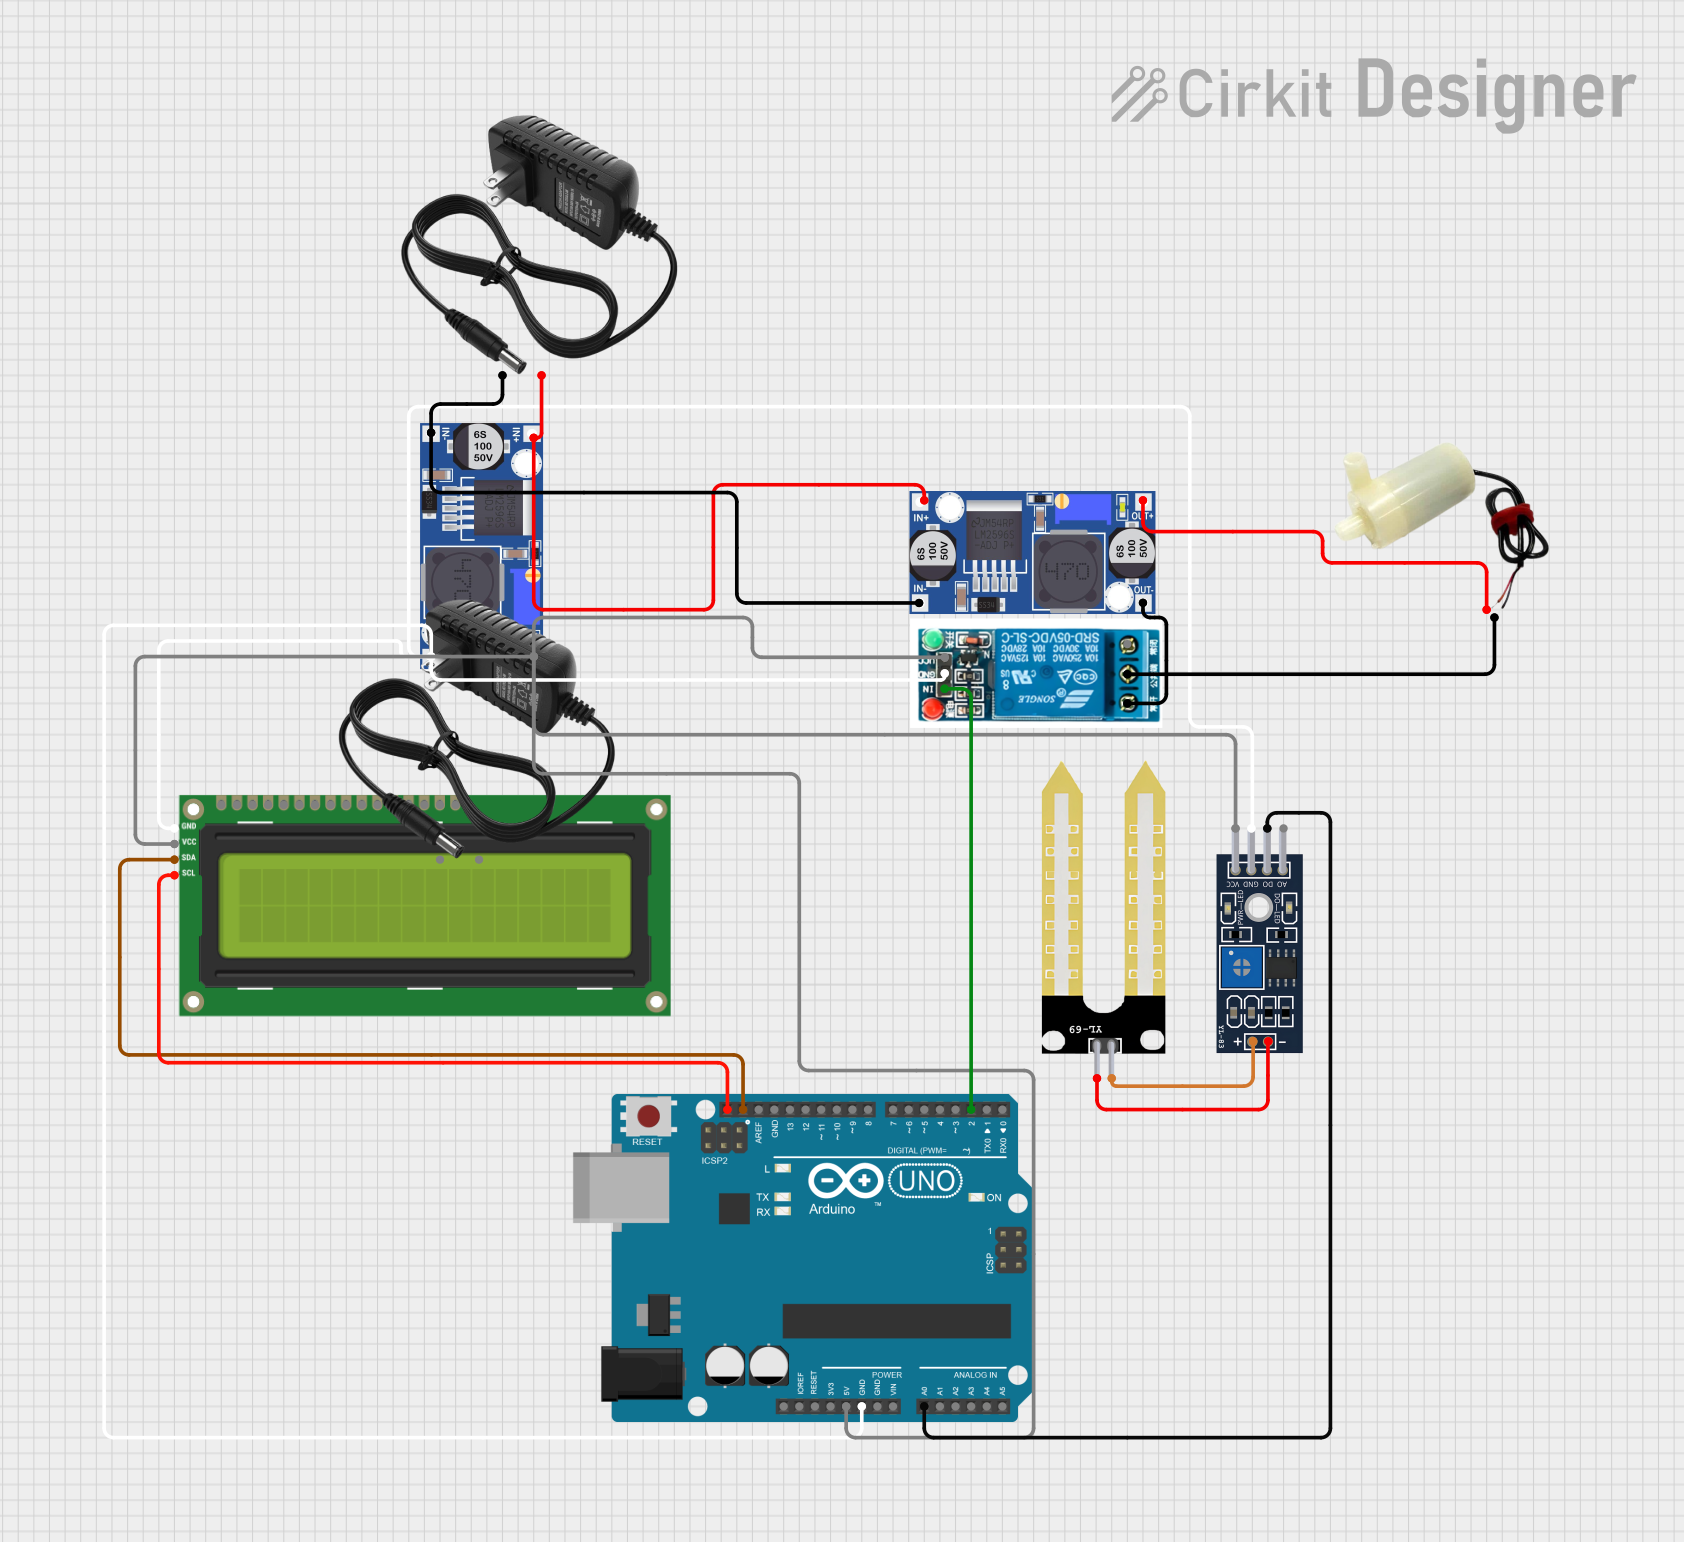
The moisture module hygrometer is a sensor designed to measure the moisture level in soil or air. It provides real-time data on humidity and moisture content, making it an essential tool for applications such as precision agriculture, automated irrigation systems, and environmental monitoring. This module is widely used in projects requiring soil moisture detection or humidity sensing, particularly in smart gardening and IoT-based systems.

Explore Projects Built with moisture module hygrometer

Use Cirkit Designer to design, explore, and prototype these projects online. Some projects support real-time simulation. Click "Open Project" to start designing instantly!
Arduino Nano-Based Multi-Zone Soil Moisture Monitor with OLED Display
Image of Soil Moisture Sensor Analog: A project utilizing moisture module hygrometer in a practical application
This circuit is designed to collect environmental data using multiple YL-83 modules with YL-69 sondas for soil moisture, and a KY-015 DHT11 sensor for humidity and temperature, all interfaced with an Arduino Nano. Data from the sensors is processed by the Arduino and displayed on an OLED screen, with power supplied by an MB102 Breadboard Power Supply Module.
Cirkit Designer LogoOpen Project in Cirkit Designer
ESP32-Based Plant Monitoring System with Wi-Fi Control and Relay Switching
Image of Plant Monitoring System: A project utilizing moisture module hygrometer in a practical application
This circuit is designed for a plant monitoring system that measures soil moisture, ambient light, and temperature/humidity conditions. It uses an ESP32 microcontroller to read data from a DHT11 temperature and humidity sensor, a YL-69 soil moisture sensor, and a photosensitive sensor module. The ESP32 controls a relay module to power a water pump based on sensor inputs, and it interfaces with a Blynk application for remote monitoring and manual override via a physical button.
Cirkit Designer LogoOpen Project in Cirkit Designer
Arduino Nano Based Soil Moisture Monitoring System with OLED Display and DHT11 Sensor
Image of Soil Moisture Sensor Digital: A project utilizing moisture module hygrometer in a practical application
This circuit is designed to monitor the moisture levels of multiple plants using YL-69 soil moisture sensors and YL-83 LM393 modules, and to display temperature and humidity readings from a DHT11 sensor on an OLED display. The Arduino Nano serves as the central microcontroller, reading the digital outputs from the moisture sensors through pull-up resistors and interfacing with the OLED via I2C. The code provided manages sensor readings, controls the display output, and indicates which plants require watering based on the moisture sensor data.
Cirkit Designer LogoOpen Project in Cirkit Designer
Arduino UNO Controlled Soil Moisture Monitoring and Water Pump System
Image of Smart Irrigation PROJECT': A project utilizing moisture module hygrometer in a practical application
This is a soil moisture monitoring system with automated water pump control. It uses an Arduino UNO to read moisture levels via a YL-83 Module LM393 and a YL-69 Sonda sensor, controlling a 5V mini water pump through a 5V relay based on the sensor's output. The system's status is displayed on an I2C LCD 16x2 Screen, and power is regulated by two buck converters from two 12V power supplies.
Cirkit Designer LogoOpen Project in Cirkit Designer

Explore Projects Built with moisture module hygrometer

Use Cirkit Designer to design, explore, and prototype these projects online. Some projects support real-time simulation. Click "Open Project" to start designing instantly!
Image of Soil Moisture Sensor Analog: A project utilizing moisture module hygrometer in a practical application
Arduino Nano-Based Multi-Zone Soil Moisture Monitor with OLED Display
This circuit is designed to collect environmental data using multiple YL-83 modules with YL-69 sondas for soil moisture, and a KY-015 DHT11 sensor for humidity and temperature, all interfaced with an Arduino Nano. Data from the sensors is processed by the Arduino and displayed on an OLED screen, with power supplied by an MB102 Breadboard Power Supply Module.
Cirkit Designer LogoOpen Project in Cirkit Designer
Image of Plant Monitoring System: A project utilizing moisture module hygrometer in a practical application
ESP32-Based Plant Monitoring System with Wi-Fi Control and Relay Switching
This circuit is designed for a plant monitoring system that measures soil moisture, ambient light, and temperature/humidity conditions. It uses an ESP32 microcontroller to read data from a DHT11 temperature and humidity sensor, a YL-69 soil moisture sensor, and a photosensitive sensor module. The ESP32 controls a relay module to power a water pump based on sensor inputs, and it interfaces with a Blynk application for remote monitoring and manual override via a physical button.
Cirkit Designer LogoOpen Project in Cirkit Designer
Image of Soil Moisture Sensor Digital: A project utilizing moisture module hygrometer in a practical application
Arduino Nano Based Soil Moisture Monitoring System with OLED Display and DHT11 Sensor
This circuit is designed to monitor the moisture levels of multiple plants using YL-69 soil moisture sensors and YL-83 LM393 modules, and to display temperature and humidity readings from a DHT11 sensor on an OLED display. The Arduino Nano serves as the central microcontroller, reading the digital outputs from the moisture sensors through pull-up resistors and interfacing with the OLED via I2C. The code provided manages sensor readings, controls the display output, and indicates which plants require watering based on the moisture sensor data.
Cirkit Designer LogoOpen Project in Cirkit Designer
Image of Smart Irrigation PROJECT': A project utilizing moisture module hygrometer in a practical application
Arduino UNO Controlled Soil Moisture Monitoring and Water Pump System
This is a soil moisture monitoring system with automated water pump control. It uses an Arduino UNO to read moisture levels via a YL-83 Module LM393 and a YL-69 Sonda sensor, controlling a 5V mini water pump through a 5V relay based on the sensor's output. The system's status is displayed on an I2C LCD 16x2 Screen, and power is regulated by two buck converters from two 12V power supplies.
Cirkit Designer LogoOpen Project in Cirkit Designer

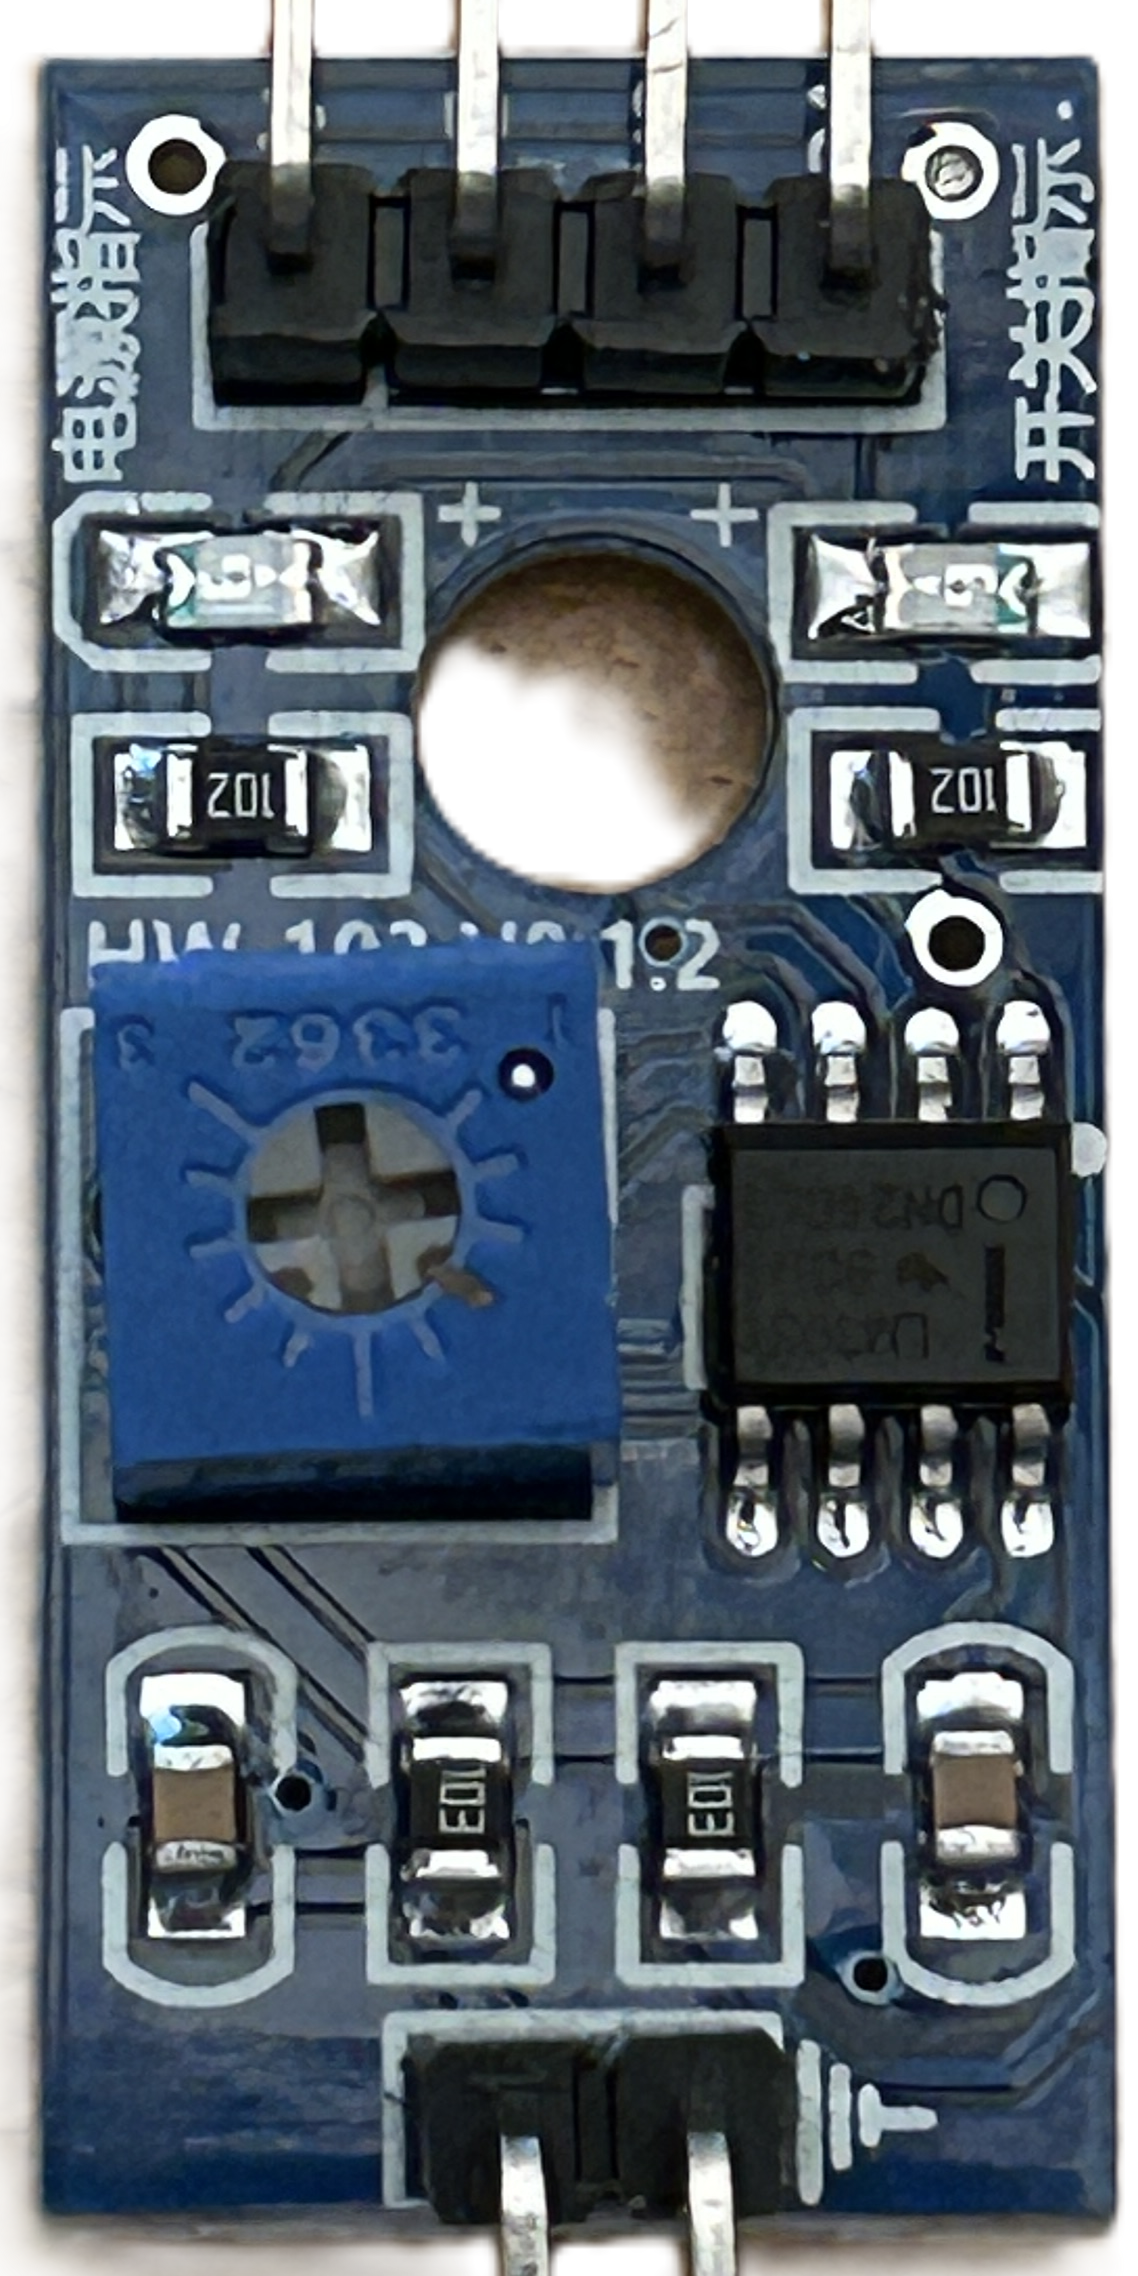
Technical Specifications

Below are the key technical details and pin configuration for the moisture module hygrometer:

Key Technical Details

  • Operating Voltage: 3.3V to 5V DC
  • Output Type: Analog and Digital
  • Current Consumption: < 20mA
  • Moisture Detection Range: 0% to 100%
  • Dimensions: Varies by model, typically 3cm x 1.5cm (sensor probe)
  • Interface: 4-pin header (VCC, GND, A0, D0)
  • Adjustable Sensitivity: Via onboard potentiometer (for digital output)

Pin Configuration and Descriptions

Pin Name Description
VCC Power supply pin. Connect to 3.3V or 5V DC.
GND Ground pin. Connect to the ground of the power supply.
A0 Analog output pin. Provides a continuous voltage proportional to moisture level.
D0 Digital output pin. Outputs HIGH or LOW based on the moisture threshold set.

Usage Instructions

How to Use the Component in a Circuit
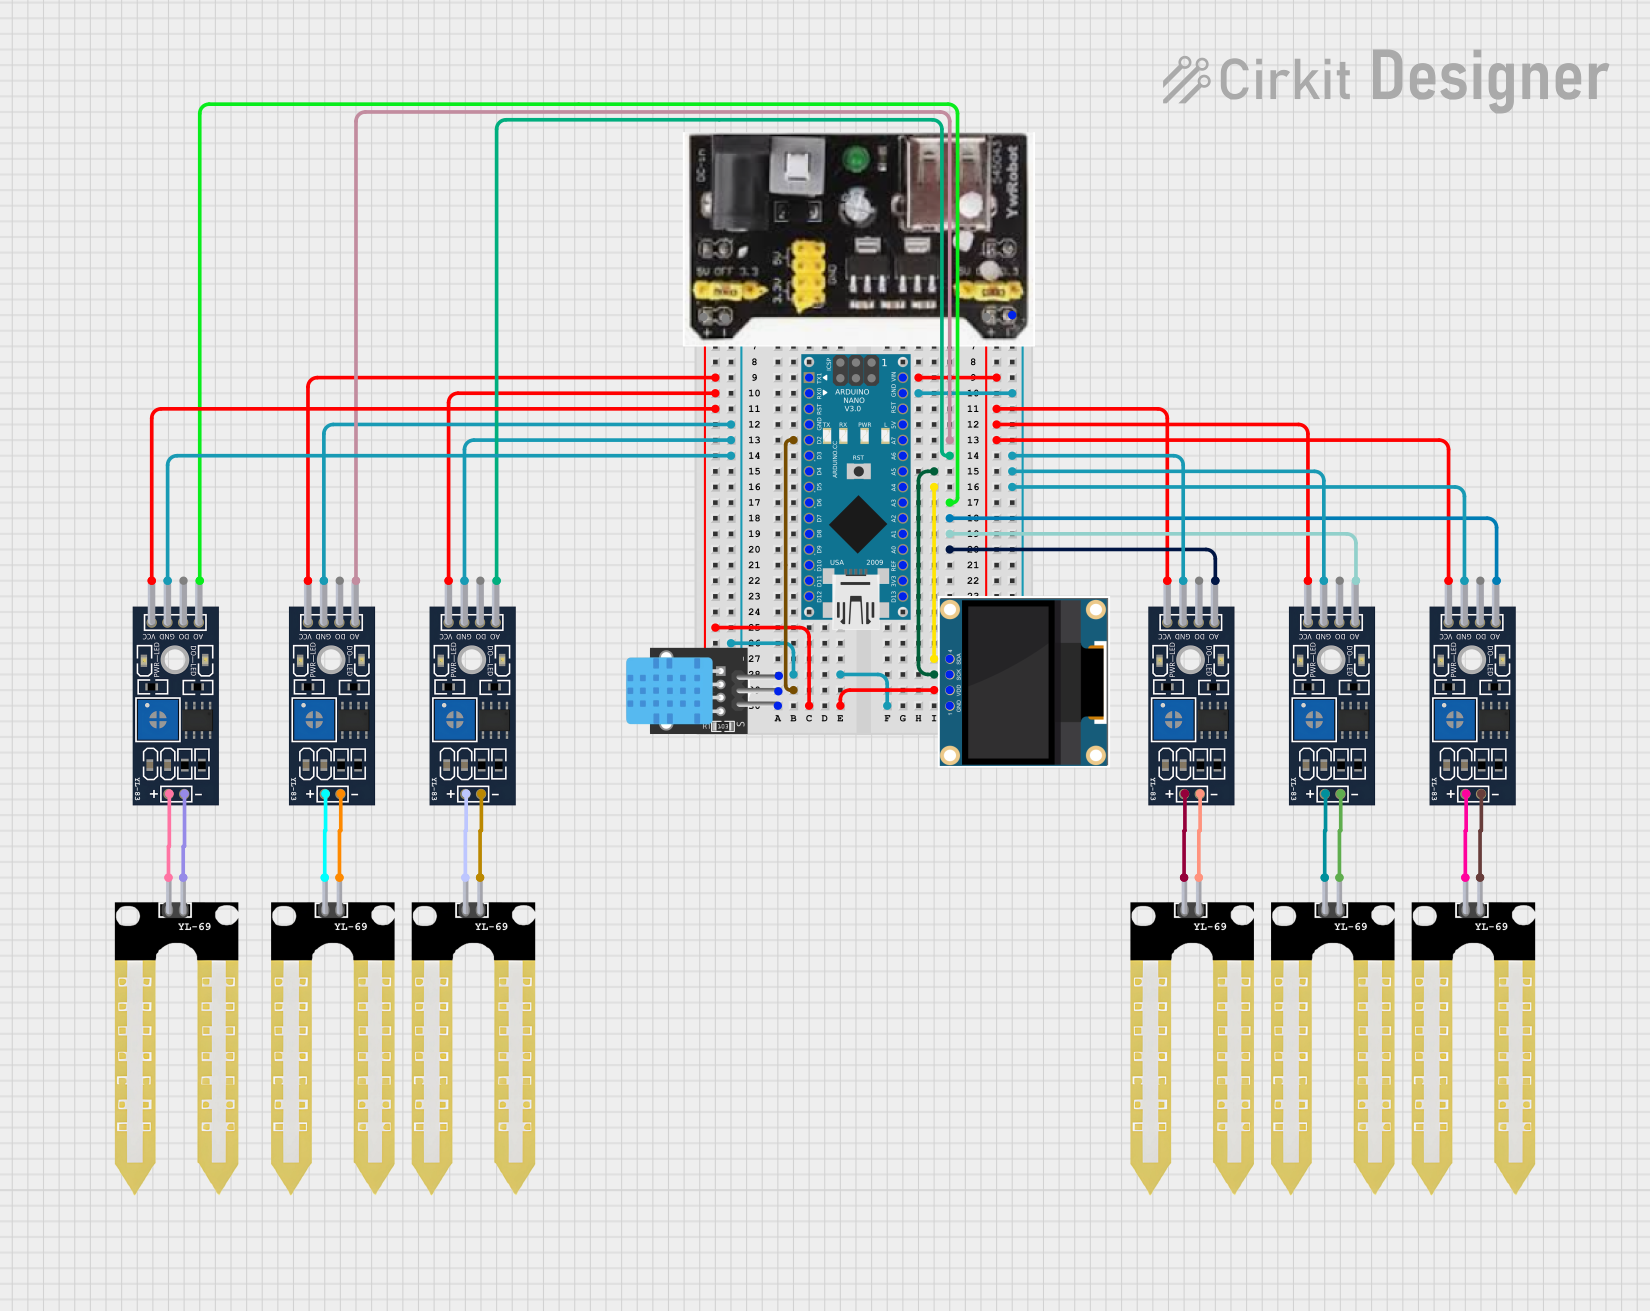
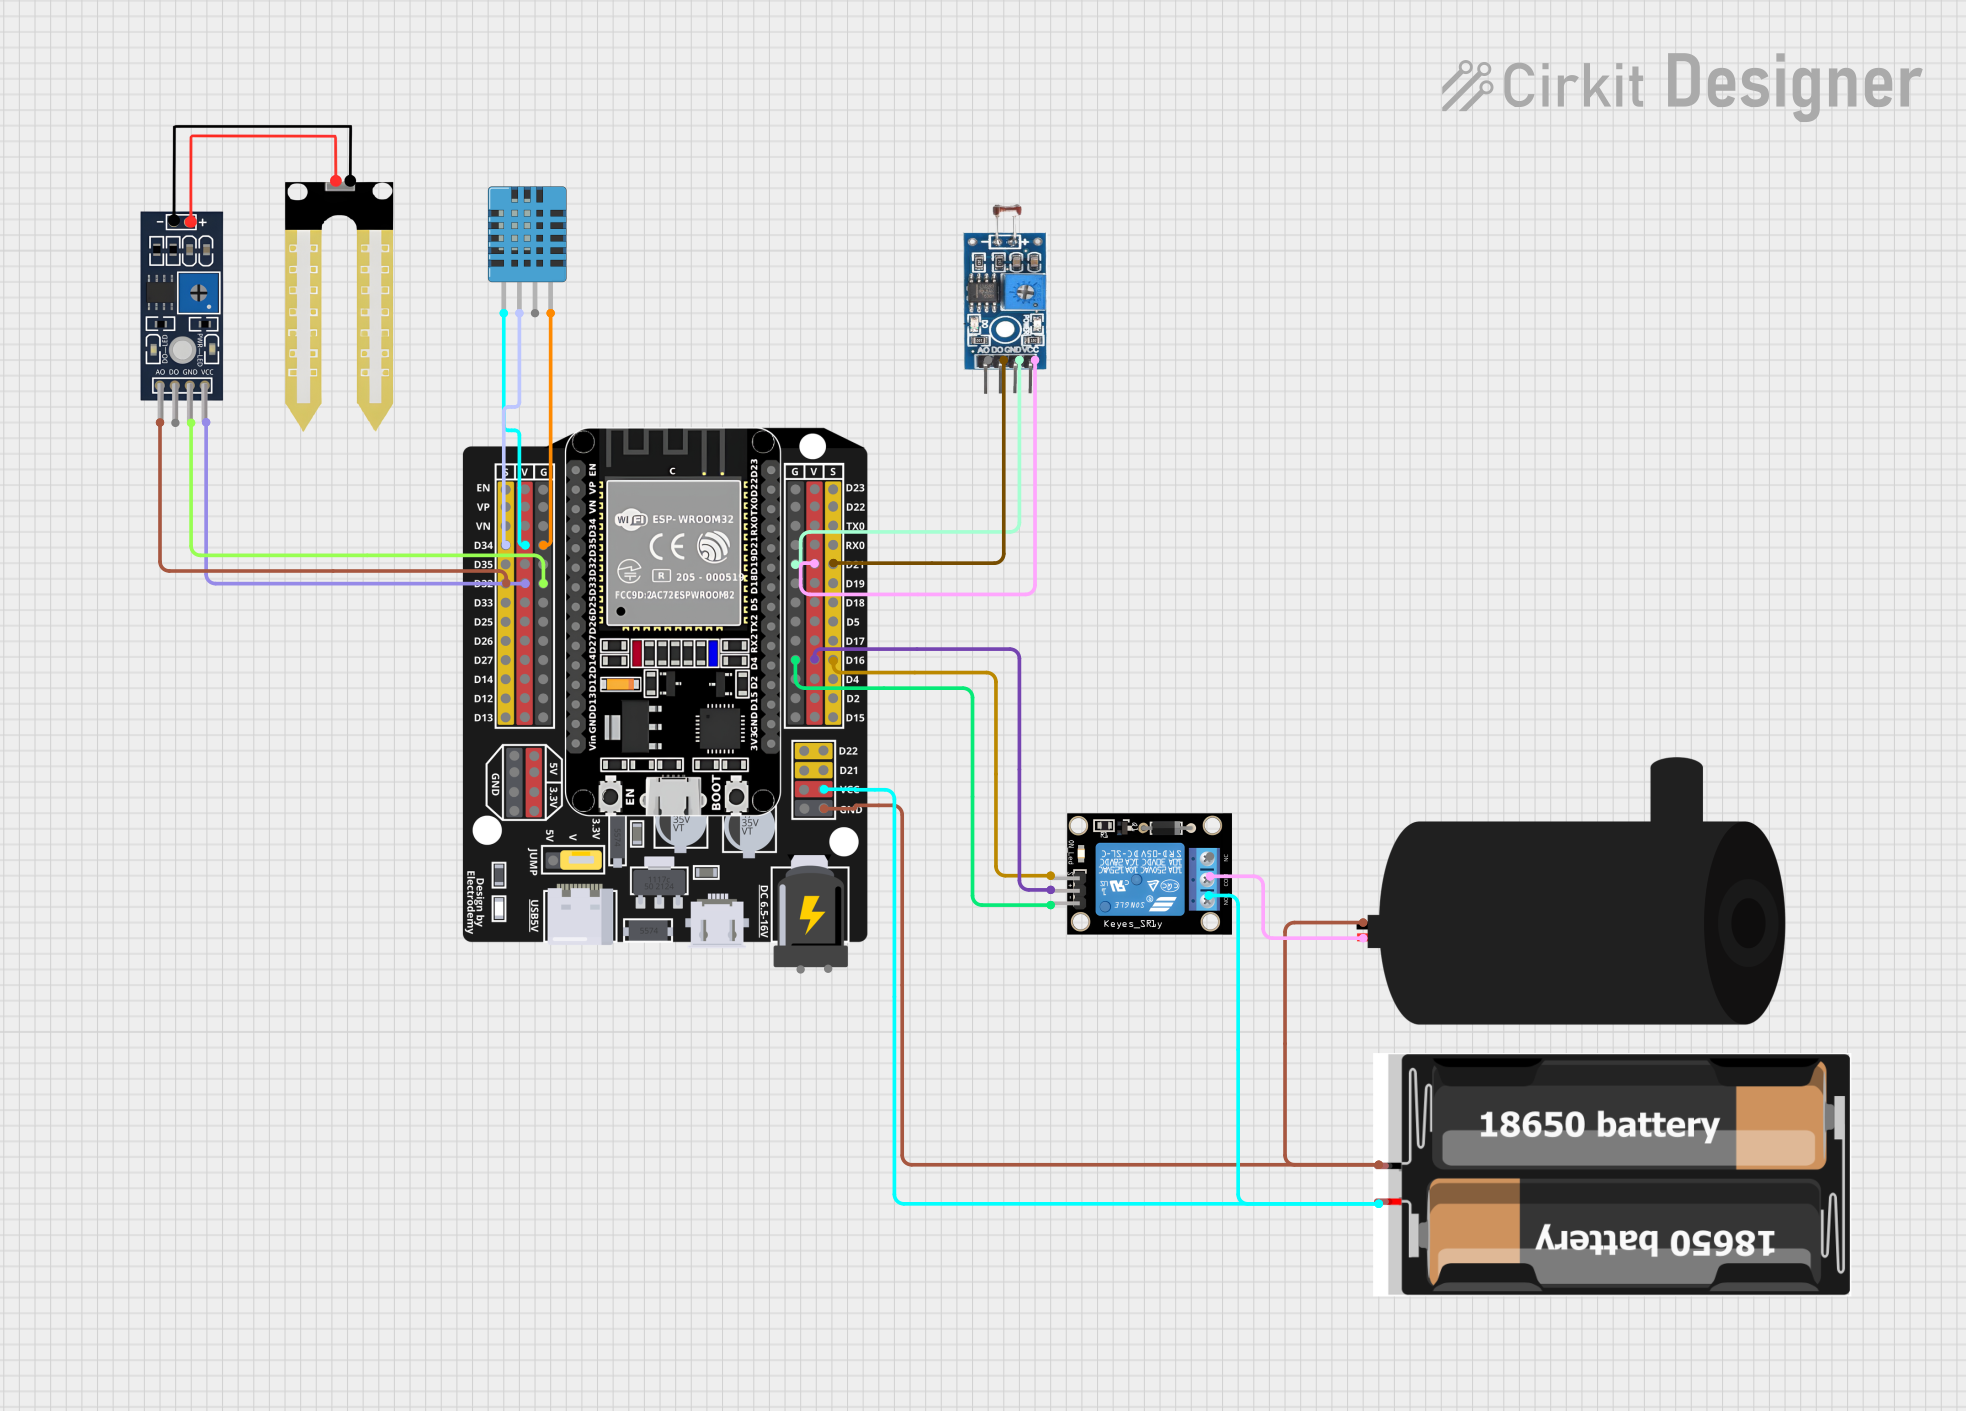
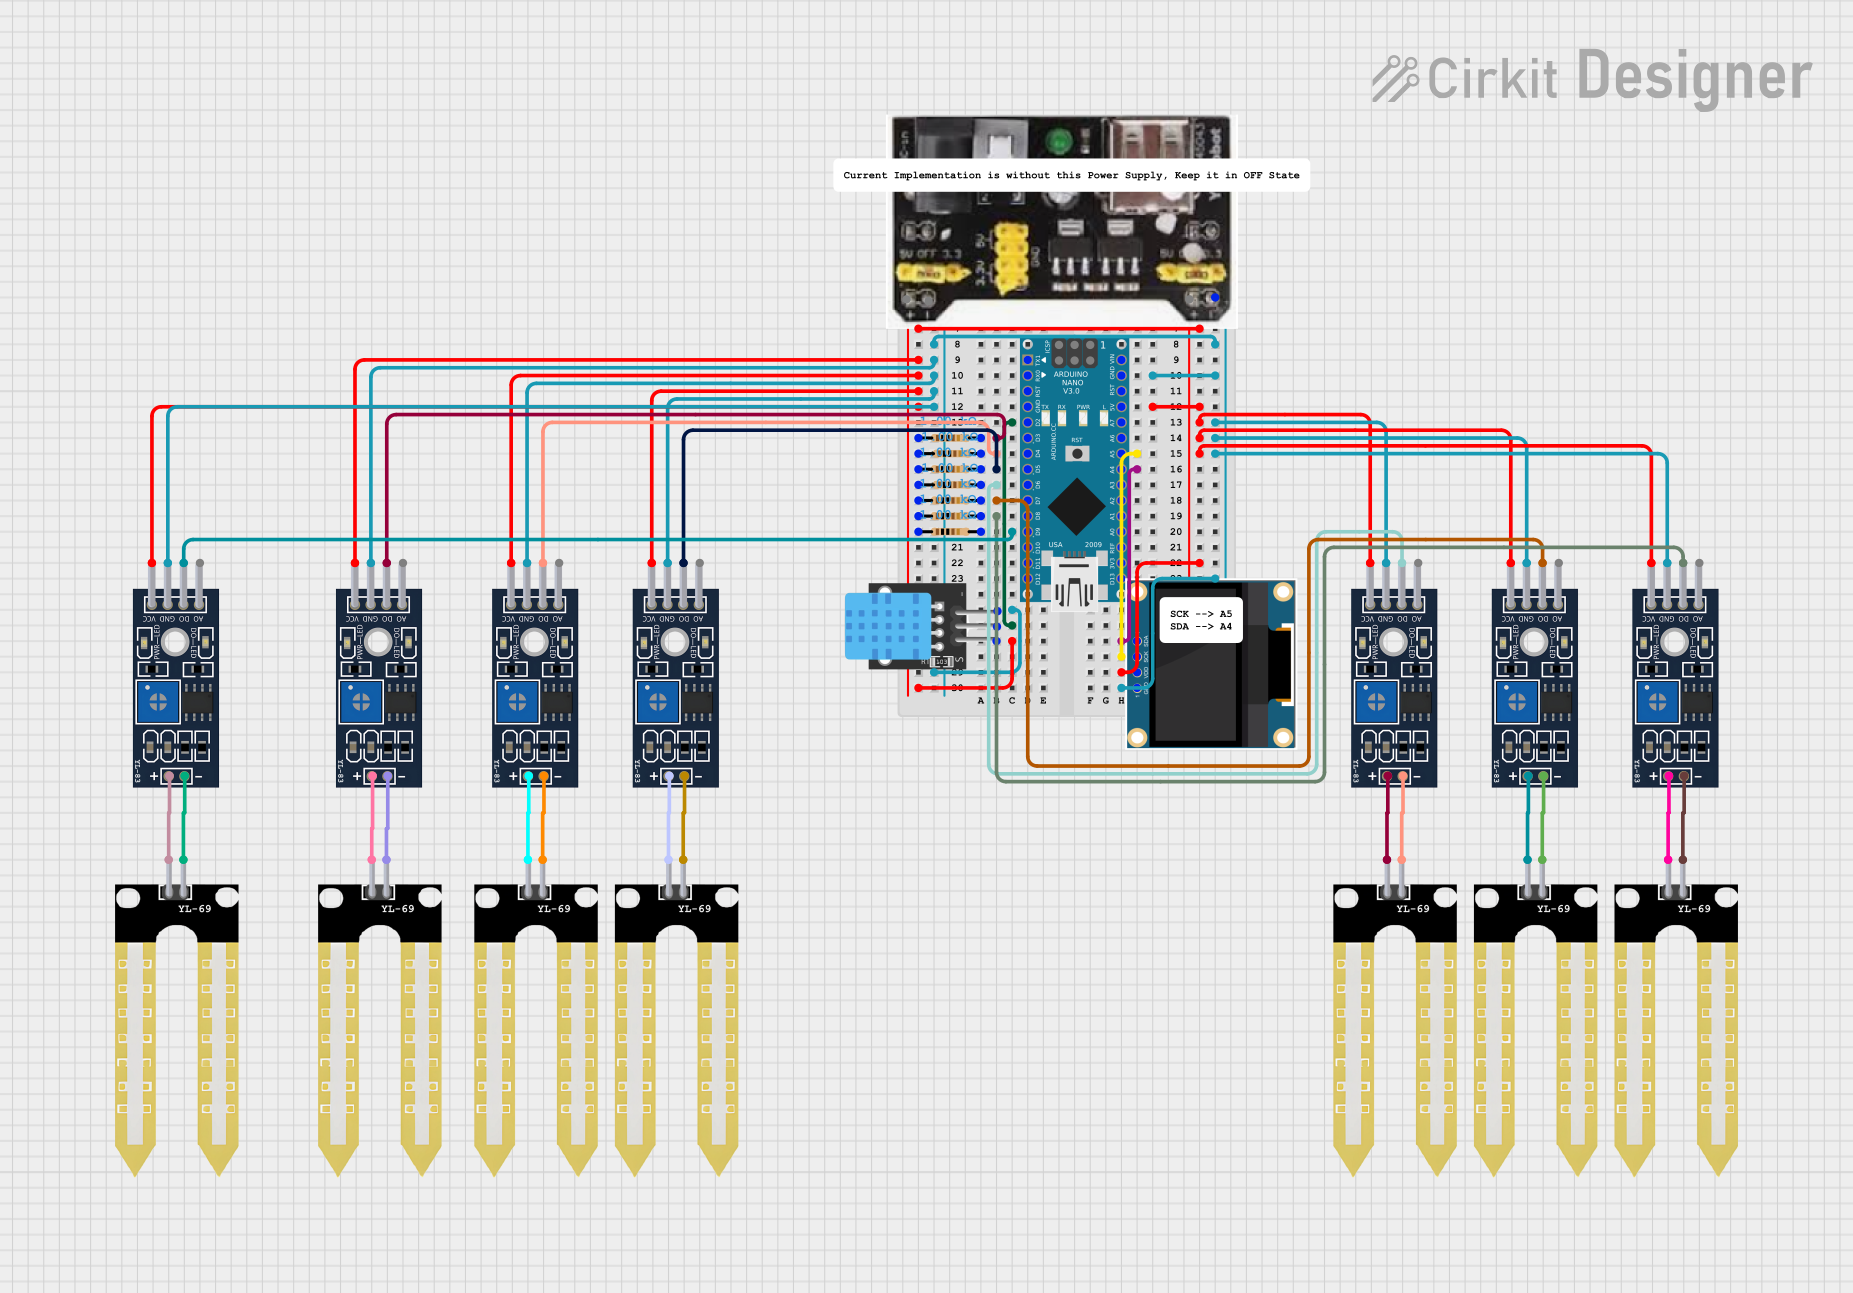
  1. Wiring the Module:

    • Connect the VCC pin to the 5V pin of your microcontroller (e.g., Arduino UNO).
    • Connect the GND pin to the ground (GND) of your microcontroller.
    • Connect the A0 pin to an analog input pin (e.g., A0 on Arduino UNO) for continuous moisture readings.
    • Optionally, connect the D0 pin to a digital input pin if you want to use the digital threshold feature.
  2. Adjusting Sensitivity:

    • Use the onboard potentiometer to set the moisture threshold for the digital output (D0). Turn clockwise to increase sensitivity and counterclockwise to decrease it.
  3. Placement:

    • Insert the sensor probe into the soil or place it in the environment where moisture needs to be measured. Ensure the probe is clean and free of debris for accurate readings.

Arduino UNO Example Code

Below is an example code to read both analog and digital outputs from the moisture module hygrometer:

// Define pin connections
const int analogPin = A0; // Analog output pin connected to A0
const int digitalPin = 2; // Digital output pin connected to D2

void setup() {
  Serial.begin(9600); // Initialize serial communication at 9600 baud
  pinMode(digitalPin, INPUT); // Set digital pin as input
}

void loop() {
  // Read analog value from the sensor
  int moistureLevel = analogRead(analogPin);
  
  // Read digital value from the sensor
  int digitalState = digitalRead(digitalPin);
  
  // Print analog moisture level to the Serial Monitor
  Serial.print("Analog Moisture Level: ");
  Serial.println(moistureLevel);
  
  // Print digital state to the Serial Monitor
  Serial.print("Digital Output State: ");
  if (digitalState == HIGH) {
    Serial.println("Dry");
  } else {
    Serial.println("Wet");
  }
  
  delay(1000); // Wait for 1 second before the next reading
}

Important Considerations and Best Practices

  • Avoid submerging the entire module in water; only the sensor probe should come into contact with moisture.
  • Clean the sensor probe after use to prevent corrosion or buildup of debris.
  • Use a pull-down resistor on the digital output pin if the signal is unstable.
  • For long-term outdoor use, consider waterproofing the module and protecting it from extreme environmental conditions.

Troubleshooting and FAQs

Common Issues and Solutions

  1. No Output or Incorrect Readings:

    • Ensure the module is powered correctly (3.3V or 5V).
    • Check all connections for loose wires or incorrect pin assignments.
    • Verify that the sensor probe is clean and free of debris.
  2. Unstable Digital Output:

    • Adjust the potentiometer to fine-tune the sensitivity.
    • Add a pull-down resistor to stabilize the digital signal.
  3. Corrosion on the Sensor Probe:

    • Clean the probe with a soft cloth and isopropyl alcohol.
    • Avoid prolonged exposure to highly acidic or alkaline soils.

FAQs

Q: Can this module measure air humidity?
A: While primarily designed for soil moisture, the module can detect moisture in the air to some extent. However, for precise air humidity measurements, a dedicated humidity sensor like the DHT11 or DHT22 is recommended.

Q: How do I interpret the analog output?
A: The analog output provides a voltage proportional to the moisture level. Higher voltage typically indicates lower moisture, while lower voltage indicates higher moisture.

Q: Can I use this module with a Raspberry Pi?
A: Yes, the module can be used with a Raspberry Pi. Connect the analog output to an ADC (Analog-to-Digital Converter) module, as the Raspberry Pi lacks built-in analog input pins.

Q: Is the module waterproof?
A: Only the sensor probe is designed to be water-resistant. The main module should be kept dry and protected from moisture.