Cirkit Designer Logo
Cirkit Designer
Your all-in-one circuit design IDE
Home / 
Component Documentation

How to Use Adafruit BME280: Examples, Pinouts, and Specs

Image of Adafruit BME280
Cirkit Designer LogoDesign with Adafruit BME280 in Cirkit Designer

Introduction

The Adafruit BME280 is a versatile and high-precision environmental sensor module capable of measuring temperature, humidity, and barometric pressure. Its compact size and I2C interface make it ideal for a wide range of applications, including weather monitoring, indoor climate control, and IoT projects. The sensor's ability to provide accurate and reliable environmental data makes it a popular choice for hobbyists and professionals alike.

Explore Projects Built with Adafruit BME280

Use Cirkit Designer to design, explore, and prototype these projects online. Some projects support real-time simulation. Click "Open Project" to start designing instantly!
Arduino UNO with Adafruit BME680 Sensor Data Logger
Image of Adafruit BME680 + Arduino UNO: A project utilizing Adafruit BME280 in a practical application
This circuit connects an Adafruit BME680 sensor to an Arduino UNO for the purpose of measuring environmental data such as temperature, pressure, humidity, gas resistance, and altitude. The BME680 is interfaced with the Arduino over I2C, with power supplied from the Arduino's 5V pin. The embedded code on the Arduino reads the sensor data and outputs it to the serial monitor, allowing for real-time environmental monitoring.
Cirkit Designer LogoOpen Project in Cirkit Designer
ESP32-Based Wi-Fi Weather Station with Data Logging
Image of bme280-sd-openlog: A project utilizing Adafruit BME280 in a practical application
This circuit features an ESP32 microcontroller interfaced with an Adafruit BME280 sensor for environmental data acquisition and a SparkFun OpenLog for data logging. The ESP32 communicates with the BME280 via I2C and with the OpenLog via UART, while all components share common power and ground connections.
Cirkit Designer LogoOpen Project in Cirkit Designer
Arduino UNO Weather Station with BME280 Sensor
Image of UNO_MBE280: A project utilizing Adafruit BME280 in a practical application
This circuit uses an Arduino UNO to read temperature, pressure, and humidity data from a BME/BMP280 sensor via I2C communication. The sensor is powered by the Arduino's 5V and GND pins, and the data is printed to the Serial Monitor.
Cirkit Designer LogoOpen Project in Cirkit Designer
Arduino UNO and BME280 Sensor-Based Weather Station with Serial Monitoring
Image of BME_280_UNO: A project utilizing Adafruit BME280 in a practical application
This circuit uses an Arduino UNO to interface with a BME/BMP280 sensor to measure temperature, pressure, and humidity. The sensor is powered by the Arduino and communicates via I2C, with data being read and printed to the Serial Monitor.
Cirkit Designer LogoOpen Project in Cirkit Designer

Explore Projects Built with Adafruit BME280

Use Cirkit Designer to design, explore, and prototype these projects online. Some projects support real-time simulation. Click "Open Project" to start designing instantly!
Image of Adafruit BME680 + Arduino UNO: A project utilizing Adafruit BME280 in a practical application
Arduino UNO with Adafruit BME680 Sensor Data Logger
This circuit connects an Adafruit BME680 sensor to an Arduino UNO for the purpose of measuring environmental data such as temperature, pressure, humidity, gas resistance, and altitude. The BME680 is interfaced with the Arduino over I2C, with power supplied from the Arduino's 5V pin. The embedded code on the Arduino reads the sensor data and outputs it to the serial monitor, allowing for real-time environmental monitoring.
Cirkit Designer LogoOpen Project in Cirkit Designer
Image of bme280-sd-openlog: A project utilizing Adafruit BME280 in a practical application
ESP32-Based Wi-Fi Weather Station with Data Logging
This circuit features an ESP32 microcontroller interfaced with an Adafruit BME280 sensor for environmental data acquisition and a SparkFun OpenLog for data logging. The ESP32 communicates with the BME280 via I2C and with the OpenLog via UART, while all components share common power and ground connections.
Cirkit Designer LogoOpen Project in Cirkit Designer
Image of UNO_MBE280: A project utilizing Adafruit BME280 in a practical application
Arduino UNO Weather Station with BME280 Sensor
This circuit uses an Arduino UNO to read temperature, pressure, and humidity data from a BME/BMP280 sensor via I2C communication. The sensor is powered by the Arduino's 5V and GND pins, and the data is printed to the Serial Monitor.
Cirkit Designer LogoOpen Project in Cirkit Designer
Image of BME_280_UNO: A project utilizing Adafruit BME280 in a practical application
Arduino UNO and BME280 Sensor-Based Weather Station with Serial Monitoring
This circuit uses an Arduino UNO to interface with a BME/BMP280 sensor to measure temperature, pressure, and humidity. The sensor is powered by the Arduino and communicates via I2C, with data being read and printed to the Serial Monitor.
Cirkit Designer LogoOpen Project in Cirkit Designer

Common Applications and Use Cases

  • Personal weather stations
  • Home automation systems
  • Environmental monitoring for HVAC systems
  • Altitude and barometric pressure measurement for drones
  • Data logging for climate research

Technical Specifications

Key Technical Details

  • Supply Voltage: 1.71 V to 3.6 V
  • Interface: I2C (up to 3.4 MHz), SPI (up to 10 MHz)
  • Operating Range:
    • Temperature: -40°C to +85°C
    • Humidity: 0% to 100% RH
    • Pressure: 300 hPa to 1100 hPa
  • Accuracy:
    • Temperature: ±1.0°C
    • Humidity: ±3% RH
    • Pressure: ±1 hPa
  • Current Consumption: 0.16 µA @ 1 Hz sampling rate
  • Response Time:
    • Temperature: 1s
    • Humidity: 1s
    • Pressure: 1s

Pin Configuration and Descriptions

Pin Number Pin Name Description
1 VDD Power supply (1.71 V to 3.6 V)
2 GND Ground
3 SCK/SCL Serial Clock Line for I2C/SPI
4 SDI/SDA Serial Data In for SPI, Data for I2C
5 SDO Serial Data Out for SPI, optional for I2C
6 CS Chip Select for SPI (active low)

Usage Instructions

How to Use the Component in a Circuit

  1. Powering the Sensor: Connect the VDD pin to a 1.71 V to 3.6 V power source and the GND pin to the ground.
  2. I2C Communication: Connect the SCK/SCL pin to the I2C clock line and the SDI/SDA pin to the I2C data line. If using SPI, also connect the SDO and CS pins accordingly.
  3. Address Selection: The BME280 can have two different I2C addresses, 0x76 or 0x77, depending on the state of the SDO pin. Connect SDO to GND for 0x76 or leave it floating (or connect to VDD) for 0x77.

Important Considerations and Best Practices

  • Ensure that the power supply is within the specified voltage range to prevent damage.
  • Use pull-up resistors on the I2C data and clock lines as required by the I2C specification.
  • Keep the sensor away from direct sunlight and heat sources to prevent inaccurate readings.
  • For accurate pressure readings, calibrate the sensor at a known altitude or against a known pressure.

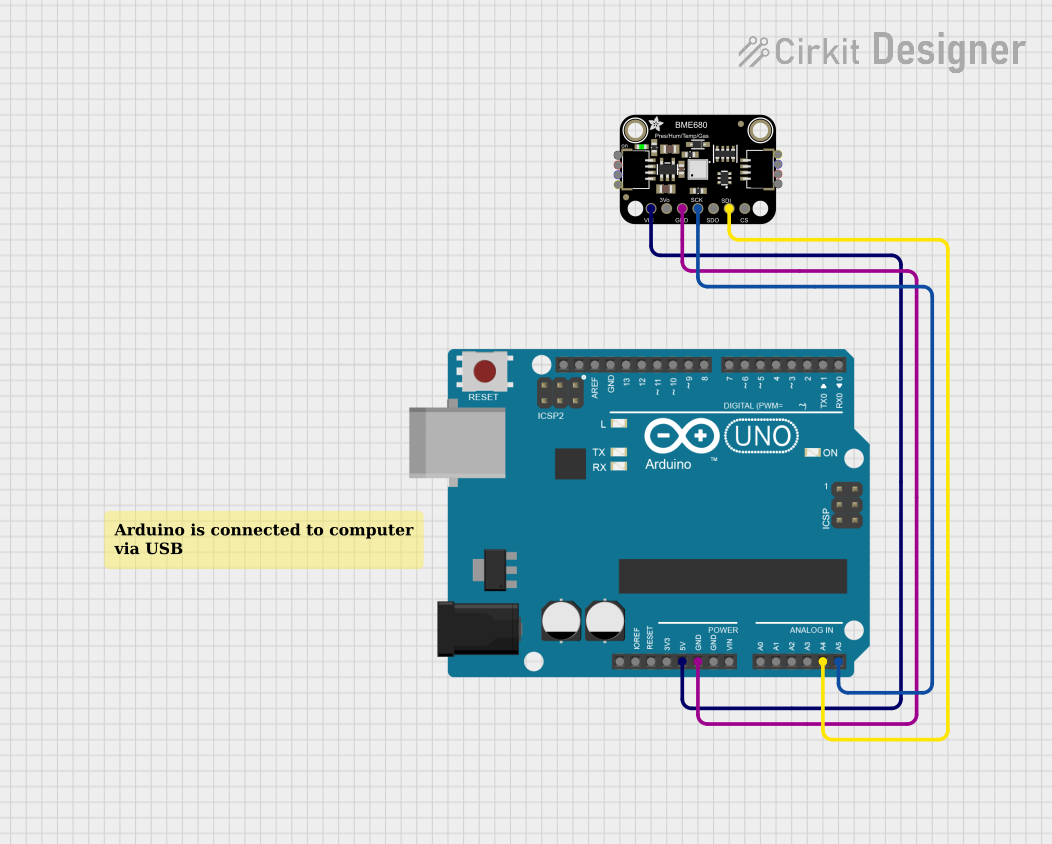
Example Arduino UNO Connection

  • VDD to 3.3V
  • GND to GND
  • SCK/SCL to A5 (SCL)
  • SDI/SDA to A4 (SDA)

Sample Arduino Code

#include <Wire.h>
#include <Adafruit_Sensor.h>
#include <Adafruit_BME280.h>

Adafruit_BME280 bme; // I2C

void setup() {
  Serial.begin(9600);
  if (!bme.begin(0x76)) {   // Address 0x76 for SDO connected to GND
    Serial.println("Could not find a valid BME280 sensor, check wiring!");
    while (1);
  }
}

void loop() {
  Serial.print("Temperature = ");
  Serial.print(bme.readTemperature());
  Serial.println(" *C");

  Serial.print("Pressure = ");
  Serial.print(bme.readPressure() / 100.0F);
  Serial.println(" hPa");

  Serial.print("Humidity = ");
  Serial.print(bme.readHumidity());
  Serial.println(" %");

  Serial.println();
  delay(2000);
}

Troubleshooting and FAQs

Common Issues

  • Sensor not detected: Check wiring, ensure correct power supply, and verify that the I2C address matches the one in your code.
  • Inaccurate readings: Ensure the sensor is not exposed to direct sunlight or heat sources. Calibrate if necessary.
  • No data on serial monitor: Confirm baud rate in the serial monitor matches the Serial.begin rate in your code.

Solutions and Tips for Troubleshooting

  • Double-check connections and solder joints.
  • Use a multimeter to verify the voltage at the VDD pin.
  • Implement a check in your code to verify sensor communication upon startup.
  • Consult the sensor datasheet for detailed operational characteristics and advanced configurations.

FAQs

Q: Can the BME280 sensor measure altitude? A: Yes, the sensor can estimate altitude based on the barometric pressure reading and a reference sea-level pressure.

Q: Is the BME280 waterproof? A: No, the BME280 is not waterproof and should be protected from moisture and condensation.

Q: How can I extend the life of the sensor? A: Avoid exposing the sensor to pollutants and corrosive gases, as they can degrade the sensor's performance over time.

Q: Can I use the BME280 sensor with a 5V microcontroller? A: Yes, but ensure that the logic levels are shifted down to 3.3V to avoid damaging the sensor.