Cirkit Designer Logo
Cirkit Designer
Your all-in-one circuit design IDE
Home / 
Component Documentation

How to Use Phoenix Edge 75 AMP ESC, 8S / 33.6V with 5 AMP BEC: Examples, Pinouts, and Specs

Image of Phoenix Edge 75 AMP ESC, 8S / 33.6V with 5 AMP BEC
Cirkit Designer LogoDesign with Phoenix Edge 75 AMP ESC, 8S / 33.6V with 5 AMP BEC in Cirkit Designer

Introduction

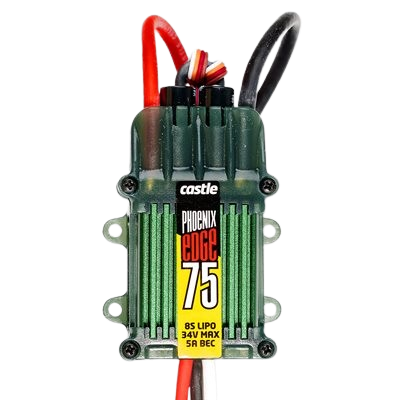
The Phoenix Edge 75 AMP ESC is a high-performance electronic speed controller (ESC) designed for demanding applications in RC vehicles, drones, and other motor-driven systems. Manufactured by Phoenix, this ESC is capable of handling up to 75 amps of continuous current and supports 8S lithium polymer (LiPo) batteries, with a maximum voltage of 33.6V. It also features an integrated 5 amp battery eliminator circuit (BEC), which provides regulated power for servos, receivers, and other onboard electronics.

Explore Projects Built with Phoenix Edge 75 AMP ESC, 8S / 33.6V with 5 AMP BEC

Use Cirkit Designer to design, explore, and prototype these projects online. Some projects support real-time simulation. Click "Open Project" to start designing instantly!
Raspberry Pi-Controlled Drone with Brushless Motors and Camera Module
Image of ROV: A project utilizing Phoenix Edge 75 AMP ESC, 8S / 33.6V with 5 AMP BEC in a practical application
This circuit is designed for a multi-motor application, likely a drone or a similar vehicle, featuring eight brushless motors controlled by two 4-in-1 electronic speed controllers (ESCs). The ESCs are powered by a 3s2p 18650 battery pack and interfaced with a Pixhawk flight controller for motor management. Additionally, the system includes a Raspberry Pi 4B for advanced processing and control, which is connected to a NoIR camera module and a cooling fan, and a power module to supply and monitor the power to the Pixhawk.
Cirkit Designer LogoOpen Project in Cirkit Designer
Battery-Powered FPV Drone with Telemetry and Dual Motor Control
Image of Krul': A project utilizing Phoenix Edge 75 AMP ESC, 8S / 33.6V with 5 AMP BEC in a practical application
This circuit appears to be a power distribution and control system for a vehicle with two motorized wheels, possibly a drone or a robot. It includes a lipo battery connected to a Power Distribution Board (PDB) that distributes power to two Electronic Speed Controllers (ESCs) which in turn control the speed and direction of the motors. The system also integrates a flight controller (H743-SLIM V3) for managing various peripherals including GPS, FPV camera system, and a telemetry link (ExpressLRS).
Cirkit Designer LogoOpen Project in Cirkit Designer
Battery-Powered Quadcopter with BLDC Motors and GPS
Image of file: A project utilizing Phoenix Edge 75 AMP ESC, 8S / 33.6V with 5 AMP BEC in a practical application
This circuit is designed for a quadcopter, featuring four BLDC motors each controlled by an Electronic Speed Controller (ESC). The ESCs are powered by a LiPo battery through a power module, and the system is managed by an APM 2.0 flight controller, which also interfaces with a GPS module, an RC receiver, and telemetry for communication.
Cirkit Designer LogoOpen Project in Cirkit Designer
ESP32-Controlled Quadcopter with GPS, MPU-6050, and ESP32-CAM
Image of drone: A project utilizing Phoenix Edge 75 AMP ESC, 8S / 33.6V with 5 AMP BEC in a practical application
This circuit is designed for a quadcopter drone with four brushless motors, each controlled by an individual Electronic Speed Controller (ESC). The ESCs receive power from a LiPo battery through a Power Distribution Board (PDB) and are interfaced with an ESP32 microcontroller for signal control. Additional components include an MPU-6050 for motion tracking, a GPS module for positioning, an HC-SR04 ultrasonic sensor for distance measurement, and an ESP32-CAM for image capture, all interfaced with the ESP32 microcontroller which manages sensor data processing and wireless communication.
Cirkit Designer LogoOpen Project in Cirkit Designer

Explore Projects Built with Phoenix Edge 75 AMP ESC, 8S / 33.6V with 5 AMP BEC

Use Cirkit Designer to design, explore, and prototype these projects online. Some projects support real-time simulation. Click "Open Project" to start designing instantly!
Image of ROV: A project utilizing Phoenix Edge 75 AMP ESC, 8S / 33.6V with 5 AMP BEC in a practical application
Raspberry Pi-Controlled Drone with Brushless Motors and Camera Module
This circuit is designed for a multi-motor application, likely a drone or a similar vehicle, featuring eight brushless motors controlled by two 4-in-1 electronic speed controllers (ESCs). The ESCs are powered by a 3s2p 18650 battery pack and interfaced with a Pixhawk flight controller for motor management. Additionally, the system includes a Raspberry Pi 4B for advanced processing and control, which is connected to a NoIR camera module and a cooling fan, and a power module to supply and monitor the power to the Pixhawk.
Cirkit Designer LogoOpen Project in Cirkit Designer
Image of Krul': A project utilizing Phoenix Edge 75 AMP ESC, 8S / 33.6V with 5 AMP BEC in a practical application
Battery-Powered FPV Drone with Telemetry and Dual Motor Control
This circuit appears to be a power distribution and control system for a vehicle with two motorized wheels, possibly a drone or a robot. It includes a lipo battery connected to a Power Distribution Board (PDB) that distributes power to two Electronic Speed Controllers (ESCs) which in turn control the speed and direction of the motors. The system also integrates a flight controller (H743-SLIM V3) for managing various peripherals including GPS, FPV camera system, and a telemetry link (ExpressLRS).
Cirkit Designer LogoOpen Project in Cirkit Designer
Image of file: A project utilizing Phoenix Edge 75 AMP ESC, 8S / 33.6V with 5 AMP BEC in a practical application
Battery-Powered Quadcopter with BLDC Motors and GPS
This circuit is designed for a quadcopter, featuring four BLDC motors each controlled by an Electronic Speed Controller (ESC). The ESCs are powered by a LiPo battery through a power module, and the system is managed by an APM 2.0 flight controller, which also interfaces with a GPS module, an RC receiver, and telemetry for communication.
Cirkit Designer LogoOpen Project in Cirkit Designer
Image of drone: A project utilizing Phoenix Edge 75 AMP ESC, 8S / 33.6V with 5 AMP BEC in a practical application
ESP32-Controlled Quadcopter with GPS, MPU-6050, and ESP32-CAM
This circuit is designed for a quadcopter drone with four brushless motors, each controlled by an individual Electronic Speed Controller (ESC). The ESCs receive power from a LiPo battery through a Power Distribution Board (PDB) and are interfaced with an ESP32 microcontroller for signal control. Additional components include an MPU-6050 for motion tracking, a GPS module for positioning, an HC-SR04 ultrasonic sensor for distance measurement, and an ESP32-CAM for image capture, all interfaced with the ESP32 microcontroller which manages sensor data processing and wireless communication.
Cirkit Designer LogoOpen Project in Cirkit Designer

Common Applications

  • Remote-controlled (RC) airplanes, helicopters, and drones
  • High-performance RC cars and boats
  • Robotics and automation systems
  • Custom motor control projects requiring precise speed and power regulation

Technical Specifications

The following table outlines the key technical details of the Phoenix Edge 75 AMP ESC:

Parameter Specification
Manufacturer Phoenix
Part ID ESC
Continuous Current Rating 75 Amps
Input Voltage Range 2S to 8S LiPo (7.4V to 33.6V)
BEC Output 5 Amps @ 5.0V (regulated)
Maximum Motor Poles 14
Operating Temperature Range -20°C to 105°C
Dimensions 2.2 x 1.5 x 0.6 inches (56 x 38 x 15 mm)
Weight 2.2 oz (62 grams)

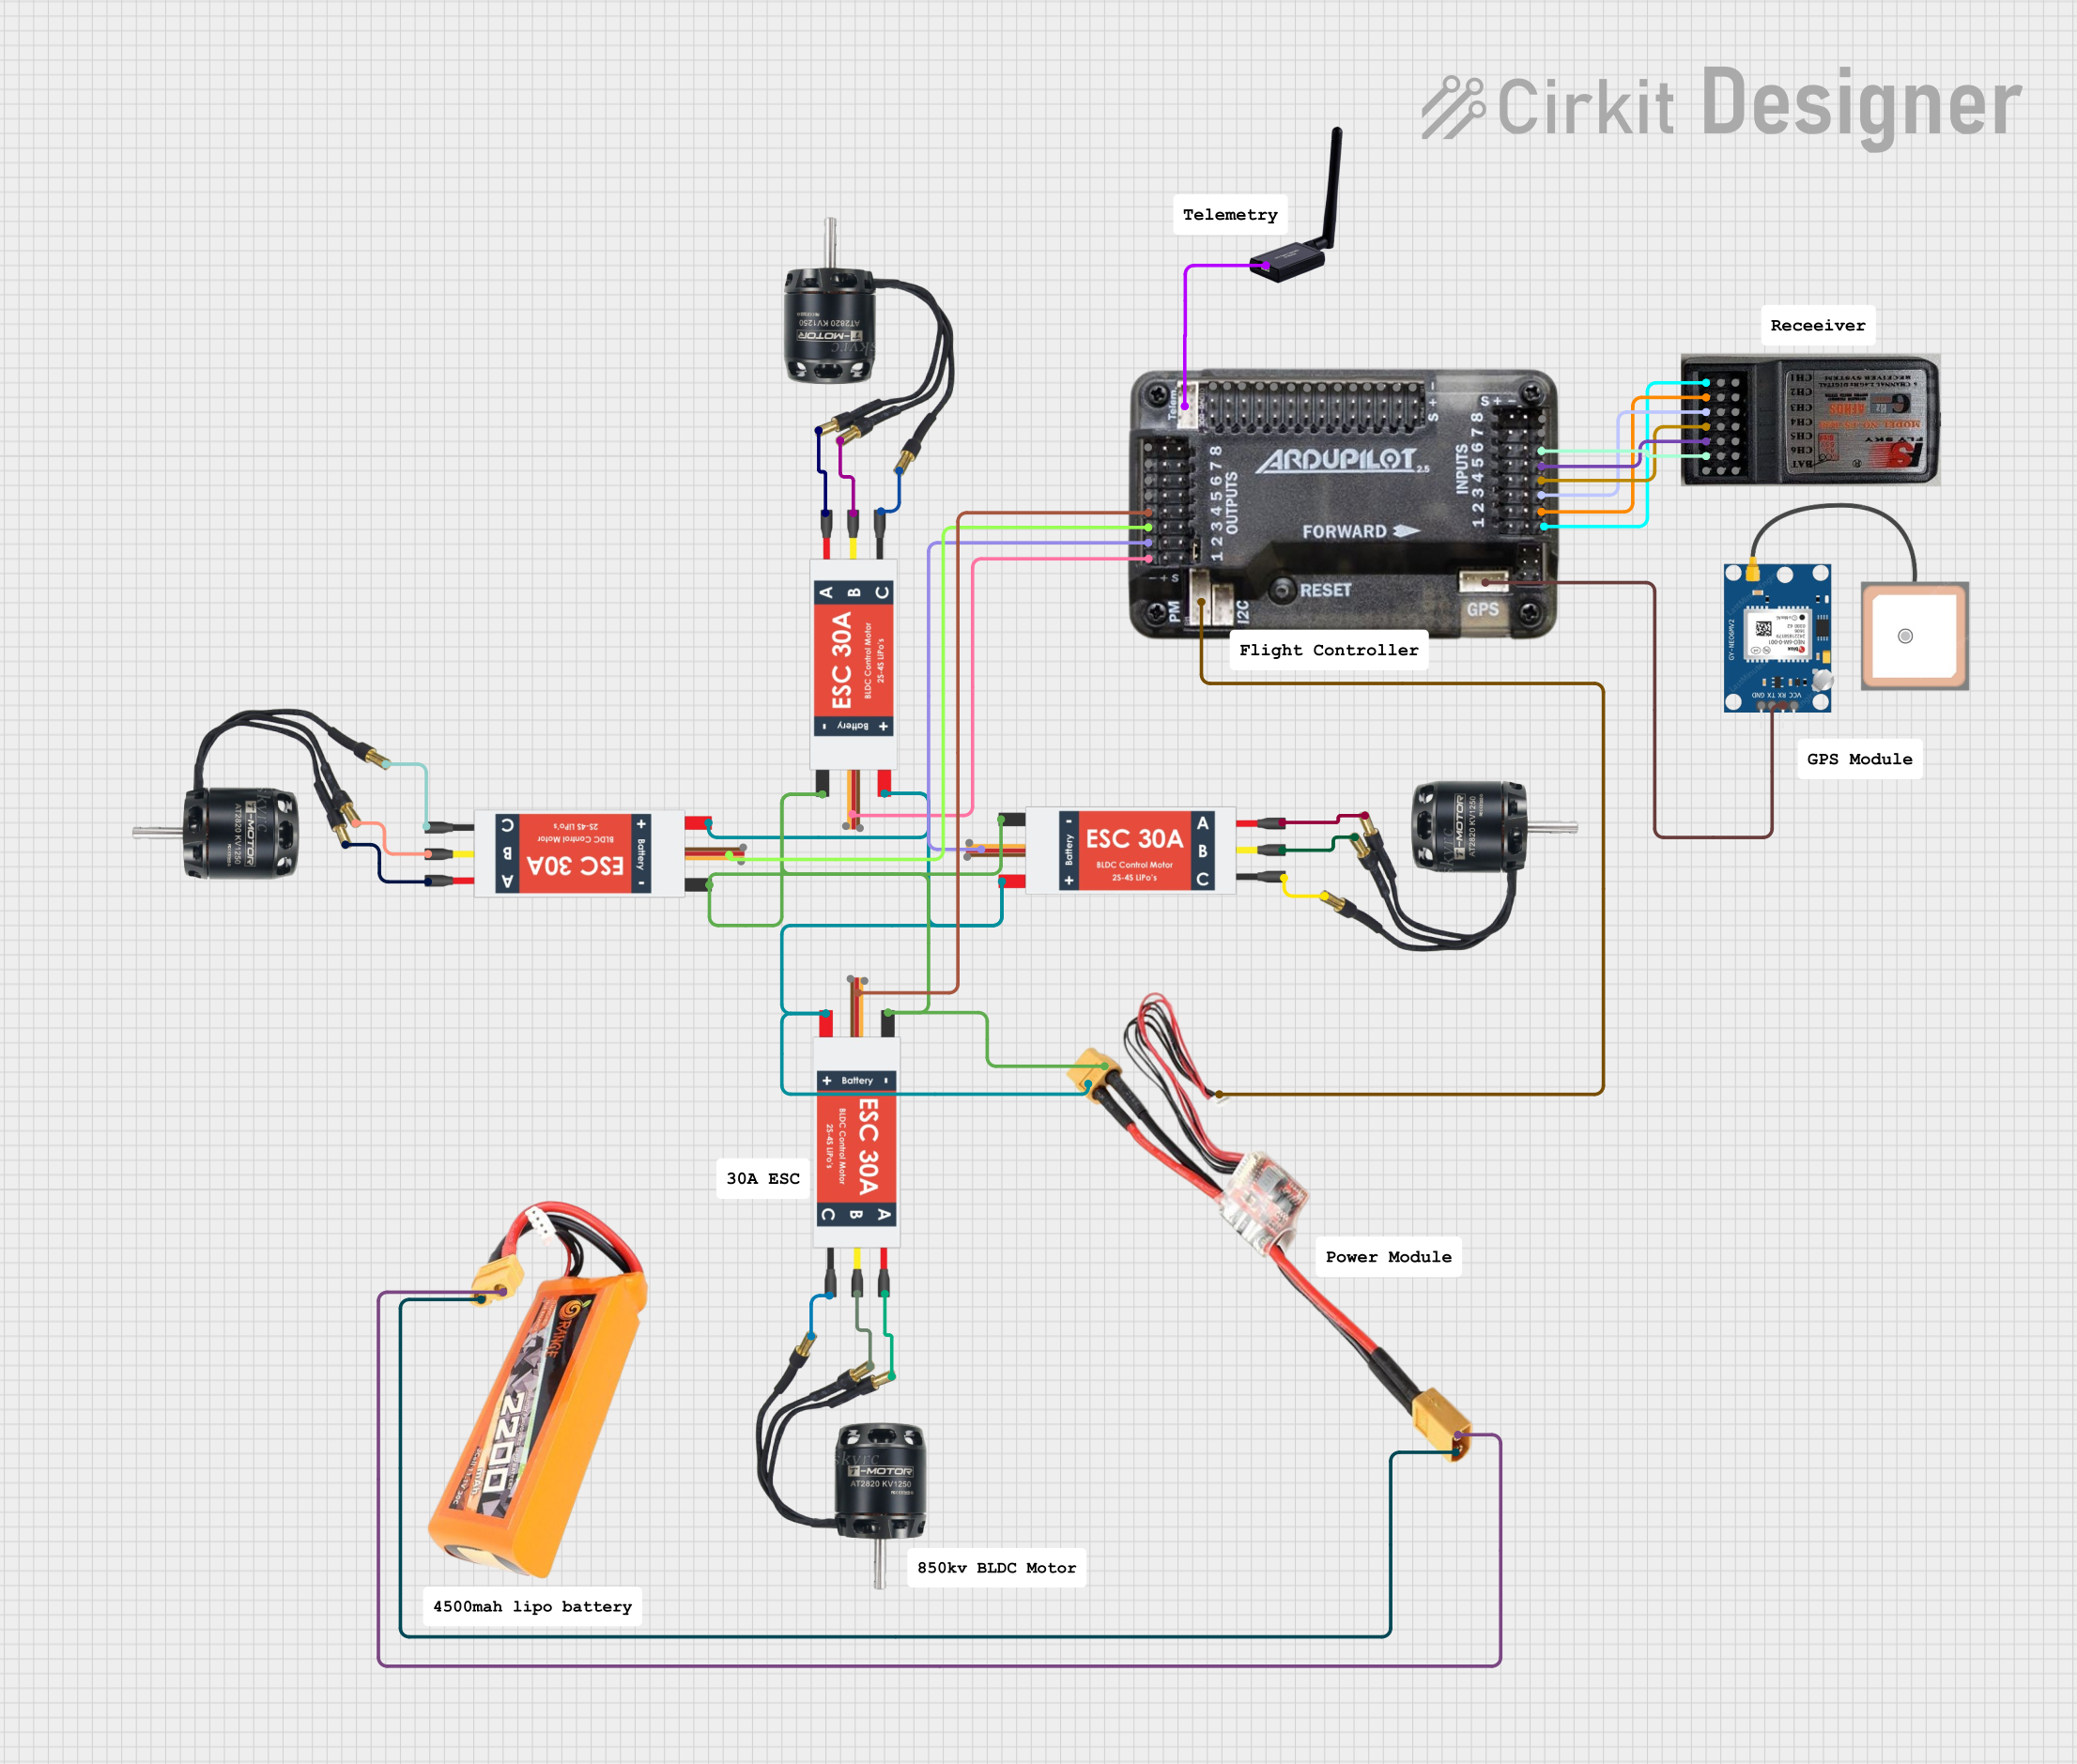
Pin Configuration and Descriptions

The Phoenix Edge 75 AMP ESC has the following key connections:

Pin/Connector Description
Battery Input Connects to the positive (+) and negative (-) terminals of the LiPo battery.
Motor Output Three wires (A, B, C) connect to the brushless motor.
Signal Input Standard 3-pin servo connector for throttle signal from the receiver.
BEC Output Provides 5V regulated power for servos, receivers, or other devices.
USB Port For firmware updates and configuration using Phoenix software.

Usage Instructions

How to Use the Phoenix Edge 75 AMP ESC in a Circuit

  1. Connect the Battery: Attach the LiPo battery to the ESC's battery input terminals, ensuring correct polarity.
  2. Connect the Motor: Connect the three motor wires (A, B, C) to the brushless motor. If the motor spins in the wrong direction, swap any two wires.
  3. Connect the Receiver: Plug the ESC's signal input connector into the throttle channel of your RC receiver.
  4. Power the System: Turn on the transmitter first, then connect the battery to the ESC. The ESC will initialize and emit a series of beeps to indicate readiness.
  5. Calibrate Throttle: Follow the ESC's manual to calibrate the throttle range for optimal performance.

Important Considerations and Best Practices

  • Battery Compatibility: Ensure the LiPo battery used is within the 2S to 8S range (7.4V to 33.6V).
  • Cooling: Avoid overheating by providing adequate airflow or heat dissipation, especially in high-current applications.
  • Firmware Updates: Use the USB port to update the ESC firmware via Phoenix's official software for improved performance and features.
  • BEC Usage: Do not exceed the 5A limit of the integrated BEC when powering external devices.

Example Code for Arduino UNO

The Phoenix Edge ESC can be controlled using an Arduino UNO by generating a PWM signal. Below is an example code snippet:

#include <Servo.h> // Include the Servo library for PWM signal generation

Servo esc; // Create a Servo object to control the ESC

void setup() {
  esc.attach(9); // Attach the ESC signal wire to pin 9 on the Arduino
  esc.writeMicroseconds(1000); // Send minimum throttle signal (1000 µs)
  delay(2000); // Wait for 2 seconds to allow ESC initialization
}

void loop() {
  esc.writeMicroseconds(1500); // Send mid-throttle signal (1500 µs)
  delay(5000); // Run motor at mid-throttle for 5 seconds

  esc.writeMicroseconds(1000); // Send minimum throttle signal (1000 µs)
  delay(5000); // Stop motor for 5 seconds
}

Note: Ensure the ESC is properly calibrated before using it with an Arduino. Refer to the ESC's manual for calibration instructions.

Troubleshooting and FAQs

Common Issues and Solutions

  1. Motor Does Not Spin

    • Cause: Incorrect wiring or throttle signal.
    • Solution: Verify motor connections (A, B, C) and ensure the throttle signal is properly calibrated.
  2. ESC Overheating

    • Cause: Excessive current draw or poor ventilation.
    • Solution: Reduce load on the motor or improve cooling with a fan or heat sink.
  3. BEC Not Powering Devices

    • Cause: Exceeding the 5A BEC limit.
    • Solution: Use an external BEC or power source for high-current devices.
  4. Beeping Sounds

    • Cause: ESC is in programming mode or detecting an error.
    • Solution: Refer to the ESC's manual for beep code meanings and resolve the issue accordingly.

FAQs

  • Can I use this ESC with a brushed motor? No, the Phoenix Edge 75 AMP ESC is designed for brushless motors only.

  • What happens if I connect a battery with a voltage higher than 33.6V? Connecting a battery with a voltage higher than the rated 33.6V can damage the ESC permanently.

  • Can I disable the BEC? Yes, the BEC can be disabled via the Phoenix software if an external power source is preferred.

  • Is the ESC waterproof? No, the ESC is not waterproof. Use waterproofing measures if operating in wet conditions.

This documentation provides a comprehensive guide to using the Phoenix Edge 75 AMP ESC effectively and safely. For further assistance, consult the manufacturer's manual or support resources.