Cirkit Designer Logo
Cirkit Designer
Your all-in-one circuit design IDE
Home / 
Component Documentation

How to Use ENS160+AHT21: Examples, Pinouts, and Specs

Image of ENS160+AHT21
Cirkit Designer LogoDesign with ENS160+AHT21 in Cirkit Designer

Introduction

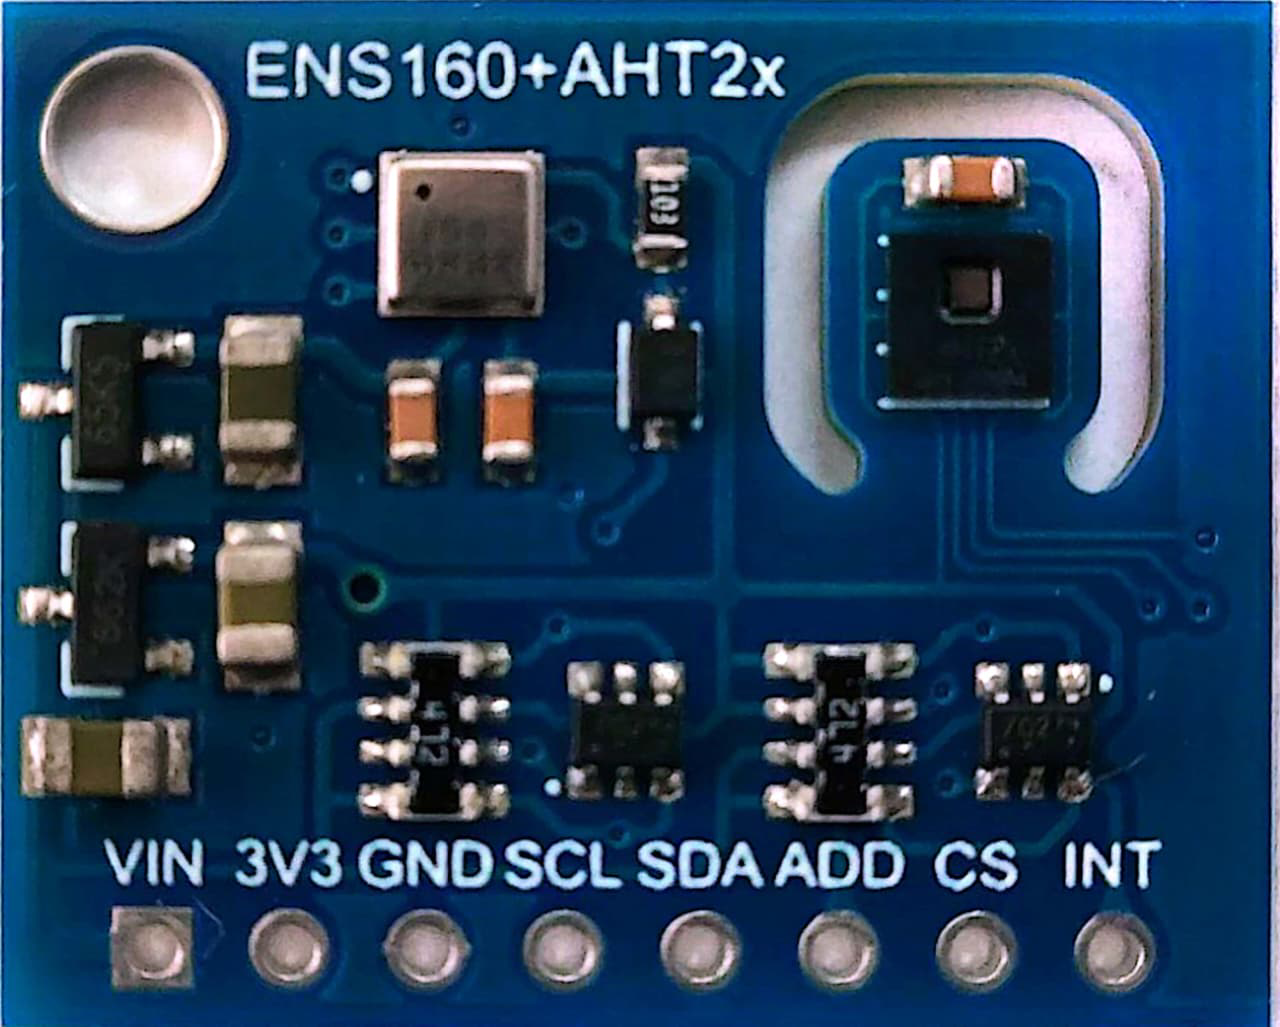
The ENS160 is a digital metal-oxide (MOX) gas sensor designed for air quality monitoring. It provides accurate measurements of volatile organic compounds (VOCs) and equivalent CO2 (eCO2) levels. The AHT21, on the other hand, is a high-precision temperature and humidity sensor. When combined, the ENS160 and AHT21 form a powerful duo for environmental sensing, enabling applications such as indoor air quality monitoring, HVAC systems, and IoT-based environmental monitoring.

Explore Projects Built with ENS160+AHT21

Use Cirkit Designer to design, explore, and prototype these projects online. Some projects support real-time simulation. Click "Open Project" to start designing instantly!
ESP32-Based Smart Scale and Environmental Sensor System
Image of Copy of test 1: A project utilizing ENS160+AHT21 in a practical application
This circuit is designed to measure weight and environmental parameters. It uses a Load Cell connected to an HX711 bridge sensor interface to measure weight, and an ENS160+AHT21 sensor module to measure temperature and humidity. The ESP32 microcontroller reads data from both sensors and communicates the measurements, with the HX711 interfacing via digital pins and the ENS160+AHT21 via I2C. A Mini-360 DC-DC Step Down Buck Converter, powered by a 12v supply, regulates voltage to the required 3.3V for the sensors and the ESP32.
Cirkit Designer LogoOpen Project in Cirkit Designer
ESP32-Based Smart Scale and Environmental Sensor System
Image of test: A project utilizing ENS160+AHT21 in a practical application
This circuit is designed to measure weight and environmental parameters. It uses a Load Cell connected to an HX711 bridge sensor interface to measure weight, and an ENS160+AHT21 sensor module to measure temperature and humidity. The ESP32 microcontroller reads data from both sensors and communicates the measurements, with the HX711 interfaced via digital pins and the ENS160+AHT21 via I2C. A Mini-360 DC-DC Step Down Buck Converter is used to step down the 12V power supply to 3.3V required by the sensors and ESP32.
Cirkit Designer LogoOpen Project in Cirkit Designer
ESP32-Based Environmental Monitoring System with Gas Sensors and OLED Display
Image of EnviroXpert Pro: A project utilizing ENS160+AHT21 in a practical application
This circuit is an environmental monitoring system using an ESP32 microcontroller. It integrates various sensors, including the MQ-7 and MQ135 gas sensors, ENS160+AHT21 air quality and temperature/humidity sensor, and a KY-037 microphone, to collect environmental data. The data is displayed on a 1.3" OLED screen.
Cirkit Designer LogoOpen Project in Cirkit Designer
ESP32-Based Smart Weighing and Environmental Monitoring System with Wi-Fi Connectivity
Image of Circuit Digram for grain silo: A project utilizing ENS160+AHT21 in a practical application
This circuit is a sensor interface system that uses an ESP32 microcontroller to read data from a load cell via an HX711 amplifier and environmental data from an ENS160+AHT21 sensor module. The system is powered by a 12V supply, stepped down to 3.3V using a DC-DC buck converter, and the ESP32 processes and outputs the sensor data.
Cirkit Designer LogoOpen Project in Cirkit Designer

Explore Projects Built with ENS160+AHT21

Use Cirkit Designer to design, explore, and prototype these projects online. Some projects support real-time simulation. Click "Open Project" to start designing instantly!
Image of Copy of test 1: A project utilizing ENS160+AHT21 in a practical application
ESP32-Based Smart Scale and Environmental Sensor System
This circuit is designed to measure weight and environmental parameters. It uses a Load Cell connected to an HX711 bridge sensor interface to measure weight, and an ENS160+AHT21 sensor module to measure temperature and humidity. The ESP32 microcontroller reads data from both sensors and communicates the measurements, with the HX711 interfacing via digital pins and the ENS160+AHT21 via I2C. A Mini-360 DC-DC Step Down Buck Converter, powered by a 12v supply, regulates voltage to the required 3.3V for the sensors and the ESP32.
Cirkit Designer LogoOpen Project in Cirkit Designer
Image of test: A project utilizing ENS160+AHT21 in a practical application
ESP32-Based Smart Scale and Environmental Sensor System
This circuit is designed to measure weight and environmental parameters. It uses a Load Cell connected to an HX711 bridge sensor interface to measure weight, and an ENS160+AHT21 sensor module to measure temperature and humidity. The ESP32 microcontroller reads data from both sensors and communicates the measurements, with the HX711 interfaced via digital pins and the ENS160+AHT21 via I2C. A Mini-360 DC-DC Step Down Buck Converter is used to step down the 12V power supply to 3.3V required by the sensors and ESP32.
Cirkit Designer LogoOpen Project in Cirkit Designer
Image of EnviroXpert Pro: A project utilizing ENS160+AHT21 in a practical application
ESP32-Based Environmental Monitoring System with Gas Sensors and OLED Display
This circuit is an environmental monitoring system using an ESP32 microcontroller. It integrates various sensors, including the MQ-7 and MQ135 gas sensors, ENS160+AHT21 air quality and temperature/humidity sensor, and a KY-037 microphone, to collect environmental data. The data is displayed on a 1.3" OLED screen.
Cirkit Designer LogoOpen Project in Cirkit Designer
Image of Circuit Digram for grain silo: A project utilizing ENS160+AHT21 in a practical application
ESP32-Based Smart Weighing and Environmental Monitoring System with Wi-Fi Connectivity
This circuit is a sensor interface system that uses an ESP32 microcontroller to read data from a load cell via an HX711 amplifier and environmental data from an ENS160+AHT21 sensor module. The system is powered by a 12V supply, stepped down to 3.3V using a DC-DC buck converter, and the ESP32 processes and outputs the sensor data.
Cirkit Designer LogoOpen Project in Cirkit Designer

Common Applications

  • Indoor air quality monitoring
  • Smart home automation
  • HVAC systems
  • IoT environmental sensing
  • Industrial air quality control

Technical Specifications

ENS160 Specifications

Parameter Value
Supply Voltage 1.8V to 3.6V
Operating Temperature -40°C to +85°C
Communication Interface I²C, SPI
VOC Measurement Range 0 to 65,535 (arbitrary units)
eCO2 Measurement Range 400 ppm to 65,535 ppm
Power Consumption < 3 mA (typical)

AHT21 Specifications

Parameter Value
Supply Voltage 2.2V to 5.5V
Operating Temperature -40°C to +85°C
Humidity Range 0% to 100% RH
Temperature Accuracy ±0.3°C
Humidity Accuracy ±2% RH
Communication Interface I²C

Pin Configuration

ENS160 Pinout

Pin Name Description
VDD Power supply (1.8V to 3.6V)
GND Ground
SDA I²C data line
SCL I²C clock line
INT Interrupt output
RST Reset input (active low)

AHT21 Pinout

Pin Name Description
VDD Power supply (2.2V to 5.5V)
GND Ground
SDA I²C data line
SCL I²C clock line

Usage Instructions

Connecting ENS160 and AHT21 to an Arduino UNO

  1. Wiring: Connect the ENS160 and AHT21 to the Arduino UNO as follows:

    • ENS160:
      • VDD to 3.3V on Arduino
      • GND to GND on Arduino
      • SDA to A4 (I²C data line)
      • SCL to A5 (I²C clock line)
    • AHT21:
      • VDD to 5V on Arduino
      • GND to GND on Arduino
      • SDA to A4 (shared with ENS160)
      • SCL to A5 (shared with ENS160)
  2. Install Libraries:

    • Install the Adafruit_Sensor and Adafruit_AHTX0 libraries for the AHT21.
    • Install the ENS160 library (if available) or use a custom I²C communication library.
  3. Arduino Code: Below is an example code snippet to read data from both sensors:

    #include <Wire.h>
    #include <Adafruit_AHTX0.h> // Library for AHT21
    #include <ENS160.h>         // Library for ENS160 (replace with actual library)
    
    Adafruit_AHTX0 aht; // Create AHT21 object
    ENS160 ens160;      // Create ENS160 object
    
    void setup() {
      Serial.begin(9600);
      Wire.begin();
    
      // Initialize AHT21
      if (!aht.begin()) {
        Serial.println("Failed to initialize AHT21!");
        while (1);
      }
      Serial.println("AHT21 initialized.");
    
      // Initialize ENS160
      if (!ens160.begin()) {
        Serial.println("Failed to initialize ENS160!");
        while (1);
      }
      Serial.println("ENS160 initialized.");
    }
    
    void loop() {
      // Read temperature and humidity from AHT21
      sensors_event_t humidity, temp;
      aht.getEvent(&humidity, &temp);
      Serial.print("Temperature: ");
      Serial.print(temp.temperature);
      Serial.println(" °C");
      Serial.print("Humidity: ");
      Serial.print(humidity.relative_humidity);
      Serial.println(" %");
    
      // Read air quality data from ENS160
      uint16_t voc = ens160.getVOC();
      uint16_t eco2 = ens160.getECO2();
      Serial.print("VOC: ");
      Serial.print(voc);
      Serial.println(" (arbitrary units)");
      Serial.print("eCO2: ");
      Serial.print(eco2);
      Serial.println(" ppm");
    
      delay(2000); // Wait 2 seconds before next reading
    }
    

Important Considerations

  • Ensure proper voltage levels for each sensor. Use level shifters if necessary.
  • Keep the sensors away from direct heat sources or contaminants for accurate readings.
  • Calibrate the ENS160 for optimal VOC and eCO2 measurements in your specific environment.

Troubleshooting and FAQs

Common Issues

  1. Sensors not detected on I²C bus:

    • Ensure correct wiring and check for loose connections.
    • Verify the I²C addresses of the sensors (default: ENS160 - 0x53, AHT21 - 0x38).
  2. Inaccurate readings:

    • Allow the sensors to stabilize for a few minutes after powering on.
    • Avoid placing the sensors in areas with extreme temperatures or humidity.
  3. Arduino code not compiling:

    • Ensure all required libraries are installed and up to date.
    • Check for typos in the code or library function calls.

FAQs

Q: Can I use both sensors on the same I²C bus?
A: Yes, the ENS160 and AHT21 have different I²C addresses, so they can share the same bus.

Q: How do I calibrate the ENS160?
A: The ENS160 automatically calibrates itself over time. For best results, expose it to clean air periodically.

Q: What is the typical response time of the sensors?
A: The AHT21 has a response time of approximately 8 seconds for humidity and temperature. The ENS160 typically updates VOC and eCO2 values every second.