
How to Use Adafruit Blue 15x7 CharliePlex FeatherWing: Examples, Pinouts, and Specs
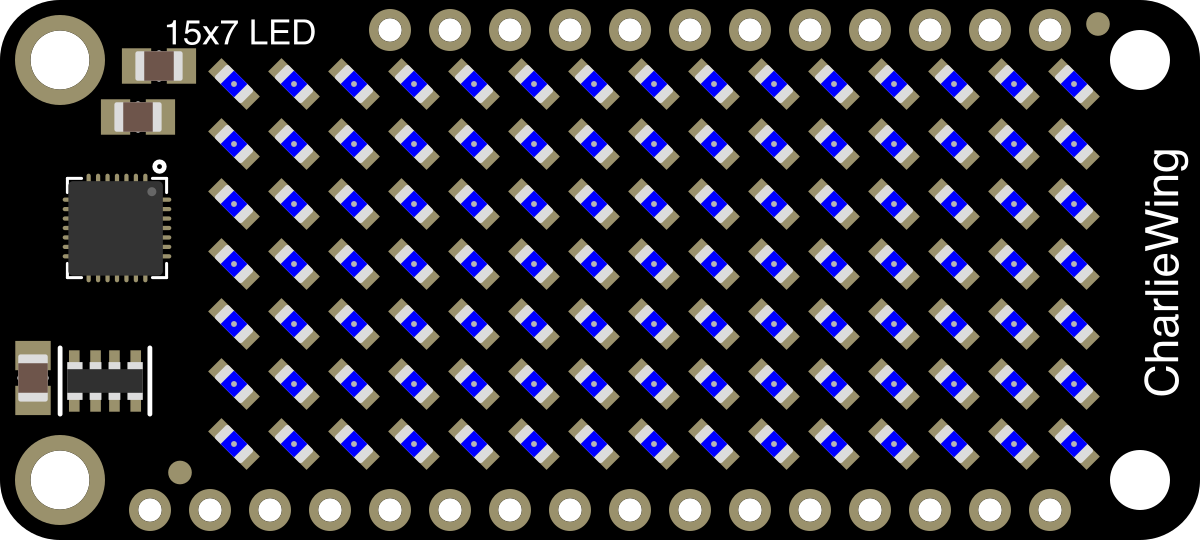
 Design with Adafruit Blue 15x7 CharliePlex FeatherWing in Cirkit Designer
Introduction
The Adafruit Blue 15x7 CharliePlex FeatherWing (Part ID: 3137) is a compact LED display module featuring a 15x7 matrix of bright blue LEDs. Designed to integrate seamlessly with Adafruit Feather microcontroller boards, this module leverages Charlieplexing technology to control up to 105 LEDs using minimal GPIO pins. This makes it an excellent choice for creating dynamic lighting effects, animations, and visual indicators in compact projects.
Explore Projects Built with Adafruit Blue 15x7 CharliePlex FeatherWing
 Open Project in Cirkit Designer
 Open Project in Cirkit Designer
 Open Project in Cirkit Designer
 Open Project in Cirkit Designer
Explore Projects Built with Adafruit Blue 15x7 CharliePlex FeatherWing
Open Project in Cirkit DesignerOpen Project in Cirkit DesignerOpen Project in Cirkit DesignerOpen Project in Cirkit DesignerCommon Applications
- Visual feedback for IoT devices
- Scrolling text displays
- Custom animations and patterns
- Status indicators for embedded systems
- Educational projects and prototyping
Technical Specifications
The Adafruit Blue 15x7 CharliePlex FeatherWing is designed for ease of use and versatility. Below are its key technical details:
Key Specifications
| Parameter | Value |
|---|---|
| LED Matrix Dimensions | 15 columns x 7 rows (105 LEDs) |
| LED Color | Blue |
| Communication Protocol | I2C |
| Operating Voltage | 3.3V (logic level) |
| Current Consumption | ~10mA (typical, varies with usage) |
| Dimensions | 50.8mm x 22.8mm x 3.2mm |
| Weight | 4.2g |
Pin Configuration
The FeatherWing connects directly to Feather boards via its headers. Below is the pin configuration:
| Pin Name | Description |
|---|---|
| SDA | I2C Data Line |
| SCL | I2C Clock Line |
| 3V | Power Supply (3.3V) |
| GND | Ground |
Usage Instructions
The Adafruit Blue 15x7 CharliePlex FeatherWing is easy to set up and use with Feather boards. Follow the steps below to get started:
Step 1: Hardware Setup
- Attach the FeatherWing: Align the FeatherWing with the Feather board's headers and press it into place.
- Power the Feather: Connect the Feather board to a power source (e.g., USB or battery).
- Verify Connections: Ensure the FeatherWing is securely attached and powered.
Step 2: Install Required Libraries
To control the FeatherWing, you'll need the Adafruit_IS31FL3731 library. Install it via the Arduino IDE:
- Open the Arduino IDE.
- Go to Sketch > Include Library > Manage Libraries.
- Search for
Adafruit IS31FL3731and click Install.
Step 3: Example Code
Below is an example sketch to display a simple animation on the FeatherWing:
#include <Wire.h>
#include <Adafruit_GFX.h>
#include <Adafruit_IS31FL3731.h>

// Create an instance of the FeatherWing object
Adafruit_IS31FL3731 matrix = Adafruit_IS31FL3731();

void setup() {
  // Initialize serial communication for debugging
  Serial.begin(115200);
  Serial.println("Adafruit 15x7 CharliePlex FeatherWing Test");

  // Initialize the LED matrix
  if (!matrix.begin()) {
    Serial.println("Matrix initialization failed!");
    while (1); // Halt if initialization fails
  }
  Serial.println("Matrix initialized successfully!");

  // Clear the display
  matrix.clear();
}

void loop() {
  // Create a simple animation: a diagonal line moving across the display
  for (int i = 0; i < 15; i++) {
    matrix.clear(); // Clear the display
    matrix.drawPixel(i, i % 7, 255); // Draw a pixel with full brightness
    delay(100); // Pause for 100ms
  }
}
Important Considerations
- Power Supply: Ensure your Feather board can supply sufficient current for the LEDs.
- Brightness Control: The library allows for individual LED brightness control (0-255).
- I2C Address: The default I2C address is
0x74. Ensure no other devices on the I2C bus conflict with this address.
Troubleshooting and FAQs
Common Issues
Matrix Not Lighting Up
- Cause: Incorrect connections or insufficient power.
- Solution: Verify the FeatherWing is securely attached to the Feather board and that the board is powered.
Library Initialization Fails
- Cause: Missing or outdated library.
- Solution: Ensure the
Adafruit_IS31FL3731library is installed and up to date.
Flickering LEDs
- Cause: Insufficient power supply or conflicting I2C devices.
- Solution: Use a stable power source and check for I2C address conflicts.
FAQs
Q: Can I use this FeatherWing with non-Adafruit boards?
A: Yes, as long as the board supports 3.3V logic and I2C communication. However, you may need to use jumper wires instead of directly attaching the FeatherWing.
Q: How do I change the I2C address?
A: The I2C address is fixed at 0x74 and cannot be changed.
Q: Can I control individual LED brightness?
A: Yes, the Adafruit_IS31FL3731 library allows for 8-bit brightness control for each LED.
By following this documentation, you can effectively integrate and utilize the Adafruit Blue 15x7 CharliePlex FeatherWing in your projects!