How to Use shield: Examples, Pinouts, and Specs
Introduction
A shield is a protective enclosure designed to prevent electromagnetic interference (EMI) and radio frequency interference (RFI) from affecting sensitive electronic components. By mitigating external noise and interference, shields play a critical role in maintaining signal integrity and ensuring the proper functioning of electronic circuits. Shields are commonly used in applications such as motor drivers, communication systems, and sensitive analog or digital circuits.
Explore Projects Built with shield


Explore Projects Built with shield
Common Applications and Use Cases
- Motor Drivers: Protects motor driver circuits from external EMI and RFI, ensuring stable operation.
- Communication Systems: Shields sensitive communication modules (e.g., Wi-Fi, Bluetooth) from interference.
- Analog Circuits: Reduces noise in precision analog circuits, such as amplifiers and sensors.
- Digital Systems: Prevents cross-talk and interference in high-speed digital circuits.
Technical Specifications
Below are the general technical specifications for a shield used in motor driver applications. Note that specific parameters may vary depending on the design and material of the shield.
Key Technical Details
- Material: Conductive metals (e.g., aluminum, copper, or steel)
- Shielding Effectiveness: 40 dB to 120 dB (depending on frequency range)
- Frequency Range: 10 kHz to 10 GHz
- Operating Temperature: -40°C to 85°C
- Dimensions: Varies based on application (customizable)
- Mounting: Snap-on, soldered, or adhesive-backed
Pin Configuration and Descriptions
While shields themselves do not have electrical pins, they are often integrated into circuits with motor driver ICs. Below is an example of a motor driver shield pinout when used with an Arduino UNO.
| Pin | Name | Description |
|---|---|---|
| 1 | GND | Ground connection for the shield and motor driver circuit. |
| 2 | VCC | Power supply input for the motor driver (typically 5V or 12V). |
| 3 | IN1 | Control input for motor direction (e.g., HIGH for forward, LOW for reverse). |
| 4 | IN2 | Control input for motor direction (e.g., HIGH for reverse, LOW for forward). |
| 5 | ENA | Enable pin for motor A (PWM signal can be applied for speed control). |
| 6 | OUT1 | Output pin connected to one terminal of motor A. |
| 7 | OUT2 | Output pin connected to the other terminal of motor A. |
Usage Instructions
How to Use the Shield in a Circuit
- Design the Shield: Ensure the shield is made of a conductive material and is properly sized to cover the sensitive components.
- Connect to Ground: Attach the shield to the circuit's ground to allow it to act as a Faraday cage, effectively blocking EMI and RFI.
- Integrate with Motor Driver:
- Place the shield over the motor driver circuit.
- Ensure that the shield does not short any exposed pins or components.
- Test the Circuit: Verify that the shield effectively reduces noise and interference by measuring signal integrity and motor performance.
Important Considerations and Best Practices
- Grounding: Always connect the shield to the circuit's ground to ensure proper functionality.
- Material Selection: Use a material with high conductivity and good shielding effectiveness, such as copper or aluminum.
- Ventilation: If the shield covers heat-generating components, ensure proper ventilation to prevent overheating.
- Isolation: Avoid direct contact between the shield and sensitive circuit traces to prevent short circuits.
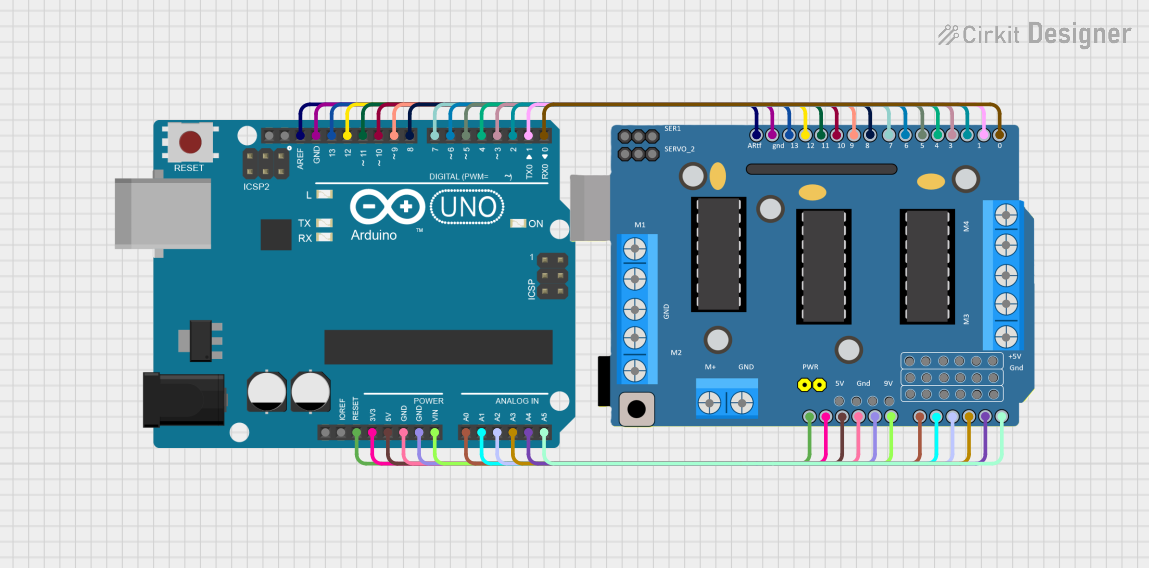
Example: Using a Motor Driver Shield with Arduino UNO
Below is an example of how to control a motor driver shield using an Arduino UNO.
// Example code to control a motor driver shield with Arduino UNO
// This code assumes the motor driver shield is connected to the Arduino as follows:
// IN1 -> Pin 8, IN2 -> Pin 9, ENA -> Pin 10 (PWM)

#define IN1 8  // Motor direction control pin 1
#define IN2 9  // Motor direction control pin 2
#define ENA 10 // Motor speed control (PWM pin)

void setup() {
  pinMode(IN1, OUTPUT); // Set IN1 as output
  pinMode(IN2, OUTPUT); // Set IN2 as output
  pinMode(ENA, OUTPUT); // Set ENA as output
}

void loop() {
  // Rotate motor forward
  digitalWrite(IN1, HIGH); // Set IN1 HIGH
  digitalWrite(IN2, LOW);  // Set IN2 LOW
  analogWrite(ENA, 128);   // Set motor speed to 50% (PWM value: 128)

  delay(2000); // Run motor for 2 seconds

  // Rotate motor backward
  digitalWrite(IN1, LOW);  // Set IN1 LOW
  digitalWrite(IN2, HIGH); // Set IN2 HIGH
  analogWrite(ENA, 128);   // Maintain motor speed at 50%

  delay(2000); // Run motor for 2 seconds

  // Stop motor
  digitalWrite(IN1, LOW);  // Set IN1 LOW
  digitalWrite(IN2, LOW);  // Set IN2 LOW
  analogWrite(ENA, 0);     // Set motor speed to 0 (stop)

  delay(2000); // Wait for 2 seconds before repeating
}
Troubleshooting and FAQs
Common Issues and Solutions
Shield Not Reducing Noise Effectively:
- Cause: Poor grounding or improper material selection.
- Solution: Ensure the shield is securely connected to the circuit's ground and made of a conductive material.
Short Circuits:
- Cause: Shield is in direct contact with exposed circuit traces or pins.
- Solution: Use insulating tape or spacers to prevent direct contact.
Overheating:
- Cause: Shield is blocking ventilation for heat-generating components.
- Solution: Add ventilation holes or use a perforated shield design.
Motor Driver Not Responding:
- Cause: Incorrect wiring or code configuration.
- Solution: Double-check the wiring and ensure the Arduino code matches the pin configuration.
FAQs
Q: Can I use any metal for the shield?
- A: While most metals provide some level of shielding, materials like copper and aluminum are preferred due to their high conductivity and effectiveness.
Q: Do I need to ground the shield?
- A: Yes, grounding the shield is essential for it to function as a Faraday cage and block interference.
Q: Can I use a shield with other components besides motor drivers?
- A: Absolutely! Shields are versatile and can be used with any sensitive electronic components that require protection from EMI and RFI.