How to Use esp32 type c: Examples, Pinouts, and Specs
Introduction
The ESP32 Type-C, manufactured by IRPANGTG, is a versatile and powerful microcontroller module designed for IoT (Internet of Things) applications. It features dual-core processing, integrated Wi-Fi and Bluetooth capabilities, and a USB Type-C interface for power and data transfer. This module is ideal for projects requiring wireless communication, low power consumption, and high processing power.
Explore Projects Built with esp32 type c
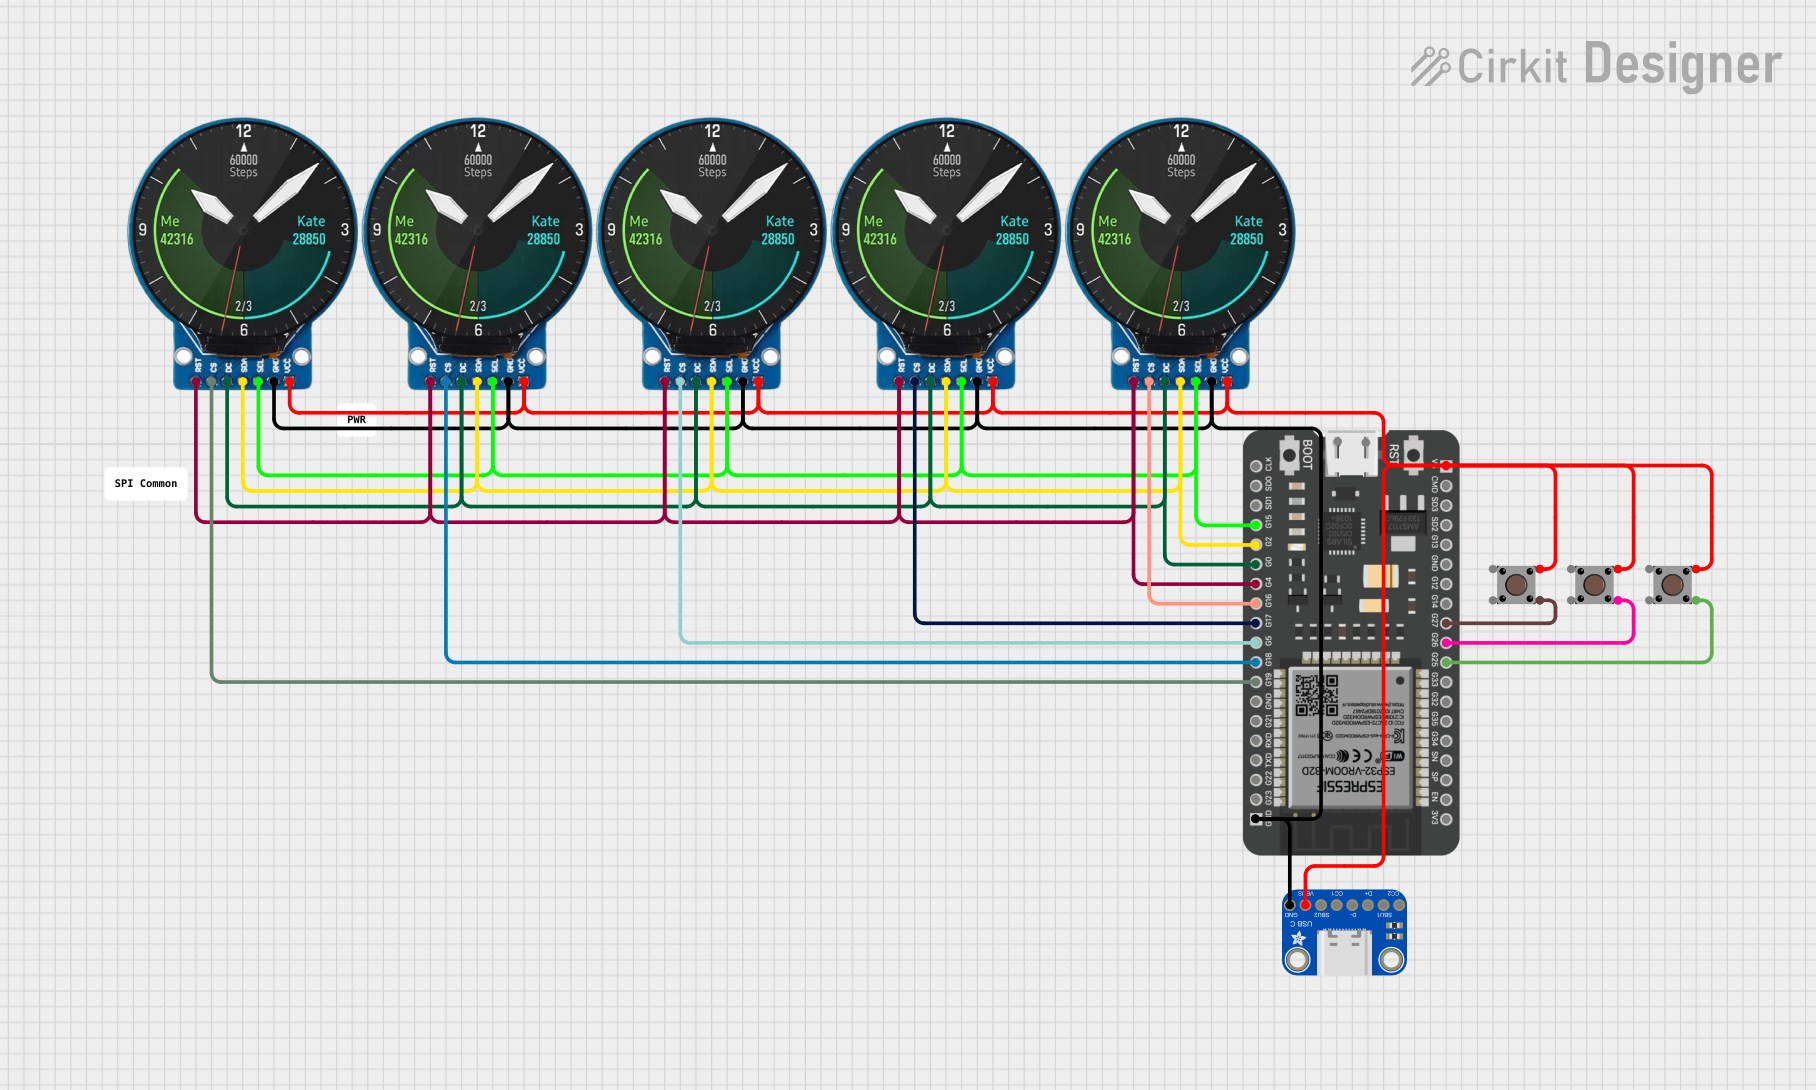
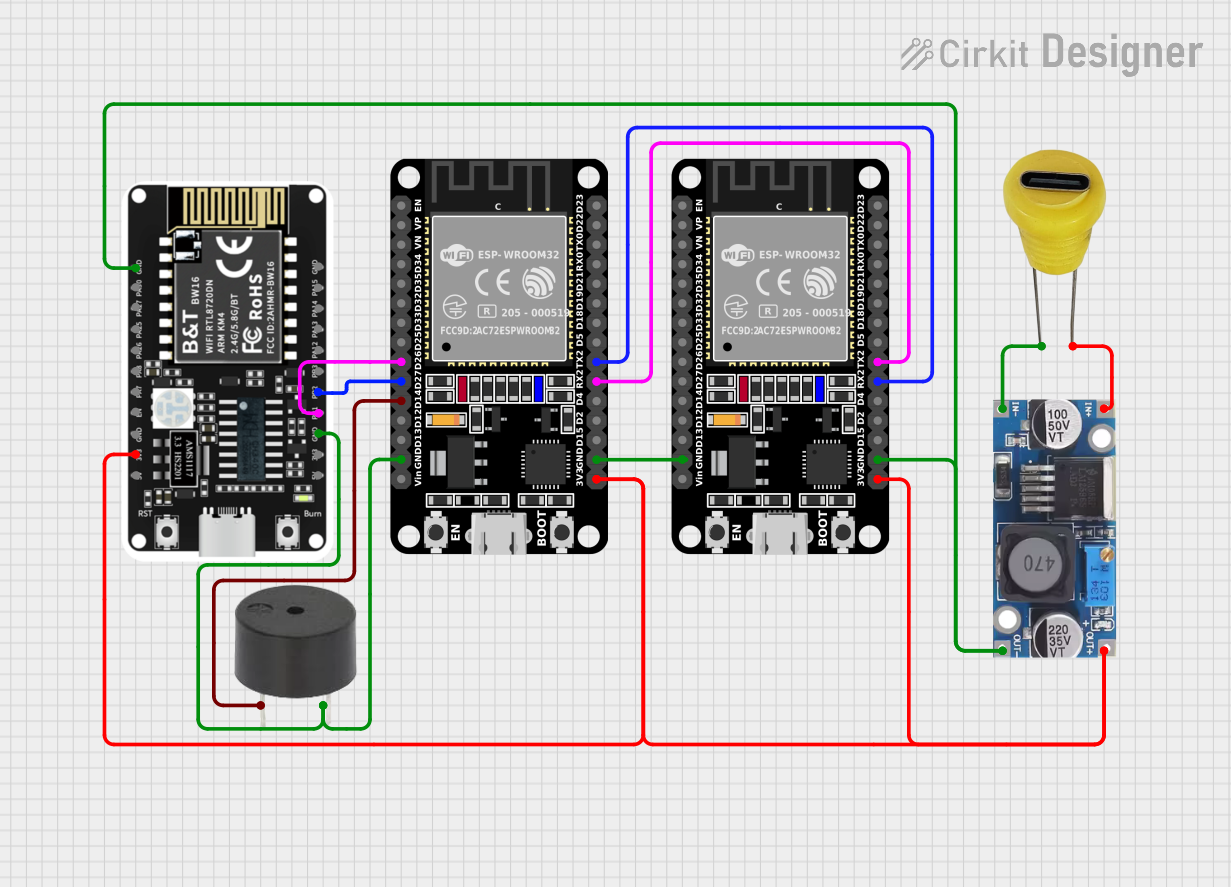


Explore Projects Built with esp32 type c
Common Applications and Use Cases
- Smart home devices (e.g., smart lights, thermostats)
- Wearable technology
- Industrial IoT systems
- Wireless sensor networks
- Robotics and automation
- Prototyping and development of IoT solutions
Technical Specifications
The ESP32 Type-C is built to deliver high performance while maintaining energy efficiency. Below are its key technical specifications:
General Specifications
| Parameter | Value |
|---|---|
| Microcontroller | ESP32 Dual-Core Xtensa LX6 |
| Clock Speed | Up to 240 MHz |
| Flash Memory | 4 MB (expandable) |
| SRAM | 520 KB |
| Wireless Connectivity | Wi-Fi 802.11 b/g/n, Bluetooth 4.2 |
| USB Interface | USB Type-C |
| Operating Voltage | 3.3V |
| Input Voltage Range | 5V (via USB Type-C) |
| GPIO Pins | 30 |
| ADC Channels | 18 |
| DAC Channels | 2 |
| PWM Channels | 16 |
| Operating Temperature | -40°C to 85°C |
Pin Configuration and Descriptions
The ESP32 Type-C module features a 30-pin layout. Below is the pin configuration:
| Pin Number | Pin Name | Function |
|---|---|---|
| 1 | GND | Ground |
| 2 | 3V3 | 3.3V Power Output |
| 3 | EN | Enable Pin (Active High) |
| 4 | IO0 | GPIO0, Boot Mode Selection |
| 5 | IO1 | GPIO1, UART TX |
| 6 | IO2 | GPIO2, ADC2 Channel 2 |
| 7 | IO3 | GPIO3, UART RX |
| 8 | IO4 | GPIO4, PWM Output |
| 9 | IO5 | GPIO5, ADC2 Channel 5 |
| 10 | IO12 | GPIO12, Touch Sensor 2 |
| 11 | IO13 | GPIO13, Touch Sensor 3 |
| 12 | IO14 | GPIO14, PWM Output |
| 13 | IO15 | GPIO15, ADC2 Channel 3 |
| 14 | IO16 | GPIO16, UART RX2 |
| 15 | IO17 | GPIO17, UART TX2 |
| 16 | IO18 | GPIO18, SPI Clock (SCK) |
| 17 | IO19 | GPIO19, SPI MISO |
| 18 | IO21 | GPIO21, I2C SDA |
| 19 | IO22 | GPIO22, I2C SCL |
| 20 | IO23 | GPIO23, SPI MOSI |
| 21 | IO25 | GPIO25, DAC1 |
| 22 | IO26 | GPIO26, DAC2 |
| 23 | IO27 | GPIO27, ADC2 Channel 7 |
| 24 | IO32 | GPIO32, ADC1 Channel 4 |
| 25 | IO33 | GPIO33, ADC1 Channel 5 |
| 26 | IO34 | GPIO34, ADC1 Channel 6 (Input) |
| 27 | IO35 | GPIO35, ADC1 Channel 7 (Input) |
| 28 | VIN | Input Voltage (5V via USB-C) |
| 29 | TXD0 | UART TX0 |
| 30 | RXD0 | UART RX0 |
Usage Instructions
How to Use the ESP32 Type-C in a Circuit
- Powering the Module: Connect the ESP32 Type-C to a 5V power source using the USB Type-C port. The onboard voltage regulator will step down the voltage to 3.3V for the microcontroller.
- Programming: Use the USB Type-C interface to connect the module to a computer. Install the necessary drivers and use the Arduino IDE or ESP-IDF for programming.
- GPIO Usage: Configure the GPIO pins as input or output in your code. Ensure that the voltage levels do not exceed 3.3V to avoid damage.
- Wireless Communication: Use the built-in Wi-Fi and Bluetooth libraries to establish wireless connections.
Important Considerations and Best Practices
- Always use a stable 5V power source to avoid voltage fluctuations.
- Avoid connecting GPIO pins directly to high-current loads; use transistors or relays for interfacing.
- Use pull-up or pull-down resistors for input pins to prevent floating states.
- Ensure proper grounding to minimize noise and interference in wireless communication.
Example Code for Arduino UNO
Below is an example of how to blink an LED connected to GPIO2 of the ESP32 Type-C:
// Example: Blink an LED connected to GPIO2 of ESP32 Type-C

// Define the GPIO pin for the LED
const int ledPin = 2;

void setup() {
  // Initialize the GPIO pin as an output
  pinMode(ledPin, OUTPUT);
}

void loop() {
  // Turn the LED on
  digitalWrite(ledPin, HIGH);
  delay(1000); // Wait for 1 second

  // Turn the LED off
  digitalWrite(ledPin, LOW);
  delay(1000); // Wait for 1 second
}
Troubleshooting and FAQs
Common Issues and Solutions
ESP32 Not Detected by Computer:
- Ensure the USB Type-C cable supports data transfer (not just charging).
- Install the correct USB-to-serial drivers for the ESP32.
Wi-Fi Connection Fails:
- Verify the SSID and password in your code.
- Check for interference from other devices or networks.
GPIO Pin Not Responding:
- Confirm the pin configuration in your code.
- Check for short circuits or incorrect wiring.
Module Overheating:
- Ensure the input voltage does not exceed 5V.
- Avoid running high-power tasks continuously without proper cooling.
FAQs
Q: Can I power the ESP32 Type-C with a battery?
A: Yes, you can use a 3.7V LiPo battery connected to the VIN pin, but ensure proper regulation to avoid damage.
Q: Does the ESP32 Type-C support OTA updates?
A: Yes, the ESP32 supports Over-The-Air (OTA) updates, which can be implemented using the Arduino IDE or ESP-IDF.
Q: Can I use the ESP32 Type-C with MicroPython?
A: Absolutely! The ESP32 is compatible with MicroPython, allowing you to write and execute Python scripts directly on the module.