Cirkit Designer Logo
Cirkit Designer
Your all-in-one circuit design IDE
Home / 
Component Documentation

How to Use Adafruit LSM303DLHC Triple-axis Accelerometer+Magnetometer (Compass): Examples, Pinouts, and Specs

Image of Adafruit LSM303DLHC Triple-axis Accelerometer+Magnetometer (Compass)
Cirkit Designer LogoDesign with Adafruit LSM303DLHC Triple-axis Accelerometer+Magnetometer (Compass) in Cirkit Designer

Introduction

The Adafruit LSM303DLHC is a compact and versatile sensor module that combines a triple-axis accelerometer and a triple-axis magnetometer. This sensor is capable of providing precise data on both acceleration and magnetic fields in three dimensions, making it an ideal choice for a wide range of applications including robotics, gaming, personal navigation, and tilt-compensated compasses.

Explore Projects Built with Adafruit LSM303DLHC Triple-axis Accelerometer+Magnetometer (Compass)

Use Cirkit Designer to design, explore, and prototype these projects online. Some projects support real-time simulation. Click "Open Project" to start designing instantly!
Arduino Ethernet with LSM303DLHC Accelerometer and Compass Interface
Image of Compass: A project utilizing Adafruit LSM303DLHC Triple-axis Accelerometer+Magnetometer (Compass) in a practical application
This circuit connects an Adafruit LSM303DLHC Triple-axis Accelerometer+Magnetometer (Compass) to an Arduino Board Ethernet using I2C communication protocol. The SCL and SDA pins of the sensor are connected to the A5 and A4 pins of the Arduino, respectively, for serial clock and data transfer. The sensor is powered by the Arduino's 5V output, and both devices share a common ground.
Cirkit Designer LogoOpen Project in Cirkit Designer
Teensy 4.1 Based Biometric Data Acquisition System with AD8232 Heart Rate Monitor and LIS3DH Accelerometer
Image of Teensy 4.1 accelerometer: A project utilizing Adafruit LSM303DLHC Triple-axis Accelerometer+Magnetometer (Compass) in a practical application
This circuit integrates a Teensy 4.1 microcontroller with an Adafruit LIS3DH Triple-Axis Accelerometer and an AD8232 Heart Rate Monitor. The accelerometer communicates with the Teensy via I2C (SCL and SDA lines), while the heart rate monitor's output and lead-off detection (LO+ and LO-) are connected to the Teensy's analog inputs. The circuit is designed to measure both acceleration and heart rate signals, likely for a wearable or health monitoring device.
Cirkit Designer LogoOpen Project in Cirkit Designer
Arduino UNO R4 WiFi and Adafruit LIS3DH Accelerometer-Based Motion Detection System
Image of circuit: A project utilizing Adafruit LSM303DLHC Triple-axis Accelerometer+Magnetometer (Compass) in a practical application
This circuit consists of an Arduino UNO R4 WiFi connected to an Adafruit LIS3DH Triple-Axis Accelerometer via I2C communication. The Arduino reads acceleration data from the LIS3DH sensor and outputs it to the serial monitor for further analysis or processing.
Cirkit Designer LogoOpen Project in Cirkit Designer
Arduino Mega 2560-Based Multi-Sensor System with Distance, Magnetometer, and Camera Integration
Image of Junior Design - Sensors: A project utilizing Adafruit LSM303DLHC Triple-axis Accelerometer+Magnetometer (Compass) in a practical application
This circuit features an Arduino Mega 2560 microcontroller interfaced with multiple VL53L0X distance sensors, an OV7725 camera module, and an Adafruit LIS3MDL triple-axis magnetometer. The Arduino reads data from these sensors and the camera, likely for a robotics or environmental sensing application, and processes the data for further use or transmission.
Cirkit Designer LogoOpen Project in Cirkit Designer

Explore Projects Built with Adafruit LSM303DLHC Triple-axis Accelerometer+Magnetometer (Compass)

Use Cirkit Designer to design, explore, and prototype these projects online. Some projects support real-time simulation. Click "Open Project" to start designing instantly!
Image of Compass: A project utilizing Adafruit LSM303DLHC Triple-axis Accelerometer+Magnetometer (Compass) in a practical application
Arduino Ethernet with LSM303DLHC Accelerometer and Compass Interface
This circuit connects an Adafruit LSM303DLHC Triple-axis Accelerometer+Magnetometer (Compass) to an Arduino Board Ethernet using I2C communication protocol. The SCL and SDA pins of the sensor are connected to the A5 and A4 pins of the Arduino, respectively, for serial clock and data transfer. The sensor is powered by the Arduino's 5V output, and both devices share a common ground.
Cirkit Designer LogoOpen Project in Cirkit Designer
Image of Teensy 4.1 accelerometer: A project utilizing Adafruit LSM303DLHC Triple-axis Accelerometer+Magnetometer (Compass) in a practical application
Teensy 4.1 Based Biometric Data Acquisition System with AD8232 Heart Rate Monitor and LIS3DH Accelerometer
This circuit integrates a Teensy 4.1 microcontroller with an Adafruit LIS3DH Triple-Axis Accelerometer and an AD8232 Heart Rate Monitor. The accelerometer communicates with the Teensy via I2C (SCL and SDA lines), while the heart rate monitor's output and lead-off detection (LO+ and LO-) are connected to the Teensy's analog inputs. The circuit is designed to measure both acceleration and heart rate signals, likely for a wearable or health monitoring device.
Cirkit Designer LogoOpen Project in Cirkit Designer
Image of circuit: A project utilizing Adafruit LSM303DLHC Triple-axis Accelerometer+Magnetometer (Compass) in a practical application
Arduino UNO R4 WiFi and Adafruit LIS3DH Accelerometer-Based Motion Detection System
This circuit consists of an Arduino UNO R4 WiFi connected to an Adafruit LIS3DH Triple-Axis Accelerometer via I2C communication. The Arduino reads acceleration data from the LIS3DH sensor and outputs it to the serial monitor for further analysis or processing.
Cirkit Designer LogoOpen Project in Cirkit Designer
Image of Junior Design - Sensors: A project utilizing Adafruit LSM303DLHC Triple-axis Accelerometer+Magnetometer (Compass) in a practical application
Arduino Mega 2560-Based Multi-Sensor System with Distance, Magnetometer, and Camera Integration
This circuit features an Arduino Mega 2560 microcontroller interfaced with multiple VL53L0X distance sensors, an OV7725 camera module, and an Adafruit LIS3MDL triple-axis magnetometer. The Arduino reads data from these sensors and the camera, likely for a robotics or environmental sensing application, and processes the data for further use or transmission.
Cirkit Designer LogoOpen Project in Cirkit Designer

Technical Specifications

General Features

  • Accelerometer:
    • Measurement Range: ±2g/±4g/±8g/±16g (selectable)
    • 12-bit resolution
  • Magnetometer:
    • Measurement Range: ±1.3 to ±8.1 gauss
    • Gain settings available for increased sensitivity
  • Communication:
    • I2C serial interface
  • Supply Voltage:
    • 3.3V (DO NOT exceed 3.6V)
  • Operating Temperature:
    • -40°C to +85°C

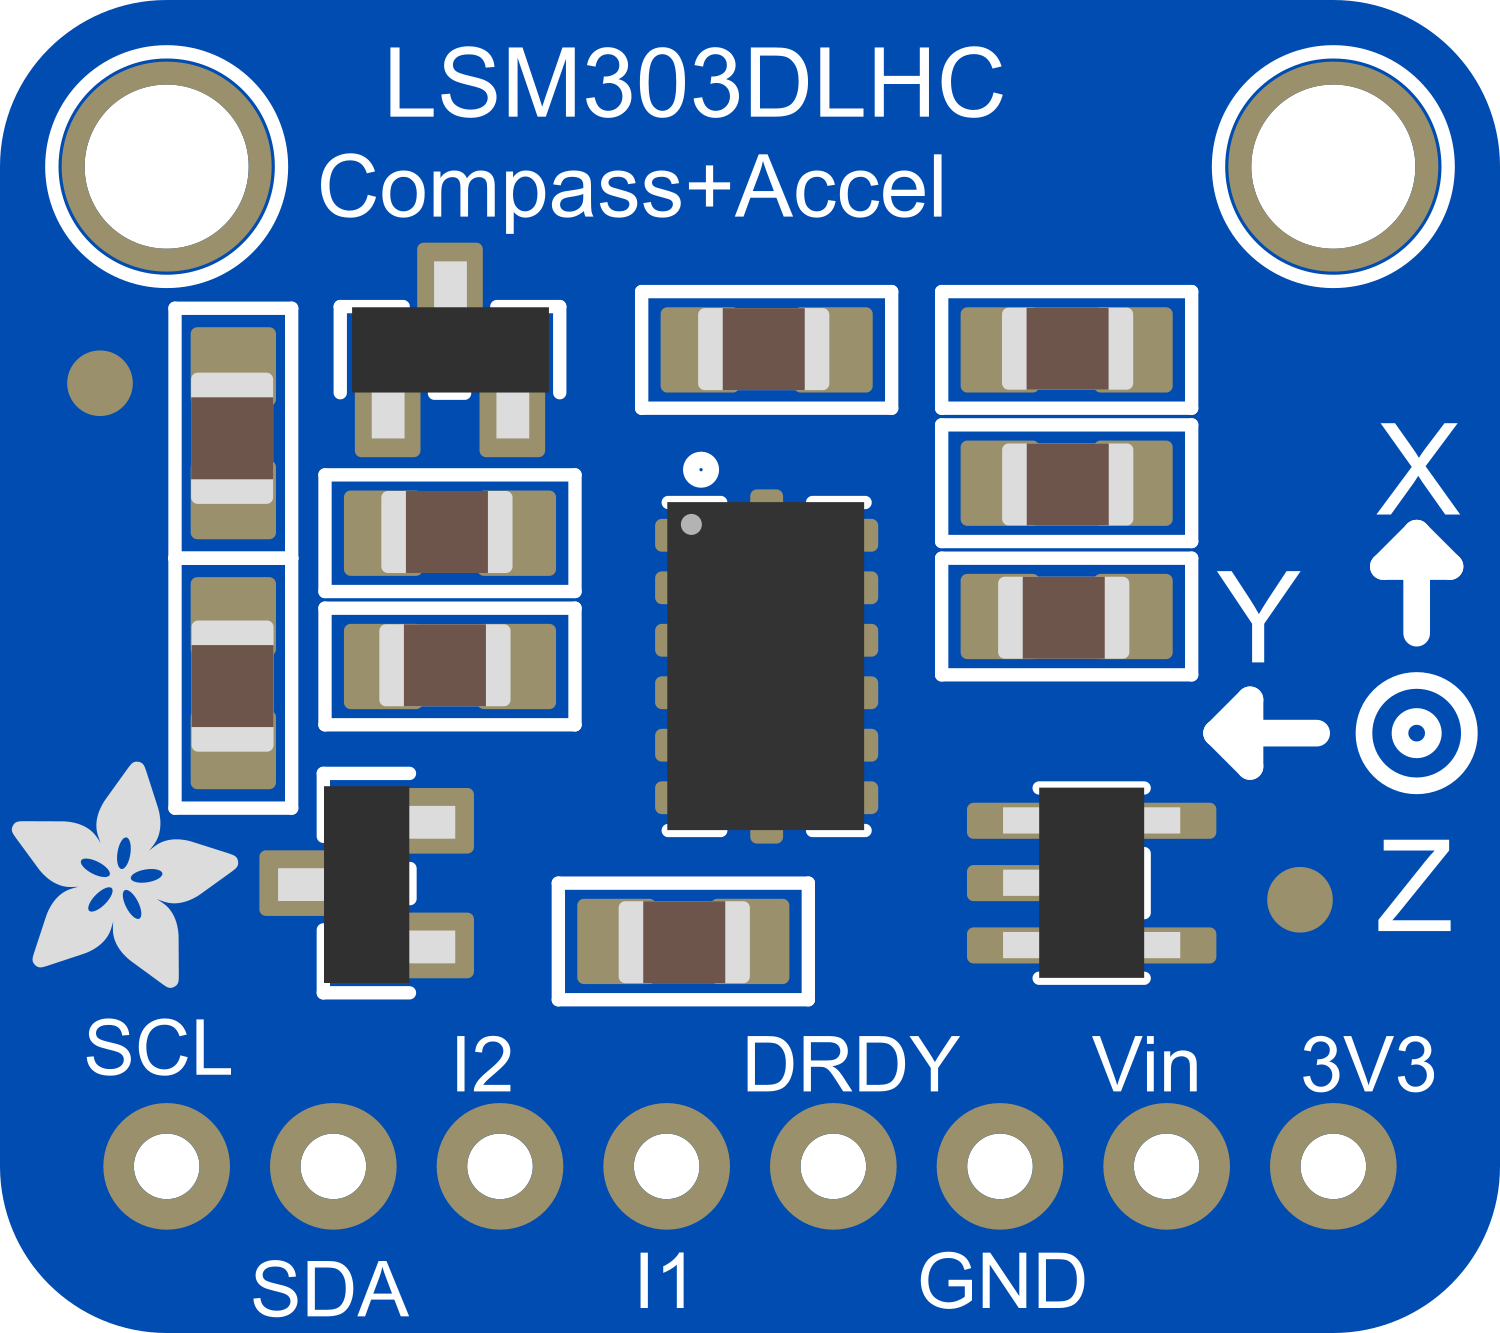
Pin Configuration and Descriptions

Pin Number Name Description
1 VIN Supply voltage (3.3V)
2 3Vo 3.3V regulated output
3 GND Ground
4 SDA I2C data line
5 SCL I2C clock line
6 DRDY Data ready output (optional)

Usage Instructions

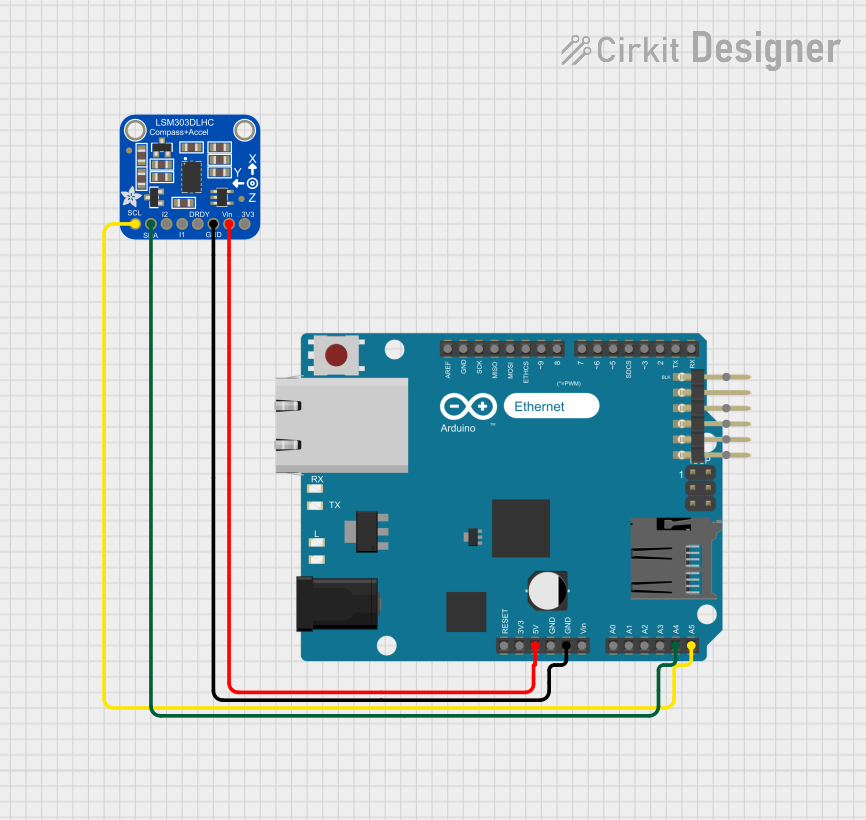
Connecting to an Arduino UNO

  1. Connect VIN to the 3.3V output on the Arduino.
  2. Connect GND to a ground pin on the Arduino.
  3. Connect SDA to A4 (SDA) on the Arduino.
  4. Connect SCL to A5 (SCL) on the Arduino.
  5. (Optional) Connect DRDY to a digital pin if you wish to use the data ready interrupt feature.

Arduino Library and Initialization

To use the LSM303DLHC with an Arduino, you will need to install the Adafruit LSM303DLHC library. This can be done through the Arduino Library Manager:

  1. Open the Arduino IDE.
  2. Go to Sketch > Include Library > Manage Libraries...
  3. Search for "Adafruit LSM303DLHC" and install the library.

After installing the library, you can include it in your sketch and initialize the sensor as follows:

#include <Wire.h>
#include <Adafruit_Sensor.h>
#include <Adafruit_LSM303_U.h>

Adafruit_LSM303_Accel_Unified accel = Adafruit_LSM303_Accel_Unified(54321);
Adafruit_LSM303_Mag_Unified mag = Adafruit_LSM303_Mag_Unified(12345);

void setup(void) {
  Serial.begin(9600);
  if (!accel.begin()) {
    Serial.println("No accelerometer detected");
    while (1);
  }
  if (!mag.begin()) {
    Serial.println("No magnetometer detected");
    while (1);
  }
}

void loop() {
  // Add code to read from the sensor and output the results.
}

Reading Sensor Data

To read data from the accelerometer and magnetometer, you can use the following code snippet:

sensors_event_t event;
accel.getEvent(&event);

Serial.print("X: "); Serial.print(event.acceleration.x); Serial.print(" ");
Serial.print("Y: "); Serial.print(event.acceleration.y); Serial.print(" ");
Serial.print("Z: "); Serial.print(event.acceleration.z); Serial.println(" m/s^2 ");

mag.getEvent(&event);

Serial.print("X: "); Serial.print(event.magnetic.x); Serial.print(" ");
Serial.print("Y: "); Serial.print(event.magnetic.y); Serial.print(" ");
Serial.print("Z: "); Serial.print(event.magnetic.z); Serial.println(" uT");

Troubleshooting and FAQs

Common Issues

  • Sensor not detected: Ensure that the wiring is correct and that the sensor is properly powered.
  • Inaccurate readings: Calibrate the sensor as per the datasheet instructions, and ensure that it is not near any magnetic or metallic objects that could interfere with its readings.
  • No data on serial monitor: Check the baud rate in the serial monitor matches the baud rate specified in your setup() function.

FAQs

Q: Can I use this sensor with a 5V Arduino? A: Yes, but ensure that you connect the VIN pin to a 3.3V output on the Arduino, as the sensor is not 5V tolerant.

Q: How do I calibrate the magnetometer? A: Calibration involves rotating the sensor in several orientations and using the provided library functions to compute offsets. Refer to the library's documentation for detailed instructions.

Q: What is the purpose of the DRDY pin? A: The DRDY (Data Ready) pin is an optional feature that signals when new data is available to read. It can be used to trigger an interrupt in your microcontroller for more efficient data acquisition.

Remember to always consult the sensor's datasheet and the Adafruit LSM303DLHC library documentation for the most detailed and accurate information.