How to Use MPL31115A2: Examples, Pinouts, and Specs
Introduction
The MPL3115A2 is a digital barometer and altimeter sensor manufactured by SparkFun, designed to provide highly accurate pressure and altitude measurements. This sensor communicates via the I2C interface, making it easy to integrate into a wide range of projects. It is ideal for applications such as weather monitoring, altitude tracking, and GPS enhancement.
Explore Projects Built with MPL31115A2


Explore Projects Built with MPL31115A2
Common Applications
- Weather stations for atmospheric pressure monitoring
- Altitude tracking in drones and model aircraft
- GPS systems for elevation correction
- Wearable devices for fitness and outdoor activities
- Environmental data logging systems
Technical Specifications
The following table outlines the key technical details of the MPL3115A2 sensor:
| Parameter | Value |
|---|---|
| Operating Voltage | 1.95V to 3.6V |
| Typical Operating Voltage | 3.3V |
| Communication Interface | I2C (7-bit address: 0x60) |
| Pressure Range | 20 kPa to 110 kPa |
| Altitude Range | -700m to +10,000m |
| Pressure Resolution | 0.016 kPa |
| Altitude Resolution | 0.3 meters |
| Temperature Range | -40°C to +85°C |
| Temperature Resolution | 0.1°C |
| Current Consumption | 2 µA (standby), 40 µA (active) |
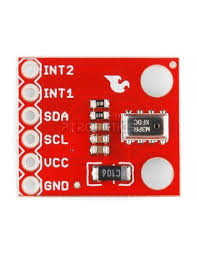
Pin Configuration and Descriptions
The MPL3115A2 sensor has the following pinout:
| Pin | Name | Description |
|---|---|---|
| 1 | VIN | Power supply input (3.3V recommended) |
| 2 | GND | Ground connection |
| 3 | SDA | I2C data line |
| 4 | SCL | I2C clock line |
| 5 | INT | Interrupt output (optional, for event notifications) |
Usage Instructions
How to Use the MPL3115A2 in a Circuit
- Power the Sensor: Connect the VIN pin to a 3.3V power source and the GND pin to ground.
- I2C Communication: Connect the SDA and SCL pins to the corresponding I2C pins on your microcontroller (e.g., Arduino UNO: A4 for SDA, A5 for SCL).
- Optional Interrupt: If you want to use the interrupt feature, connect the INT pin to a digital input pin on your microcontroller.
- Pull-Up Resistors: Ensure that the I2C lines (SDA and SCL) have pull-up resistors (typically 4.7kΩ) if not already provided on your board.
Best Practices
- Use a stable 3.3V power supply to ensure accurate readings.
- Avoid placing the sensor in areas with high electromagnetic interference.
- Calibrate the sensor for your specific altitude and pressure conditions for optimal accuracy.
- Use proper decoupling capacitors (e.g., 0.1 µF) near the power pins to reduce noise.
Example Code for Arduino UNO
Below is an example Arduino sketch to read altitude and pressure data from the MPL3115A2:
#include <Wire.h>
#include <SparkFunMPL3115A2.h> // Include the SparkFun MPL3115A2 library

MPL3115A2 mySensor; // Create an instance of the sensor

void setup() {
  Serial.begin(9600); // Initialize serial communication
  Wire.begin();       // Initialize I2C communication

  // Initialize the MPL3115A2 sensor
  if (!mySensor.begin()) {
    Serial.println("MPL3115A2 not detected. Check connections.");
    while (1); // Halt execution if the sensor is not found
  }

  // Set the sensor to Altimeter mode
  mySensor.setModeAltimeter();
  Serial.println("MPL3115A2 initialized in Altimeter mode.");
}

void loop() {
  // Read altitude in meters
  float altitude = mySensor.readAltitude();
  Serial.print("Altitude (m): ");
  Serial.println(altitude);

  // Read pressure in Pascals
  float pressure = mySensor.readPressure();
  Serial.print("Pressure (Pa): ");
  Serial.println(pressure);

  // Read temperature in Celsius
  float temperature = mySensor.readTemp();
  Serial.print("Temperature (°C): ");
  Serial.println(temperature);

  delay(1000); // Wait 1 second before the next reading
}
Notes:
- Install the SparkFun MPL3115A2 library via the Arduino Library Manager before running the code.
- Ensure the I2C address (default: 0x60) matches the sensor's configuration.
Troubleshooting and FAQs
Common Issues
Sensor Not Detected
- Cause: Incorrect wiring or I2C address mismatch.
- Solution: Verify the connections and ensure the SDA and SCL lines are properly connected. Check the I2C address in the code.
Inaccurate Readings
- Cause: Lack of calibration or unstable power supply.
- Solution: Calibrate the sensor for your environment and use a stable 3.3V power source.
No Data Output
- Cause: Library not installed or incorrect initialization.
- Solution: Ensure the SparkFun MPL3115A2 library is installed and the
begin()function is called in the setup.
FAQs
Q: Can the MPL3115A2 measure temperature?
A: Yes, the sensor includes a built-in temperature sensor with a resolution of 0.1°C.
Q: What is the maximum altitude the sensor can measure?
A: The MPL3115A2 can measure altitudes up to 10,000 meters above sea level.
Q: Can I use the MPL3115A2 with a 5V microcontroller?
A: Yes, but you must use a logic level shifter to safely interface the 3.3V I2C lines with the 5V microcontroller.
Q: Does the sensor require calibration?
A: While the sensor is factory-calibrated, additional calibration may improve accuracy in specific environments.
Q: How do I switch between Altimeter and Barometer modes?
A: Use the setModeAltimeter() and setModeBarometer() functions provided by the SparkFun library.