Cirkit Designer
Your all-in-one circuit design IDE
Home /
Component Documentation
How to Use laser beam photoelectric sensor: Examples, Pinouts, and Specs
Introduction
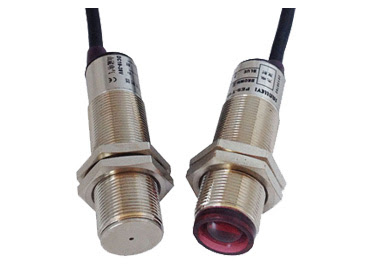
The Laser Beam Photoelectric Sensor is a device that uses a laser beam to detect the presence or absence of an object by measuring the interruption or reflection of the beam. This sensor is highly precise and can be used in various applications, including industrial automation, security systems, and object detection in robotics.
Explore Projects Built with laser beam photoelectric sensor
ESP32-Based Wi-Fi Controlled Laser Shooting Game with OLED Display

This circuit is a laser shooting game controlled by a PS3 controller, featuring an ESP32 microcontroller, two photosensitive sensors for light detection, and a motor driver to control two DC motors. The game includes an OLED display for score visualization, and a MOSFET to control an LED bulb, with power supplied by a 12V battery and regulated by a DC-DC step-down converter.
ESP32-Based Security System with RFID and Laser Intrusion Detection

This circuit is a security and access control system featuring motion detection, laser beam-break sensing, and RFID scanning, interfaced with a keypad and visual/audible indicators, powered by a solar-charged battery, and capable of controlling an electric lock via a relay.
Arduino UNO Laser Tripwire Security System with GSM Alert
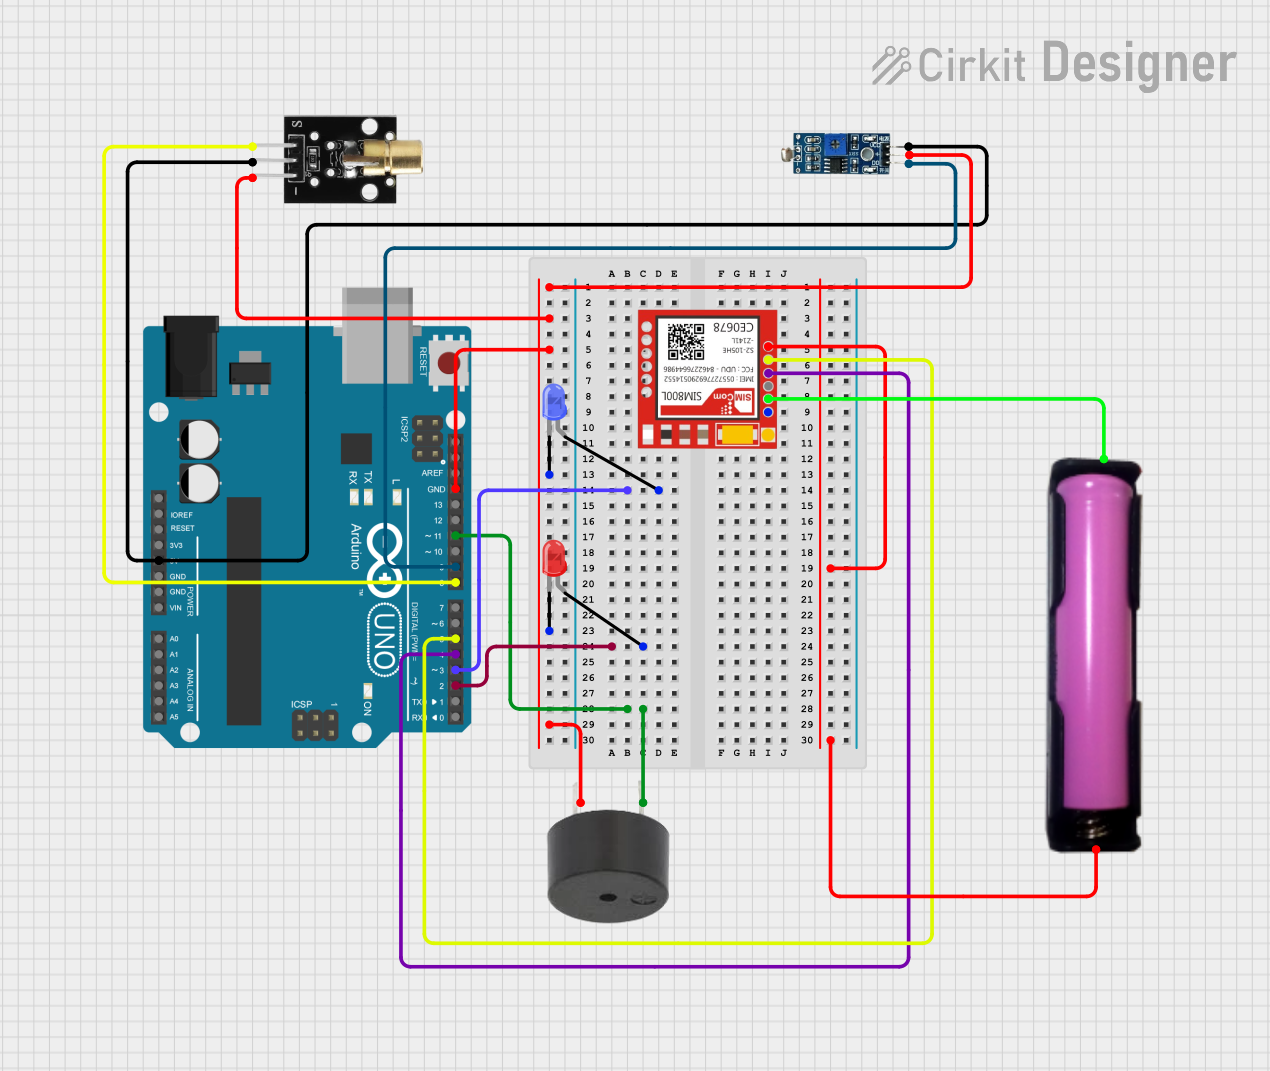
This circuit is a laser tripwire security system using an Arduino UNO. When the laser beam is interrupted, the system triggers a buzzer, lights up an LED, and sends an alert via a SIM800L GSM module. The system also includes an LDR module to detect the laser beam and two LEDs to indicate the system status.
Arduino UNO Laser Alarm System with Piezo Buzzer
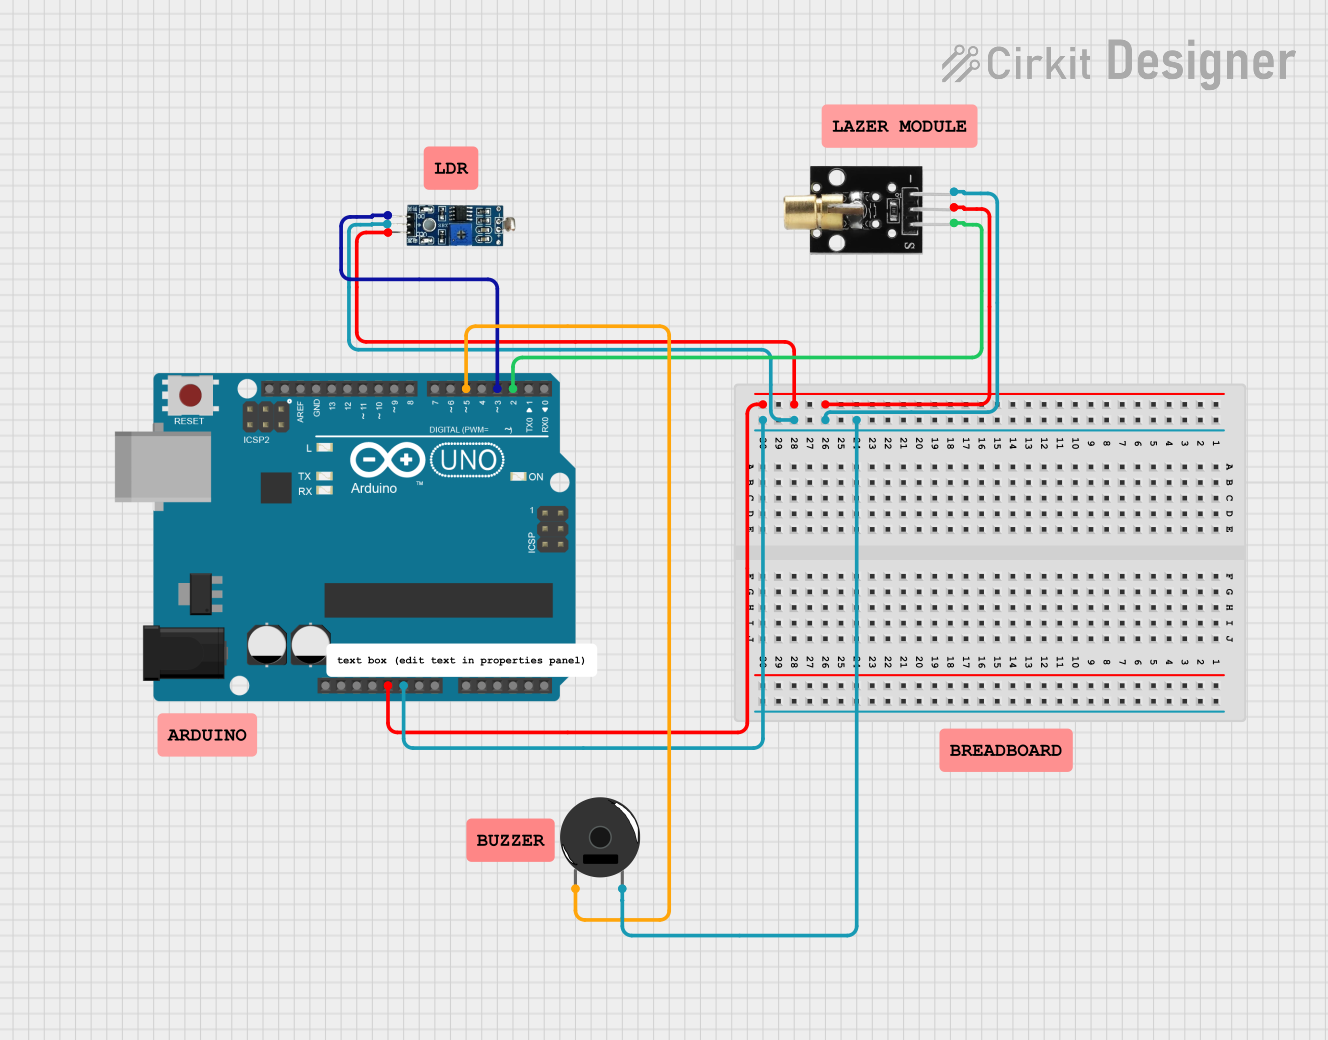
This circuit is a laser alarm system using an Arduino UNO, a KY-008 laser emitter, an LDR module, and a piezo buzzer. The laser emitter continuously shines a beam onto the LDR, and if the beam is interrupted, the LDR signals the Arduino to activate the buzzer, sounding an alarm.
Explore Projects Built with laser beam photoelectric sensor
ESP32-Based Wi-Fi Controlled Laser Shooting Game with OLED Display
This circuit is a laser shooting game controlled by a PS3 controller, featuring an ESP32 microcontroller, two photosensitive sensors for light detection, and a motor driver to control two DC motors. The game includes an OLED display for score visualization, and a MOSFET to control an LED bulb, with power supplied by a 12V battery and regulated by a DC-DC step-down converter.
ESP32-Based Security System with RFID and Laser Intrusion Detection
This circuit is a security and access control system featuring motion detection, laser beam-break sensing, and RFID scanning, interfaced with a keypad and visual/audible indicators, powered by a solar-charged battery, and capable of controlling an electric lock via a relay.
Arduino UNO Laser Tripwire Security System with GSM Alert
This circuit is a laser tripwire security system using an Arduino UNO. When the laser beam is interrupted, the system triggers a buzzer, lights up an LED, and sends an alert via a SIM800L GSM module. The system also includes an LDR module to detect the laser beam and two LEDs to indicate the system status.
Arduino UNO Laser Alarm System with Piezo Buzzer
This circuit is a laser alarm system using an Arduino UNO, a KY-008 laser emitter, an LDR module, and a piezo buzzer. The laser emitter continuously shines a beam onto the LDR, and if the beam is interrupted, the LDR signals the Arduino to activate the buzzer, sounding an alarm.
Common Applications and Use Cases
- Industrial Automation: Detecting objects on conveyor belts, counting items, and ensuring proper placement.
- Security Systems: Monitoring entry points and detecting intrusions.
- Robotics: Object detection and avoidance, alignment tasks, and distance measurement.
Technical Specifications
Key Technical Details
| Parameter | Value |
|---|---|
| Operating Voltage | 5V - 24V DC |
| Operating Current | ≤ 30mA |
| Detection Range | 0.1m - 10m |
| Response Time | ≤ 1ms |
| Output Type | NPN/PNP, NO/NC |
| Laser Wavelength | 650nm (Red) |
| Operating Temperature | -10°C to 50°C |
| Dimensions | 50mm x 25mm x 15mm |
Pin Configuration and Descriptions
| Pin Number | Pin Name | Description |
|---|---|---|
| 1 | VCC | Power supply (5V - 24V DC) |
| 2 | GND | Ground |
| 3 | OUT | Output signal (NPN/PNP, NO/NC) |
Usage Instructions
How to Use the Component in a Circuit
- Power Connection: Connect the VCC pin to a 5V - 24V DC power supply and the GND pin to the ground of your circuit.
- Output Connection: Connect the OUT pin to the input pin of your microcontroller or any other processing unit. If using an Arduino, connect it to a digital input pin.
Important Considerations and Best Practices
- Alignment: Ensure the laser beam is properly aligned with the target object for accurate detection.
- Environment: Avoid using the sensor in environments with excessive dust, smoke, or reflective surfaces that may interfere with the laser beam.
- Power Supply: Use a stable power supply to avoid fluctuations that could affect sensor performance.
- Safety: Do not look directly into the laser beam to avoid eye injury.
Example Circuit with Arduino UNO
/*
  Laser Beam Photoelectric Sensor Example
  This code demonstrates how to use the laser beam photoelectric sensor
  with an Arduino UNO to detect the presence of an object.
*/

const int sensorPin = 2; // Pin connected to the sensor's OUT pin
const int ledPin = 13;   // Pin connected to an LED for indication

void setup() {
  pinMode(sensorPin, INPUT); // Set sensor pin as input
  pinMode(ledPin, OUTPUT);   // Set LED pin as output
  Serial.begin(9600);        // Initialize serial communication
}

void loop() {
  int sensorValue = digitalRead(sensorPin); // Read the sensor value

  if (sensorValue == HIGH) {
    // Object detected
    digitalWrite(ledPin, HIGH); // Turn on the LED
    Serial.println("Object detected!");
  } else {
    // No object detected
    digitalWrite(ledPin, LOW); // Turn off the LED
    Serial.println("No object detected.");
  }

  delay(100); // Small delay to avoid serial flooding
}
Troubleshooting and FAQs
Common Issues Users Might Face
False Detections:
- Solution: Ensure the sensor is properly aligned and there are no reflective surfaces in the detection path.
No Detection:
- Solution: Check the power supply and connections. Ensure the object is within the detection range.
Intermittent Operation:
- Solution: Verify the stability of the power supply and check for any loose connections.
Solutions and Tips for Troubleshooting
- Check Connections: Ensure all connections are secure and correct.
- Verify Power Supply: Use a stable and appropriate power supply.
- Adjust Alignment: Fine-tune the alignment of the laser beam with the target object.
- Clean Sensor: Keep the sensor lens clean from dust and debris.
By following this documentation, users can effectively integrate and utilize the Laser Beam Photoelectric Sensor in their projects, ensuring accurate and reliable object detection.