
How to Use ST7789 With MicroSD Reader: Examples, Pinouts, and Specs
 Design with ST7789 With MicroSD Reader in Cirkit Designer
Introduction
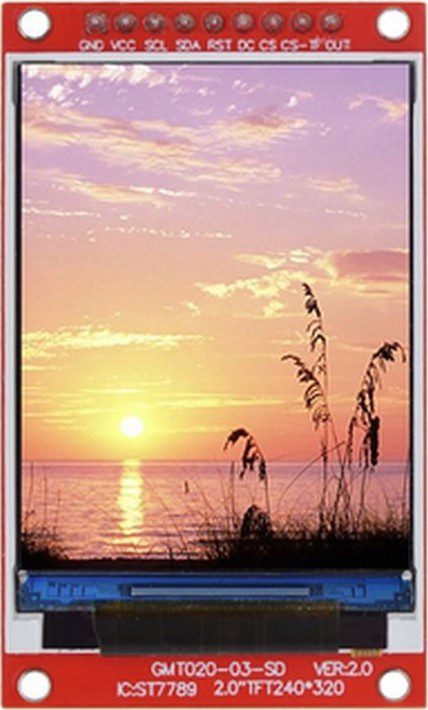
The ST7789 is a compact color display driver designed for small screens with a resolution of 240x240 pixels. It is widely used in embedded systems due to its vibrant color rendering and efficient performance. This module also includes an integrated MicroSD card reader, enabling convenient storage and retrieval of images, fonts, and other data. Its compact size and versatile functionality make it ideal for portable devices, IoT projects, and graphical user interfaces.
Explore Projects Built with ST7789 With MicroSD Reader
 Open Project in Cirkit Designer
 Open Project in Cirkit Designer
 Open Project in Cirkit Designer
 Open Project in Cirkit Designer
Explore Projects Built with ST7789 With MicroSD Reader
Open Project in Cirkit DesignerOpen Project in Cirkit DesignerOpen Project in Cirkit DesignerOpen Project in Cirkit DesignerCommon Applications
- Portable devices such as smartwatches and handheld gadgets
- IoT projects requiring graphical displays
- Data visualization in embedded systems
- Image and font rendering using MicroSD storage
- Educational and prototyping projects with microcontrollers like Arduino and Raspberry Pi
Technical Specifications
Key Technical Details
| Parameter | Value |
|---|---|
| Display Resolution | 240x240 pixels |
| Display Type | TFT LCD, IPS (In-Plane Switching) |
| Color Depth | 65K (16-bit) or 262K (18-bit) |
| Interface | SPI (Serial Peripheral Interface) |
| Operating Voltage | 3.3V (logic and power supply) |
| Backlight Voltage | 3.0V to 3.3V |
| Current Consumption | ~20mA (backlight on) |
| MicroSD Card Support | Standard MicroSD cards (FAT32 format) |
| Dimensions | Varies by module (~1.3 inches diagonal) |
Pin Configuration
ST7789 Display Pins
| Pin Name | Description |
|---|---|
| VCC | Power supply (3.3V) |
| GND | Ground |
| SCL (CLK) | SPI Clock |
| SDA (MOSI) | SPI Data (Master Out Slave In) |
| RES (RST) | Reset pin (active low) |
| DC (A0) | Data/Command control pin |
| BLK | Backlight control (connect to GND to enable) |
MicroSD Reader Pins
| Pin Name | Description |
|---|---|
| CS | Chip Select for MicroSD |
| MOSI | SPI Data (Master Out Slave In) |
| MISO | SPI Data (Master In Slave Out) |
| SCK | SPI Clock |
| VCC | Power supply (3.3V) |
| GND | Ground |
Usage Instructions
Connecting the ST7789 to an Arduino UNO
To use the ST7789 display with an Arduino UNO, connect the pins as follows:
| ST7789 Pin | Arduino UNO Pin |
|---|---|
| VCC | 3.3V |
| GND | GND |
| SCL (CLK) | D13 (SCK) |
| SDA (MOSI) | D11 (MOSI) |
| RES (RST) | D8 |
| DC (A0) | D9 |
| BLK | GND |
For the MicroSD reader, connect the pins as follows:
| MicroSD Pin | Arduino UNO Pin |
|---|---|
| CS | D4 |
| MOSI | D11 (MOSI) |
| MISO | D12 (MISO) |
| SCK | D13 (SCK) |
| VCC | 3.3V |
| GND | GND |
Arduino Code Example
Below is an example code to initialize the ST7789 display and display a simple message. It also includes initialization for the MicroSD card.
#include <Adafruit_GFX.h>       // Core graphics library
#include <Adafruit_ST7789.h>    // ST7789 driver library
#include <SPI.h>
#include <SD.h>

// Define pins for ST7789
#define TFT_CS    10  // Not used, but required by library
#define TFT_RST   8   // Reset pin
#define TFT_DC    9   // Data/Command pin

// Define pin for MicroSD card
#define SD_CS     4   // Chip Select for MicroSD

// Initialize ST7789 display
Adafruit_ST7789 tft = Adafruit_ST7789(TFT_CS, TFT_DC, TFT_RST);

void setup() {
  // Initialize serial communication
  Serial.begin(9600);
  while (!Serial);

  // Initialize the display
  tft.init(240, 240);  // Initialize with 240x240 resolution
  tft.setRotation(1);  // Set display rotation
  tft.fillScreen(ST77XX_BLACK);  // Clear screen with black color
  tft.setTextColor(ST77XX_WHITE);
  tft.setTextSize(2);
  tft.setCursor(10, 10);
  tft.println("Hello, ST7789!");

  // Initialize MicroSD card
  if (!SD.begin(SD_CS)) {
    Serial.println("MicroSD initialization failed!");
    tft.setCursor(10, 50);
    tft.println("SD Init Failed!");
    return;
  }
  Serial.println("MicroSD initialized.");
  tft.setCursor(10, 50);
  tft.println("SD Init Success!");
}

void loop() {
  // Main loop does nothing in this example
}
Important Considerations
- Voltage Levels: Ensure the module operates at 3.3V. Using 5V logic without level shifters may damage the display.
- SPI Speed: Use a moderate SPI clock speed (e.g., 4 MHz) to ensure stable communication.
- MicroSD Formatting: Format the MicroSD card to FAT32 before use.
- Backlight Control: Connect the BLK pin to GND to enable the backlight. For dimming, use a PWM pin.
Troubleshooting and FAQs
Common Issues
Display Not Turning On
- Cause: Incorrect wiring or insufficient power supply.
- Solution: Double-check connections and ensure the VCC pin is connected to a stable 3.3V source.
MicroSD Card Not Detected
- Cause: Improper formatting or loose connections.
- Solution: Format the card to FAT32 and ensure the CS, MOSI, MISO, and SCK pins are correctly connected.
Flickering or Noisy Display
- Cause: High SPI clock speed or poor power supply.
- Solution: Reduce the SPI clock speed and use a decoupling capacitor near the VCC and GND pins.
Text or Graphics Not Displaying Correctly
- Cause: Incorrect initialization or wrong library settings.
- Solution: Verify the display resolution and initialization code. Ensure the correct library is installed.
FAQs
Can I use the ST7789 with a 5V microcontroller?
- Yes, but you must use level shifters to convert 5V logic to 3.3V.
What is the maximum MicroSD card size supported?
- The module typically supports MicroSD cards up to 32GB formatted in FAT32.
Can I control the backlight brightness?
- Yes, connect the BLK pin to a PWM-capable pin on your microcontroller for brightness control.
Is the ST7789 compatible with Raspberry Pi?
- Yes, the ST7789 can be used with Raspberry Pi using SPI and appropriate libraries like
luma.lcd.
- Yes, the ST7789 can be used with Raspberry Pi using SPI and appropriate libraries like
By following this documentation, you can effectively integrate the ST7789 with MicroSD reader into your projects for vibrant displays and convenient data storage.