
How to Use AVR 10-pin ICSP Header: Examples, Pinouts, and Specs
 Design with AVR 10-pin ICSP Header in Cirkit Designer
Introduction
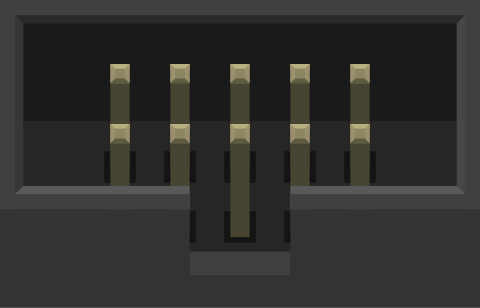
The AVR 10-pin ICSP (In-Circuit Serial Programming) Header, manufactured by SparkFun Electronics (Part ID: PRT-00778), is a specialized connector designed for programming and debugging AVR microcontrollers. This header allows users to program microcontrollers directly on the circuit board without the need to remove the chip, making it an essential component for embedded systems development and prototyping.
Explore Projects Built with AVR 10-pin ICSP Header
 Open Project in Cirkit Designer
 Open Project in Cirkit Designer
 Open Project in Cirkit Designer
 Open Project in Cirkit Designer
Explore Projects Built with AVR 10-pin ICSP Header
Open Project in Cirkit DesignerOpen Project in Cirkit DesignerOpen Project in Cirkit DesignerOpen Project in Cirkit DesignerCommon Applications and Use Cases
- Programming AVR microcontrollers in embedded systems.
- Debugging and testing AVR-based circuits.
- Used in development boards and custom PCB designs for AVR microcontrollers.
- Ideal for projects requiring frequent firmware updates or debugging.
Technical Specifications
The AVR 10-pin ICSP Header is a standard 2x5 (10-pin) connector with a 0.1-inch (2.54 mm) pitch. It is compatible with AVR microcontrollers and follows the standard ICSP pinout.
Key Technical Details
- Manufacturer: SparkFun Electronics
- Part ID: PRT-00778
- Connector Type: 2x5 (10-pin) header
- Pin Pitch: 0.1 inch (2.54 mm)
- Compatibility: AVR microcontrollers
- Material: Gold-plated pins for reliable connections
- Operating Temperature: -40°C to +85°C
Pin Configuration and Descriptions
The following table describes the pinout of the AVR 10-pin ICSP Header:
| Pin Number | Pin Name | Description |
|---|---|---|
| 1 | MISO | Master In Slave Out - Data line for SPI communication from the microcontroller. |
| 2 | VCC | Power supply for the microcontroller (typically 5V or 3.3V). |
| 3 | SCK | Serial Clock - Clock signal for SPI communication. |
| 4 | GND | Ground connection. |
| 5 | MOSI | Master Out Slave In - Data line for SPI communication to the microcontroller. |
| 6 | GND | Additional ground connection for improved stability. |
| 7 | RESET | Reset line for the microcontroller. |
| 8 | GND | Additional ground connection for improved stability. |
| 9 | NC (No Connect) | Reserved or unused pin. |
| 10 | GND | Additional ground connection for improved stability. |
Usage Instructions
How to Use the AVR 10-pin ICSP Header in a Circuit
Connect the Header to the Microcontroller:
- Align the 10-pin ICSP header with the corresponding pins on the AVR microcontroller or development board.
- Ensure proper orientation by matching the pin 1 indicator (often marked with a dot or notch) on the header with the microcontroller's ICSP pin 1.
Connect the Programmer:
- Use an AVR-compatible programmer (e.g., USBasp or AVRISP) with a 10-pin ICSP cable.
- Plug the cable into the ICSP header, ensuring correct alignment.
Power the Circuit:
- Provide power to the microcontroller circuit through the VCC and GND pins of the ICSP header or an external power source.
Program the Microcontroller:
- Use programming software (e.g., AVRDUDE or Atmel Studio) to upload firmware to the microcontroller via the ICSP header.
Important Considerations and Best Practices
- Orientation: Always verify the orientation of the ICSP header and cable to avoid incorrect connections that could damage the microcontroller or programmer.
- Power Supply: Ensure the microcontroller is powered during programming. Some programmers can supply power through the ICSP header, but verify compatibility first.
- Signal Integrity: Use short and high-quality cables to minimize signal degradation during programming.
- Pin Compatibility: Double-check the pinout of your microcontroller to ensure it matches the ICSP header's configuration.
Example: Using the ICSP Header with an Arduino UNO
The Arduino UNO does not have a 10-pin ICSP header but includes a 6-pin ICSP header. To use the AVR 10-pin ICSP Header, you can use an adapter or manually connect the corresponding pins. Below is an example of programming an AVR microcontroller using AVRDUDE:
Command to program an AVR microcontroller using AVRDUDE
avrdude -c usbasp -p m328p -U flash:w:firmware.hex
-c specifies the programmer type (usbasp in this case).
-p specifies the microcontroller type (ATmega328P in this case).
-U specifies the memory operation (write firmware.hex to flash memory).
Troubleshooting and FAQs
Common Issues and Solutions
Programmer Not Detected:
- Ensure the programmer is properly connected to the ICSP header and the computer.
- Verify that the correct drivers for the programmer are installed.
Microcontroller Not Responding:
- Check the power supply to the microcontroller.
- Verify the ICSP header's orientation and connections.
- Ensure the RESET pin is properly connected.
Firmware Upload Fails:
- Confirm that the correct microcontroller type is selected in the programming software.
- Check for loose or damaged connections in the ICSP cable or header.
Signal Interference:
- Use shorter cables to reduce noise and improve signal integrity.
- Ensure proper grounding by connecting all GND pins.
FAQs
Q: Can I use the AVR 10-pin ICSP Header with non-AVR microcontrollers?
A: The header is specifically designed for AVR microcontrollers. However, it may be adapted for other microcontrollers with compatible SPI programming interfaces.
Q: What is the difference between a 6-pin and 10-pin ICSP header?
A: The 10-pin ICSP header includes additional ground pins for improved stability, while the 6-pin header is a more compact version with fewer ground connections.
Q: Can the ICSP header supply power to the microcontroller?
A: Some programmers can supply power through the VCC pin of the ICSP header. Verify your programmer's capabilities before relying on this feature.
Q: How do I identify pin 1 on the ICSP header?
A: Pin 1 is typically marked with a dot, notch, or square pad on the PCB. Ensure the programmer's cable aligns with this marking.